
At a glance
Symptoms
- • The refrigerator runs non-stop without the compressor cycling off.
- • The exterior cabinet or the center mullion feels hot to the touch.
- • Frozen items are slushy, or the fresh food compartment fails to stay below 40°F.
- • Audible humming, buzzing, or rattling coming from the back or bottom of the unit.
- • It has been over 6 months since your last cleaning (or 3 months if you have pets).
- • Visible accumulation of dust, lint, or pet hair around the toe kick grille.
Common causes
- • Obstructed condenser coils prevent heat dissipation, causing the sealed system to overheat.
- • Forces the compressor to run excessively, raising your utility bills—a significant issue given regional energy costs in Washington and Oregon.
- • Leads to premature compressor failure, potentially turning a cheap DIY task into a $700-$1,200 repair.
- • Causes components like the start relay or run capacitor to burn out due to excessive heat.
- • Diminishes cooling efficiency, risking food spoilage and unsafe storage temperatures.
Safety First — Read Before You Start
- •Always unplug the refrigerator from the wall outlet before removing any access panels or cleaning near the compressor to eliminate the risk of electric shock.
- •Never use water, wet rags, or liquid chemical cleaners directly on the condenser coils; this is strictly a dry-cleaning task.
- •Exercise extreme caution around the delicate copper tubing and aluminum cooling fins; bending or puncturing them can cause a catastrophic, unrepairable refrigerant leak.
- •Wear a dust mask, as you will be disturbing years of accumulated dust, pet dander, mold spores, and kitchen grease.
- •If pulling the refrigerator away from the wall, move it straight out to avoid tearing your linoleum or scratching hardwood floors.
Tools & supplies you'll need
- Appliance coil cleaning brush (long, flexible, bristled brush - $10-$15 at hardware stores)
- Vacuum cleaner with a narrow crevice tool and soft brush attachment
- Flashlight or headlamp for visibility under the unit
- Phillips and 1/4-inch hex nut drivers (for removing the rear access panel if required)
- Dust mask (highly recommended for allergy sufferers or homes with heavy pet dander)
- Microfiber cloth or damp rag for wiping down the exterior grilles
Step-by-step instructions
Unplug the Refrigerator and Prep the Area
Safety first: disconnect the power before doing anything else. If the power cord is behind the unit, pull the fridge straight out. In tight PNW galley kitchens, you may need to wiggle it gently. Once unplugged, place an old towel or drop cloth on the floor to catch the dust that will fall during the cleaning process.
Tip: If you have delicate flooring, put cardboard or hard plastic under the wheels before moving the unit to prevent damage.
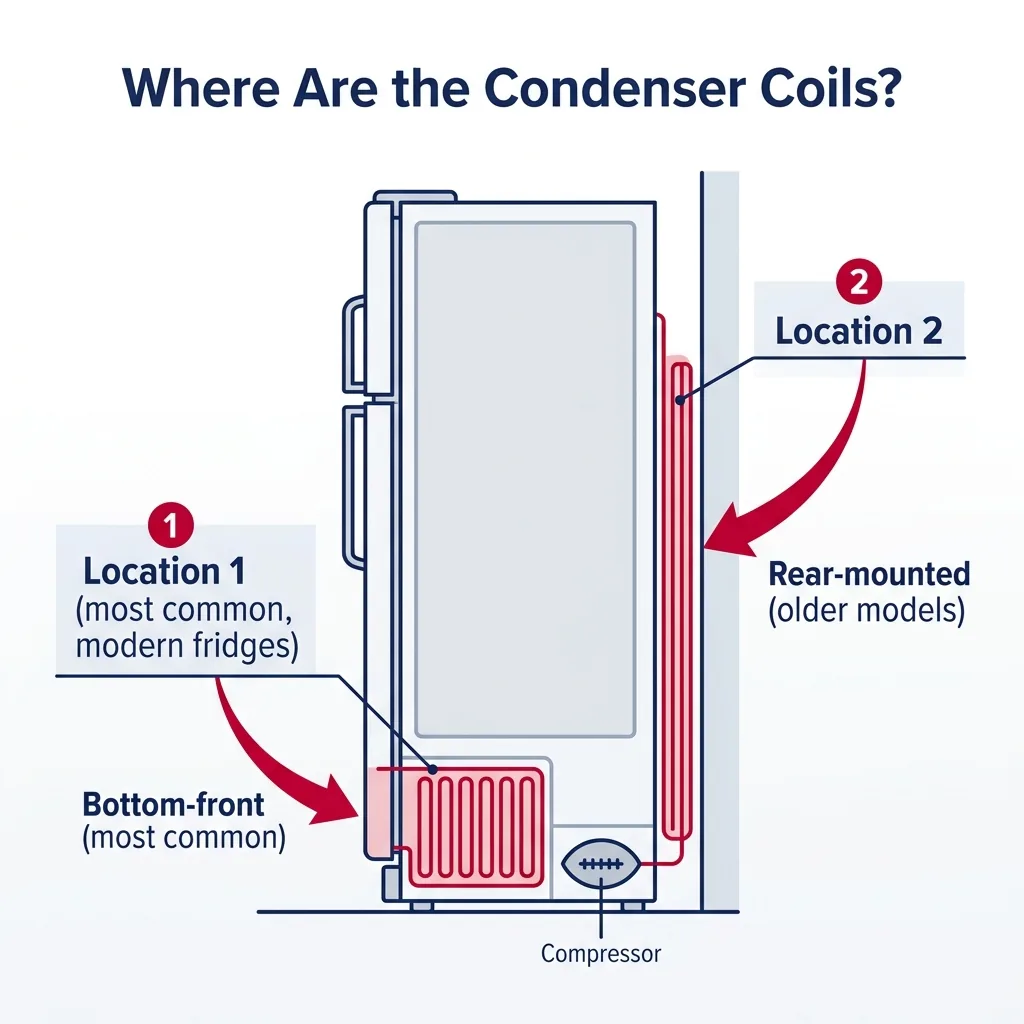
Locate Your Condenser Coils
Condenser coils are typically found in one of three spots. On older models, they are often a large black wire grid on the rear. Most modern freestanding units have them underneath, accessible from the front or back. High-end built-ins like Sub-Zero usually feature coils at the top behind a louvered grille.
Tip: Check your owner's manual if you are unsure. If there is a removable toe-kick at the bottom, your coils are likely located underneath.
Remove the Access Panel or Grille
If the coils are accessed from the front, pull the toe-kick grille straight off. If you are accessing from the rear, use a 1/4-inch hex nut driver or Phillips screwdriver to remove the lower back panel. Keep all screws in a small container so they don't get lost.
Tip: Never leave the panel off permanently. It acts as an air baffle to guide airflow over the coils; without it, your fridge will overheat.
Brush the Coils Thoroughly
Put on your dust mask. Use your flexible appliance brush to reach into the gaps between the coils. Twist and pull to extract dust and hair. Repeat this until the assembly is clear. In humid regions like Seattle or the coast, kitchen grease can make dust sticky, so use extra care to break it loose.
Tip: Be gentle. Do not forcefully jam the brush into the coils. The aluminum fins are sharp and easily bent, and the copper tubing containing the refrigerant is fragile.
Vacuum the Debris
As you loosen the debris, use your vacuum's crevice tool to suck up the dust. Hold the nozzle near the coils while brushing with your other hand. If working from the rear, carefully vacuum the condenser fan blades, being careful not to bend them.
Tip: A shop-vac with strong suction is preferred over standard household stick vacuums for clearing deep-seated debris.
Clean the Area and Reassemble
Once the coils are clean, vacuum the surrounding floor. Wipe down the toe-kick or rear panel with a damp cloth before replacing it. Secure the screws, plug the fridge back in, and slide it back into position.
Tip: Maintain 1 to 2 inches of clearance between the fridge and the wall to ensure proper airflow.
Brand-specific notes
Some brands have known design quirks worth knowing about before you start.
Sub-Zero
Sub-Zero units feature top-mounted compressors. You'll need to flip up or unscrew the louvered grille at the very top of the unit. The aluminum fins on these condensers are extremely delicate. Often, a soft brush attachment on a vacuum is safer than a stiff coil brush. Always turn the unit off at the control panel before cleaning near the fan.
LG / Samsung
On many modern LG and Samsung French Door refrigerators, the coils are packed tightly into the rear bottom compartment. You MUST pull the fridge out and remove the lower back panel to access them properly. The front toe-kick area usually only provides access to the water filter and leveling legs, not the coils.
Whirlpool / KitchenAid
These brands frequently place the coils underneath the unit in a serpentine pattern. The front toe kick pulls straight off. Because the coils run deep under the floor of the fridge, you will absolutely need a long, flexible 24-inch coil brush to reach the back sections where the worst dust accumulates.
GE / Profile
Certain GE models feature what they call a 'NeverClean' condenser, which is rolled into a tight, black cylinder in the back machine compartment. Spoiler alert: they absolutely do need cleaning. You'll need to remove the back panel and carefully brush the exterior of the cylinder to remove the mat of dust that inevitably forms.
What our techs see most often
Here in the Pacific Northwest, we see a massive spike in 'fridge not cooling' calls during the first major heatwave in July. Nine times out of ten, the culprit is just a heavy blanket of golden retriever hair and dusty smog buildup suffocating the condenser coils. A $15 coil brush and 20 minutes twice a year will literally save you from an $800 compressor replacement.
When to call a professional
- → You accidentally bend or puncture a copper line while brushing and hear a hissing sound (this is a refrigerant leak—open windows immediately and call a pro).
- → The compressor is clicking on and off every 3 to 5 minutes even after the coils have been thoroughly cleaned (indicates a failed start relay or bad compressor).
- → The condenser fan motor (located next to the coils in the back) is seized, won't spin freely, or makes a loud grinding noise when running.
- → Your refrigerator is a high-end built-in unit and you cannot safely access the top panel without risk of injury or damaging the custom cabinetry.
- → The coils are coated in a thick, sticky layer of heavy kitchen grease that dry brushing and vacuuming cannot remove; a pro may need to use specialized coil cleaner.
Related Refrigerator Troubleshooting
These troubleshooting guides cover problems this task can help solve.
Refrigerator Compressor Running Non-Stop: Troubleshooting and Repairs
Refrigerator Door Not Sealing Properly: How to Fix
Refrigerator Ice Maker Not Working: How to Fix It
Troubleshooting a Refrigerator That Won't Cool
Why Your Refrigerator Is Making Strange Noises and How to Fix It
Frequently asked questions
How often should I clean my refrigerator condenser coils?
The standard recommendation is every 6 months. However, if you have heavily shedding pets, live in a very dusty area, or have a fridge located in a garage, you should perform this task every 3 to 4 months.
Can I use an air compressor or canned air to blow the coils clean?
While it is incredibly effective at removing dust, blowing high-pressure air indoors will create a massive, unsanitary dust cloud in your kitchen. It is much better to use a brush and vacuum. If your fridge is in a garage and you can roll it out into the driveway, compressed air is an excellent method.
How much does a professional refrigerator coil cleaning cost?
Appliance repair companies typically charge between $125 and $185 for a preventative maintenance visit. This usually includes a thorough coil cleaning, inspecting the door gaskets, checking the defrost system, and verifying temperature calibration.
Why is my fridge still running constantly after I cleaned the coils?
It can take up to 24 hours for a warm refrigerator to fully cool down and return to a normal cycling pattern. If the compressor continues to run non-stop after a full day, you may have a failing condenser fan motor (a $150-$250 repair), a weak compressor, or a sealed system refrigerant leak.
Need a technician in WA or OR?
If the fix above does not work, A-Fix Service repairs refrigerators across Washington and Oregon. $90 diagnostic visit.
Related Repair Guides
Troubleshooting a Refrigerator That Won't Cool
A refrigerator that runs but fails to maintain a cold temperature is a common headache for PNW homeowners. Most of these issues stem from clogged condenser coils, a faulty evaporator fan, or a breakdown in the defrost system—many of which can be resolved in under an hour.
Refrigerator Compressor Running Non-Stop: Troubleshooting and Repairs
When a refrigerator compressor stays on indefinitely, it drives up energy costs, creates constant noise, and risks permanent motor failure. Discover how to troubleshoot common culprits, from clogged condenser coils to failing door seals.
Refrigerator Door Not Sealing Properly: How to Fix
A compromised refrigerator seal forces the motor to work harder, driving up utility costs and risking food safety. Discover how to inspect, clean, and install a new gasket to ensure a secure, airtight closure.