
At a glance
Symptoms
- • Signs you need to do this: Doors fail to swing shut on their own or pop open easily when the opposite door is closed.
- • Signs you need to do this: The ice maker produces hollow, misshapen, or overly large ice cubes, or spills water into the ice bin.
- • Signs you need to do this: Water leaks or unexplained puddles appear on the floor near the front of the unit.
- • Signs you need to do this: The compressor or condenser fan makes excessive vibrating or rattling noises during operation.
- • Signs you need to do this: The refrigerator visibly leans to one side or rocks back and forth when you open the door.
- • Signs you need to do this: Heavy frost buildup occurs in the freezer due to warm air seeping past a twisted door gasket.
Common causes
- • Why this task matters: Proper sealing. An unlevel fridge causes the entire cabinet to twist slightly, preventing the magnetic door gaskets from sitting flush. In coastal areas like Tacoma or Seattle, this pulls in heavy marine layer humidity, causing massive frost walls overnight.
- • Why this task matters: Defrost drainage. The internal drip pan relies on gravity. If the fridge is tilted forward or severely to one side, defrost water misses the drain hole and leaks inside the cabin or onto your floor.
- • Why this task matters: Ice maker function. The ice mold tray must be perfectly level side-to-side. If it sits at an angle, water pools to one side, spilling over the edge and freezing into a solid block in the bucket.
- • Why this task matters: Compressor longevity. Uneven weight distribution can cause the compressor's internal suspension springs to rattle, leading to irritating noise and premature mechanical wear.
- • Why this task matters: Convenience and safety. A proper slight back-tilt ensures the heavy doors close automatically, saving energy and preventing spoiled food if you accidentally leave a door ajar.
Safety First — Read Before You Start
- •Always exercise extreme caution when lifting or tilting a heavy refrigerator; use a helper to push back on the top of the fridge to take weight off the front legs while you adjust them.
- •Watch out for the copper or plastic water supply line connected to the back of the fridge. Pushing the fridge too far back or tilting it aggressively can pinch or snap the line, causing a flood.
- •If you have a built-in unit or a very tall, top-heavy refrigerator, ensure the anti-tip bracket is properly engaged before making major adjustments. the Pacific Northwest earthquake safety standards often require these brackets.
- •Never attempt to level the refrigerator by adjusting the rear wheels unless specified by the manufacturer; most modern fridges are leveled exclusively using the front adjustable legs.
Tools & supplies you'll need
- Standard carpenter's level (24-inch preferred, or a reliable smartphone level app)
- Adjustable wrench or pliers
- Flathead screwdriver (for removing the base grille)
- 1/4-inch or 5/16-inch nut driver (depending on your brand's leveling screw type)
- Hard plastic shims (if dealing with severely uneven floors)
- Flashlight to see under the appliance
Step-by-step instructions
Clear Access and Remove the Base Grille
Clear the area around the bottom of the unit. Open the refrigerator doors to reach the clips or screws securing the kickplate. Some models pop off, while others need a flathead or Phillips screwdriver to release. Put the grille aside. Use your flashlight to examine the leveling legs and rollers. In regions with hard water like Spokane or Portland, mineral buildup or rust can seize these threads; apply a little WD-40 if they feel stuck and wait a few minutes before trying to turn them.
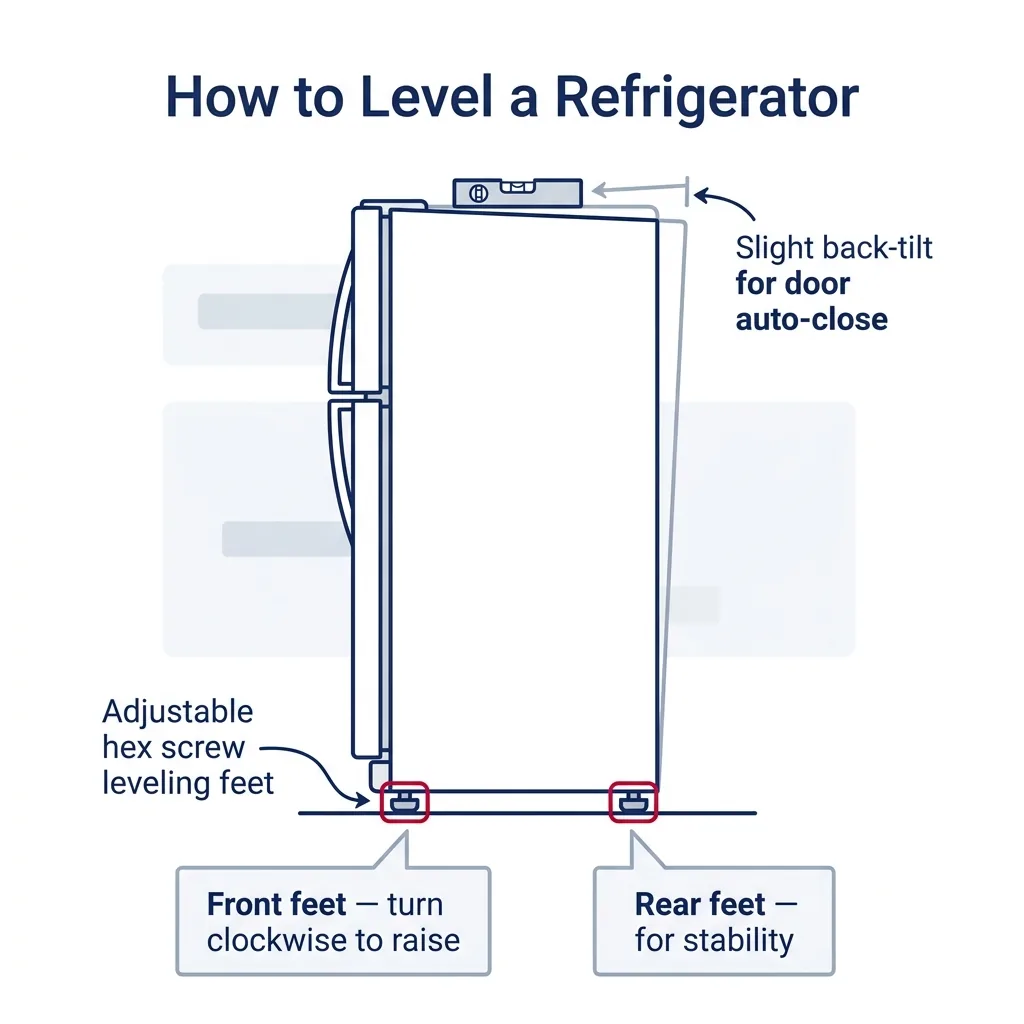
Tip: Lay down some cardboard to protect your knees and keep your tools from marring your kitchen flooring.
⚠ Warning: Avoid reaching blindly under the unit; condenser coils and sharp metal edges can easily cut your hands.
Check Side-to-Side Alignment
To prevent cabinet twisting and ensure the ice maker fills correctly, the unit needs to be perfectly level horizontally. Lay your carpenter's level across the top of the cabinet behind the hinges. If that is blocked, open the doors and place the level on a solid, fixed shelf or the interior floor of the unit. Adjust the front legs until the bubble is centered. Avoid using the doors for leveling, as they may sag independently.
Tip: If utilizing a smartphone app, verify that your phone case doesn't have protrusions that interfere with a flat reading.
⚠ Warning: None
Set the Front-to-Back Tilt
Your fridge should not be perfectly level from front to back; it requires a slight rearward pitch. Aim for the front to be roughly 1/4 to 1/2 inch higher than the back. Place the level on the top or an interior shelf pointing front-to-back. The bubble should sit just ahead of the center lines. If the unit leans forward, adjust both front legs to raise the front. This pitch ensures the doors close by themselves and the defrost system drains correctly.
Tip: Test this by opening the doors to 90 degrees; they should glide shut on their own. If they stay open or swing wide, increase the height of the front legs.
⚠ Warning: None
Adjusting the Legs and Rollers
Ask a helper to gently lean the fridge back, taking the weight off the front legs. Use pliers, an adjustable wrench, or the manufacturer-supplied tool to turn the legs. Turning left (counterclockwise) lowers the foot, lifting the fridge corner. Turning right (clockwise) raises the foot, lowering the corner. For models like Whirlpool or KitchenAid, use a 1/4-inch nut driver on the adjustment bolt above the roller to move the assembly. Go slowly and check the level often.
Tip: None
⚠ Warning: Do not remove the legs entirely from their threads, or the unit could fall.
Handling Sloping Floors
Many older homes in the Pacific Northwest, particularly historic craftsman houses in Spokane or hillside properties, have uneven flooring. If your leveling legs are fully extended and the fridge is still off, use hard plastic shims. Avoid wood shims, as they compress and rot from kitchen moisture. Carefully insert the plastic wedges under the rollers or legs, ensuring they support the full weight to avoid damaging your floor.
Tip: For severely sagging floors, a 1/4-inch sheet of plywood under the entire footprint of the fridge can provide a stable, level base before you even begin.
⚠ Warning: None
Final Verification and Reassembly
Once you have hit the target side-to-side level and the 1/4-inch rearward tilt, confirm the fridge is stable. Push on the sides to ensure it doesn't wobble. Test the doors; they should close gently. If you have a French door style and the doors don't align, check the bottom hinges for micro-adjustment hex nuts. Finally, reattach the base grille.
Tip: If your ice maker was previously frozen due to being unlevel, it might take a full day to resume normal ice production.
⚠ Warning: None
Brand-specific notes
Some brands have known design quirks worth knowing about before you start.
Samsung
Samsung French Door refrigerators are notorious for door alignment issues if the cabinet isn't perfectly level. They usually include a special C-shaped wrench in the manual packet specifically for adjusting the locking nuts on the front leveling legs, as well as snap-rings to micro-adjust the height of individual doors.
LG
LG models utilizing the Linear Compressor are particularly sensitive to vibration. If an LG fridge is not leveled correctly, the compressor can resonate against the chassis, creating a loud humming noise. Ensuring all four corners carry equal weight is critical for these models.
Whirlpool & KitchenAid
Many Whirlpool-built refrigerators do not use a standard threaded foot. Instead, they feature an adjustable front roller system. You will need a 1/4-inch nut driver or socket to turn the adjustment bolt located just above the wheel. Turning it clockwise pushes the wheel down, raising the fridge.
GE Appliances
GE Profile and Cafe series refrigerators often have drop-down leveling legs that sit just behind the front rollers. You must roll the fridge into place, then use an adjustable wrench or pliers to screw the legs down until they lift the front rollers completely off the floor to lock the unit in place.
Sub-Zero
Built-in units like Sub-Zero and Wolf require precise leveling before they are secured to the surrounding cabinetry. They utilize specialized rear leveling systems adjusted from the front via a long threaded rod. Because of their extreme weight and anti-tip bracket requirements, leveling a built-in should generally be left to professional installers.
What our techs see most often
Out here in the Issaquah Highlands and older Spokane craftsman homes, uneven floors are a daily battle. Nine times out of ten, when a customer complains about a brand-new fridge's doors not closing or the ice maker leaking, it just needs a quick leveling adjustment. It's the cheapest, fastest fix in the book.
When to call a professional
- → The leveling leg is stripped, severely rusted solid from hard water exposure, or physically snapped off the frame.
- → You have a built-in refrigerator (like a Sub-Zero or Thermador) that requires securing to cabinetry and complex anti-tip brackets.
- → The floor beneath the refrigerator is structurally sagging, rotting due to previous water damage, or feels soft when you step on it.
- → You need to move or adjust a fully loaded, extremely heavy refrigerator on soft flooring (like linoleum or soft pine) that might tear or dent easily.
- → You've leveled the refrigerator perfectly, but the doors are still visibly warped or the ice maker continues to leak heavily.
Related Refrigerator Troubleshooting
These troubleshooting guides cover problems this task can help solve.
Refrigerator Compressor Running Non-Stop: Troubleshooting and Repairs
Refrigerator Door Not Sealing Properly: How to Fix
Refrigerator Ice Maker Not Working: How to Fix It
Troubleshooting a Refrigerator That Won't Cool
Why Your Refrigerator Is Making Strange Noises and How to Fix It
Frequently asked questions
How much does it cost to replace a broken refrigerator leveling leg?
If you snap a leveling leg, the replacement part is very affordable, typically ranging from $15 to $45 depending on the brand. However, if you need a professional to safely lift the fridge, extract the broken threaded shaft, and install the new leg, expect a service call fee of $125 to $250.
Is it normal for my refrigerator to tilt backward?
Yes, absolutely. A refrigerator should lean backward slightly—about 1/4 to 1/2 inch higher in the front than in the back. This tilt ensures that defrost water flows properly into the drain pan and allows the heavy doors to swing shut automatically using gravity.
Can I use wood shims to level my fridge if my floor is uneven?
While you can use wood shims in a pinch, it is highly recommended to use hard plastic shims (which cost about $5 to $10 at any hardware store). Kitchens are prone to spills and mopping; wood shims can absorb water, rot, and compress under the 300+ pound weight of the fridge over time.
Will leveling my refrigerator fix my leaking ice maker?
Very often, yes. If the refrigerator leans too far forward or to one side, the water filling the ice mold will pool at the low end and spill over into the ice bucket or down the freezer wall. Leveling side-to-side and ensuring a slight back-tilt is the first step in diagnosing an ice maker leak.
Why does my fridge rock back and forth when I open the door?
This happens when the four points of contact (the two rear rollers and the two front leveling legs) are not sitting flush on the floor, similar to a wobbly restaurant table. Lowering one of the front leveling legs until it makes firm contact with the floor will eliminate the rocking.
Need a technician in WA or OR?
If the fix above does not work, A-Fix Service repairs refrigerators across Washington and Oregon. $90 diagnostic visit.
Related Repair Guides
Refrigerator Door Not Sealing Properly: How to Fix
A compromised refrigerator seal forces the motor to work harder, driving up utility costs and risking food safety. Discover how to inspect, clean, and install a new gasket to ensure a secure, airtight closure.
Refrigerator Ice Maker Not Working: How to Fix It
If your ice maker has quit, it is rarely a total unit failure. In our experience across the Pacific Northwest, 8 out of 10 cases come down to a frozen fill tube, a water-supply problem, or a clogged filter — all fixable in 30-60 minutes.
Why Your Refrigerator Is Making Strange Noises and How to Fix It
While a quiet hum is standard for a healthy fridge, sudden buzzing, grinding, or clicking noises are clear indicators of a mechanical issue. This guide helps you pinpoint the noise source to decide if it is a manageable DIY project or a task for our professional team.