
At a glance
Symptoms
- • Thick ice buildup on the freezer walls or ceiling (more than 1/4 inch thick).
- • Freezer or refrigerator doors failing to close securely due to ice obstruction.
- • The refrigerator section is running warm while the freezer section is heavily frosted.
- • Loud buzzing, grinding, or clicking noises caused by the evaporator fan blades hitting ice.
- • Visible frost or snow-like buildup on the rear panel of the freezer or fridge interior.
- • Water pooling or a solid sheet of ice forming on the floor of a bottom-mount freezer.
Common causes
- • Restores proper airflow between the freezer and refrigerator compartments, which is essential for cooling both sections.
- • Prevents physical damage to the evaporator fan motor, which can burn out if restricted by solid ice.
- • Improves overall energy efficiency; thick ice acts as an insulator, forcing the compressor to work harder and increasing your electric bill.
- • Prevents food spoilage by ensuring the appliance can maintain safe, consistent temperatures.
- • Serves as a necessary first step or temporary reset if your automatic defrost system has failed, buying you time while awaiting replacement parts.
- • Clears out clogged defrost drains that commonly freeze over, especially in humid coastal the Pacific Northwest climates.
Safety First — Read Before You Start
- •NEVER use a hair dryer or heat gun to melt the ice. The plastic interior liners of modern refrigerators warp and melt very easily, causing irreparable damage that requires replacing the entire appliance.
- •NEVER use knives, screwdrivers, ice picks, or any metal tools to chip away ice. Puncturing the aluminum evaporator coils or refrigerant lines will release the gas and permanently ruin the refrigerator.
- •Always unplug the appliance from the wall outlet before beginning the defrost process to eliminate the risk of electrical shock.
- •Keep plenty of dry towels on hand to prevent slip-and-fall hazards on hard kitchen flooring, especially sensitive hardwood or laminate floors common in Washington & Oregon homes.
Tools & supplies you'll need
- Coolers with ice or a backup garage refrigerator for food storage
- Thick, highly absorbent bath towels
- Baking pans, rimmed baking sheets, or shallow buckets to catch water
- Wooden or plastic spatula (NEVER use metal tools)
- A standard room fan for air circulation
- Large bowls or pots filled with hot water (optional accelerator)
- Baking soda and warm water for cleaning the interior afterward
Step-by-step instructions
Prep the Area and Empty the Appliance
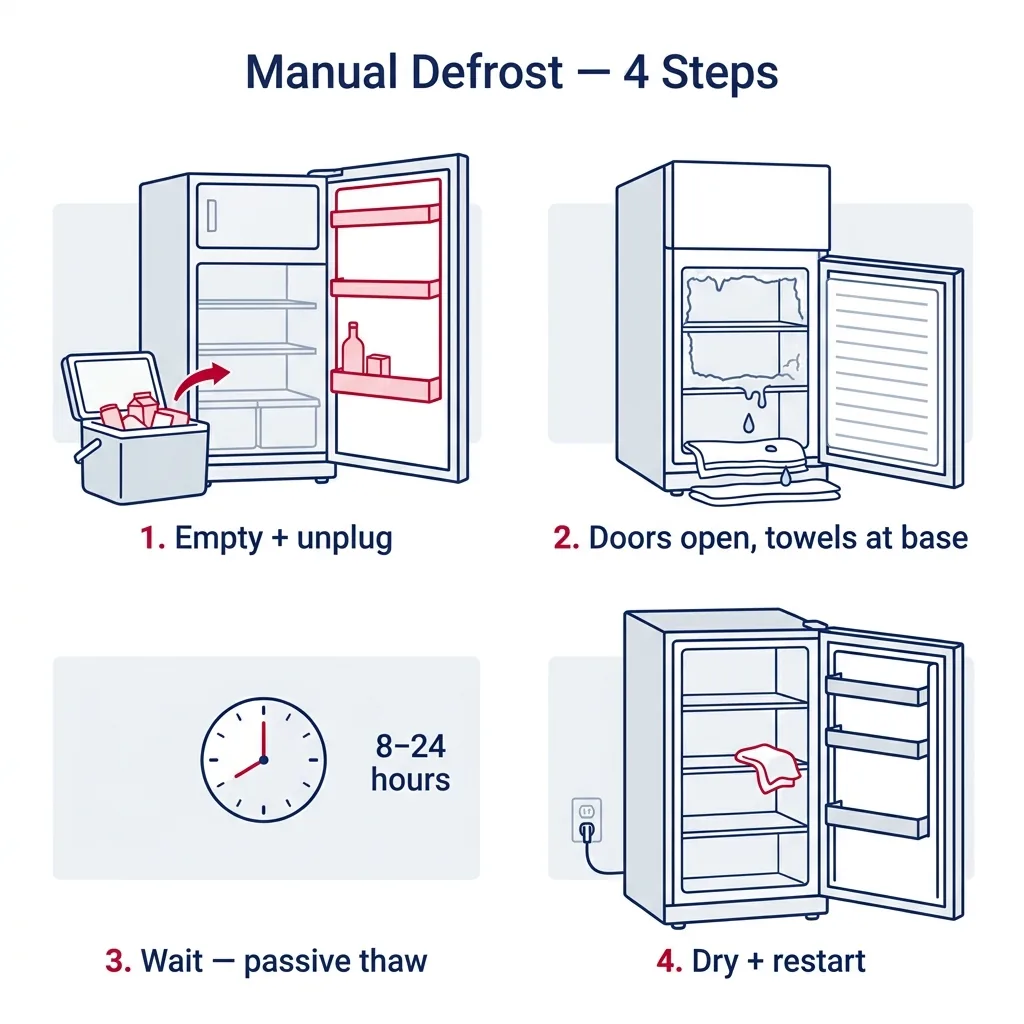
Begin by fully clearing out your fridge and freezer. Move all food into ice-filled coolers or a secondary garage fridge. It is vital to remove food entirely, as the defrost cycle takes many hours and poses a food safety risk. Once empty, take out all shelves and drawers. If they are frozen in place, wait for them to thaw naturally rather than prying them. Clean these parts in your sink with warm, soapy water and let them air dry.
Tip: For folks in warmer parts of the PNW, keep your coolers inside your climate-controlled home rather than a hot garage to help the ice last longer.
Unplug the Unit and Secure the Doors Open
Safety is the priority: pull the plug from the wall outlet. If you cannot reach the plug, trip the specific circuit breaker at your home's electrical panel. With the power off, prop the doors wide open. Use a heavy object, a chair, or a thick towel to hold them in place. This allows the air to circulate and melt the ice naturally.
Tip: Do not leave the unit plugged in. If the fridge runs with the doors open, the compressor may overheat, and the humid PNW air will only create more frost.
Protect Your Floors from Water Damage
As the ice turns to water, it will drain out. Line the bottom of the compartments with thick, absorbent towels. Place more towels on the floor in front of the unit. Slide shallow baking sheets or rimmed pans under the front to catch the runoff. Check your towel situation every hour, swapping out soaked ones for dry ones to protect your floors.
Tip: If you have high-end hardwood floors, lay down a plastic drop cloth beneath your towels to ensure no moisture reaches the wood.
Accelerate the Melting Process Safely
You can wait for the ice to melt on its own, or speed things up. Place pots or bowls of hot (not boiling) water inside on top of towels to generate steam. You can also point a standard room fan toward the open unit to push air in. Refresh the hot water every 30-45 minutes.
Tip: Never use a space heater, hair dryer, or heat gun. The concentrated heat will ruin your plastic liner instantly.
Gently Remove Loosened Ice Chunks
As large ice pieces begin to break away from the walls, use a plastic or wooden spatula to nudge them loose. Pull these pieces out by hand and discard them in the sink. If a piece of ice is stuck, leave it alone; let the heat and air do the heavy lifting. Avoid prying, as you could crack the plastic interior or damage the coils hidden behind the panel.
Tip: Clearing out the big chunks as they loosen will help the rest of the ice melt faster and keep your floor drier.
Clean, Sanitize, and Dry the Interior completely
Once the ice is gone, dry every surface completely with microfiber cloths. Any leftover moisture will quickly turn back to frost once you power the unit back up. Use a solution of one tablespoon of baking soda per quart of warm water to wipe down the interior; this removes odors and residue. Ensure everything is bone dry.
Tip: Inspect the rubber door seals carefully. If they are torn or dirty, they could be letting in humid air, which causes the frost to return.
Restart and Reload the Appliance
Replace all your shelves and bins. Plug the appliance back in or reset the breaker. Close the doors and let the unit run empty for at least 2-4 hours to stabilize the temperature (target 37°F for the fridge and 0°F for the freezer). Once it reaches these temps, you can return your food.
Tip: Watch the unit over the coming week. If heavy frost returns, you likely have a faulty component, like a defrost heater or control board, that needs professional attention.
Brand-specific notes
Some brands have known design quirks worth knowing about before you start.
LG
LG French door models often freeze up behind the rear panel in the refrigerator section, leading to an 'Er rF' error code or warm fridge temps. A manual defrost for these dual-evaporator systems takes a full 24-48 hours to clear the hidden ice block completely. Don't rush it.
Samsung
Samsung is notorious for the 'ice maker freezing over' and twin cooling panel frost issues. If you're manually defrosting a Samsung, you must leave the doors open for at least 24 hours. The ice behind those rear panels is heavily insulated and takes forever to melt naturally.
Whirlpool
On Whirlpool, KitchenAid, and Maytag bottom-mount freezers, ice sheets on the freezer floor usually mean a clogged defrost drain. Once the main ice is gone, use a turkey baster to flush hot water down the drain hole at the back center of the freezer floor to clear the blockage.
GE
GE Profile and Cafe series units have robust evaporator fans, but if ice builds up, you'll hear a very loud buzzing like an airplane taking off. Do not try to unscrew and force the plastic rear covers off while frozen; the plastic tabs will snap off instantly. Let the ice melt first.
Frigidaire
Upright manual-defrost freezers by Frigidaire are incredibly popular in hot valley garages. You should plan to manually defrost these at least once a year, or whenever the ice gets thicker than 1/4 inch, to keep your electric bill from skyrocketing during the summer.
What our techs see most often
Living in the damp, humid climate of the Pacific Northwest, even a small gap in a door seal can lead to massive ice buildup. A manual defrost is often the first step in troubleshooting cooling issues before we send a tech out.
When to call a professional
- → If the unit frosts up again entirely within a week or two of manually defrosting, indicating a failed automatic defrost component.
- → If you accidentally puncture the interior wall with a tool and hear a hissing sound (turn the unit off immediately and open windows; the appliance is likely unrepairable).
- → If the refrigerator trips the circuit breaker immediately when plugged back in after defrosting.
- → If the unit has been defrosted and plugged in for 24 hours but fails to drop in temperature, pointing to a sealed system or compressor failure.
- → If you need to test the defrost heater, bimetal thermostat, or control board with a multimeter and are not comfortable working around live voltage.
Related Refrigerator Troubleshooting
These troubleshooting guides cover problems this task can help solve.
Refrigerator Compressor Running Non-Stop: Troubleshooting and Repairs
Refrigerator Door Not Sealing Properly: How to Fix
Refrigerator Ice Maker Not Working: How to Fix It
Troubleshooting a Refrigerator That Won't Cool
Why Your Refrigerator Is Making Strange Noises and How to Fix It
Frequently asked questions
Can I use a hair dryer to speed up defrosting?
Absolutely not. The plastic liners in modern refrigerators are very thin and will melt and warp quickly under the direct, dry heat of a hair dryer or heat gun. A warped liner cannot be replaced; you would have to buy an entirely new refrigerator. Use bowls of hot water instead.
How long does a manual defrost take?
A thorough manual defrost typically takes between 8 to 24 hours. If you have a brand like Samsung or LG with hidden evaporators behind plastic panels, the ice is heavily insulated and usually requires a full 24 hours with the doors open to melt completely.
Will a manual defrost permanently fix my broken fridge?
It depends on the cause. If the frost was caused by a door accidentally left ajar, a manual defrost will fix it permanently. However, if a defrost heater, bimetal thermostat, or control board has failed (typically a $150-$350 repair), the manual defrost will only temporarily restore cooling. The ice will return in 1 to 2 weeks.
Do I really need to empty the entire fridge to defrost it?
Yes. Leaving food in the unit while the doors sit open for 12+ hours will absolutely lead to spoilage and potential foodborne illness. You must move all perishable items to a cooler packed with ice or a backup refrigerator.
Why is there a solid sheet of ice on the bottom of my freezer?
A solid sheet of ice on the floor of a bottom-mount freezer usually indicates a clogged defrost drain rather than a failed defrost heater. During the automatic defrost cycle, the melted water has nowhere to go, so it overflows onto the floor and refreezes. You will need to manually defrost the unit and then flush the drain line with hot water to clear the clog.
Need a technician in WA or OR?
If the fix above does not work, A-Fix Service repairs refrigerators across Washington and Oregon. $90 diagnostic visit.
Related Repair Guides
Troubleshooting a Refrigerator That Won't Cool
A refrigerator that runs but fails to maintain a cold temperature is a common headache for PNW homeowners. Most of these issues stem from clogged condenser coils, a faulty evaporator fan, or a breakdown in the defrost system—many of which can be resolved in under an hour.
A Guide to Cleaning Refrigerator Condenser Coils
Boost your refrigerator's efficiency and head off costly compressor issues by keeping your condenser coils free of debris. This quick 20-minute maintenance task is vital for the health of your appliance.
Refrigerator Compressor Running Non-Stop: Troubleshooting and Repairs
When a refrigerator compressor stays on indefinitely, it drives up energy costs, creates constant noise, and risks permanent motor failure. Discover how to troubleshoot common culprits, from clogged condenser coils to failing door seals.