
At a glance
Symptoms
- • Thick white ice on the back wall of the freezer (more than 1/4 inch)
- • Frost on packaging, frozen-over food bags, or icicles hanging from racks
- • Ice on the freezer ceiling or accumulated on the door gasket
- • Freezer is also getting warmer than 0°F as the frost grows
- • Compressor running constantly to compensate for the iced-over evaporator
- • Air vents inside the freezer are blocked with ice
- • Loud fan-blade-hitting-ice grinding noise from the back of the freezer
Common causes
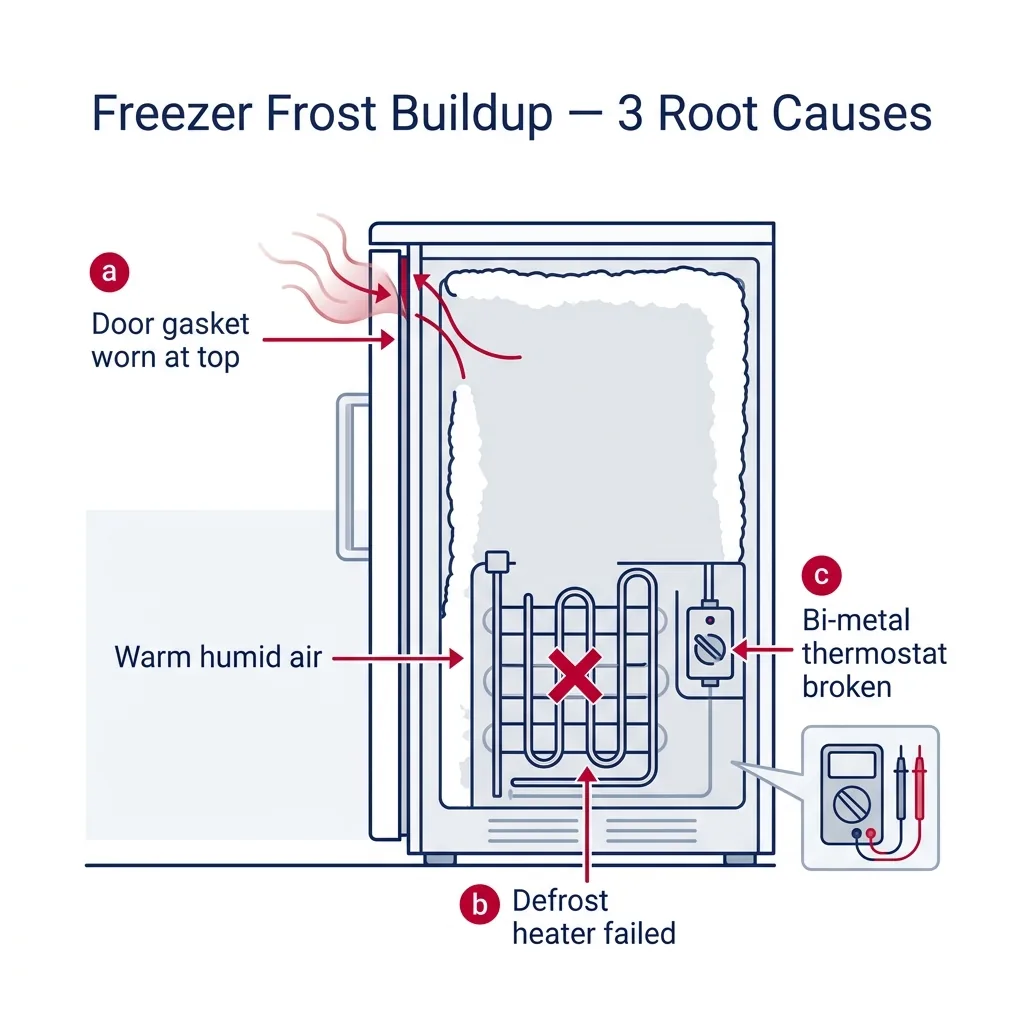
- • Auto-defrost: failed defrost heater (most common on units 5+ years old)
- • Auto-defrost: failed bi-metal defrost thermostat (cheapest part, very common failure)
- • Auto-defrost: failed defrost timer or main control board
- • Door gasket leaking warm humid air into the cavity
- • Door left ajar or not closing fully (kids, shifted boxes, stuck shelves)
- • Frequent door opening in a hot, humid environment (garage in summer)
- • Manual-defrost chest freezer simply needing seasonal defrost
- • Ice maker fill tube dripping onto the evaporator
Safety First — Read Before You Start
- •Unplug the freezer before removing the back panel inside the freezer or testing components.
- •Do not use a heat gun, open flame, or sharp object to chip ice from the evaporator coils — the tubing is thin copper and a puncture means a refrigerant leak.
- •A defrost heater carries 120V when energized — confirm power is off before touching it.
- •On chest freezers, never use a metal tool to chip ice off the cabinet walls. The cooling coils are bonded to the wall and can be punctured.
- •Move food to coolers if the repair will take more than 30 minutes — opened food in a freezer that warms above 40°F should be discarded if frozen state is lost.
Tools & supplies you'll need
- Phillips and flat-head screwdrivers
- 1/4-inch nut driver
- Multimeter
- Hair dryer (for thawing the evaporator)
- Coolers or insulated bags (to hold food during repair)
- Towels and a shop vacuum
- Replacement defrost components as identified
- Door gasket if needed
Step-by-step instructions
Identify auto-defrost vs. manual-defrost
First, confirm your specific freezer type. Modern uprights, refrigerator-freezer combinations, and most French-door models utilize auto-defrost, meaning a heater automatically clears the evaporator coils every 6-12 hours of operation. Conversely, chest freezers and some budget-friendly uprights are manual-defrost; they lack a heater, and you must manually remove ice buildup. If you have a manual-defrost model, icing is standard operation—simply defrost it. If you have an auto-defrost model, heavy icing confirms a component failure.
Tip: Not sure? Check the model on the manufacturer site, or look for a "frost-free" badge on the door interior. If your freezer has cold air vents on the back wall, it is auto-defrost.
Manual-defrost: defrost the cabinet
For chest freezers or basic uprights without internal fans, defrosting is standard maintenance. Transfer your food to coolers, disconnect power, and leave the lid open. Place towels and a tray inside to manage melting ice. Give it 4-12 hours to thaw completely. Dry the interior, restore power, and allow 4 hours for the temperature to stabilize before returning food. Perform this every 6-12 months to maintain efficiency. If your unit is auto-defrost, skip this process.
Tip: Speed it up by placing pots of warm (not boiling) water inside with the lid closed for 15-20 minutes at a time. Never use a hair dryer pointed at the cabinet walls of a chest freezer — the heat can warp the liner.
Auto-defrost: check the door gasket and door behavior
Before disassembling components, address the most likely culprit: warm, moist air intrusion. Use a dollar bill to test the seal around the entire perimeter; if it pulls out easily, your gasket is compromised. Replace the gasket ($40-80, usually a peel-and-stick process) if it appears cracked, stiff, or misshapen. Also, ensure the door closes completely without interference from items inside. In the damp Pacific Northwest climate, even a minor seal gap can cause rapid frost buildup within a week.
Tip: Do not use a hair dryer on the gasket to "soften" it — that just hides the wear. A failing gasket needs replacement, not a temporary trick.
Inspect the evaporator and clear the ice
Move your food to coolers, unplug the appliance, and remove the internal rear panel—typically secured by 4-8 screws. You will see the evaporator coil, the defrost heater (a glass rod or tube), and the small bi-metal defrost thermostat. A healthy coil should have a light, uniform frost. If it is encased in solid ice, use a hair dryer on the low setting to melt it away, which usually takes 20-40 minutes. Use towels to capture the water. Avoid using tools to chip away ice to prevent puncturing the sensitive copper lines, which would result in a total loss of the sealed system.
Tip: Take a picture of the wiring before disconnecting anything — it makes reassembly much faster.
Test the defrost thermostat
The bi-metal defrost thermostat is the small disc clipped to the coil with two wires. It acts as a switch, closing to allow current to the heater only when the coil is below 25°F. With the unit unplugged and the coil thoroughly chilled (after thawing and letting it sit in the cold freezer for an hour), use a multimeter to check for continuity. If you get no reading, the thermostat is faulty. This $20-25 part is the most frequent cause of frost issues in auto-defrost systems.
Test the defrost heater
If the thermostat is functional, inspect the heater. With power disconnected, detach the heater wires and check for resistance. A healthy heater typically reads between 20-50 ohms, depending on your model. If you see an open circuit (infinite resistance) or visible physical damage like a split, the heater is dead and requires replacement. These parts usually cost $30-60. If the heater tests correctly, the issue likely resides with the defrost timer or the main control board.
Tip: On older units with a separate mechanical defrost timer (often clicking inside a small panel near the cold-control), the timer can also fail. Manually advance the timer with a flat screwdriver to the defrost position and listen for the heater to come on — if it does, the timer needs replacement.
Reassemble and verify
Secure the rear panel and any insulation, then restore power. Observe the unit for 24 hours. Check the back wall after one day and again in a week. If frost returns, revisit the gasket or control board. If the interior remains clear for two weeks, your repair is successful. Set a recurring reminder to clean the condenser coils every 6 months and check the door seal annually to prevent recurrence.
Brand-specific notes
Some brands have known design quirks worth knowing about before you start.
Frigidaire
Frigidaire uprights (FFFU and FFFH series) often have a defrost thermostat that fails after 5-7 years. The part is shared with several other brands and is one of the cheapest fixes in appliance repair. If your Frigidaire has frost on the back wall, start here.
Whirlpool / KitchenAid
Whirlpool and KitchenAid share a defrost system across most uprights and refrigerator-freezer combos. The bi-metal thermostat is the typical failure; the heater itself is robust and rarely fails until the unit is over 10 years old.
Samsung
Samsung French-door units (RF series) have ice formation patterns that often trace back to a defective drain in the evaporator pan or an ice-maker drip. Look for ice formations away from the evaporator — those point to a drain or ice-maker issue, not a defrost-system failure.
GE
GE side-by-side and bottom-freezer models often have main-board failures that present as defrost system failures. If you have replaced the heater and thermostat and the problem persists, the main board is the next suspect — and that is usually a tech-level diagnosis.
LG
LG French-door freezers have a tendency to ice over the rear evaporator wall when the drain heater fails — water from the defrost cycle freezes in the drain trough instead of running to the pan. The fix is the drain heater (a small tube along the bottom of the evaporator), $30-40 part.
Sub-Zero
Sub-Zero columns have a dual-evaporator system; frost in just one zone usually points to a defrost component specific to that zone. These are not user-serviceable on most models — call a Sub-Zero-trained tech to avoid voiding the sealed-system warranty.
What our techs see most often
Requests regarding frost buildup generally fall into two categories. Roughly 60% involve auto-defrost systems where a $25 bi-metal thermostat has failed. About 25% are gasket-related, which we see often in garages across Washington and Oregon, where the combination of seasonal temperature swings and frequent door openings breaks down the seal. The remainder involve heater issues or control boards. Our service vans are fully stocked with universal thermostats and gasket adhesives to handle these on the first visit.
When to call a professional
- → You have replaced the defrost thermostat and heater and frost still returns within a week
- → You suspect the main control board (intermittent defrost cycles, no defrost cycle ever)
- → The unit is a built-in (Sub-Zero, Thermador) where opening the back risks voiding the warranty
- → You see frost growing in places not associated with the evaporator (suggests drain heater or sealed-system issue)
- → You are not comfortable using a multimeter to test components
- → Frost has returned within days even though the gasket is good and the door closes properly — the defrost cycle is not running at all, which usually means the timer or main control board
Frequently asked questions
How much frost is normal in a freezer?
On an auto-defrost unit, you should see a thin even layer of frost on packages and a clean evaporator behind the back panel. Anything more than that — visible ice on the back wall, ice on the ceiling, frost on shelves — is abnormal. On a manual-defrost chest freezer, frost up to 1/4 inch on the walls is fine; beyond that, defrost the unit.
Will manually defrosting my auto-defrost freezer fix the problem?
It will solve the symptom for a few days. A full manual defrost (unplug, doors open, 24 hours) clears all the ice from the evaporator. But if the auto-defrost system itself is broken, the ice will rebuild within a week or two. So a manual defrost is a useful diagnostic — it confirms the cooling system is otherwise fine — but the underlying defrost component still needs replacement.
Why is there frost on the door gasket but nowhere else?
Frost on the gasket means warm humid air is condensing where the cold seal meets it — the gasket is leaking. Run a dollar-bill test around the entire seal and look for spots where it slides out easily. Replacement is straightforward and stops the frost from forming.
My freezer just got moved — is the frost related?
Possibly. Moving can shift the door alignment and cause the gasket not to seal properly. It can also disturb the drain line if the unit was tipped or laid down. Let the freezer sit upright and unplugged for at least 4 hours before plugging back in (longer if it was on its side). If frost appears in the days after a move, check the gasket and door seal first.
Is frost in my freezer making my electricity bill higher?
Yes. A frosted-over evaporator forces the compressor to run nearly continuously to compensate for poor heat exchange. Once frost is heavy enough to cover the coils, energy use can double. Fixing the underlying defrost issue typically pays for itself in 6-12 months on the electric bill alone.
Need a technician in WA or OR?
If the fix above does not work, A-Fix Service repairs freezers across Washington and Oregon. $90 diagnostic visit.
Related Repair Guides
Freezer Not Freezing: Diagnose and Fix
If your freezer is running but your food is thawing, the culprit is usually blocked airflow, a faulty fan, a defrost malfunction, or an internal sealed-system issue. About 80% of these problems are manageable for the average homeowner. The rest—specifically refrigerant leaks or compressor failure—require an EPA-certified technician. This guide follows the standard professional diagnostic flow.
Freezer Door Not Sealing: Resolving Frost and Thermal Loss
A freezer door failing to seal properly permits warm, moisture-rich air to enter, resulting in excessive frost and compromised food safety. We guide you through diagnosing gasket failures, correcting hinge alignment, and restoring a secure seal.
Freezer Running Too Cold: Fixing Freezer Burn and Over-Freezing
When a freezer stays too cold, it wastes electricity and degrades food quality through severe freezer burn. This guide helps you identify and resolve the issue, from simple dial adjustments to replacing faulty temperature sensors.