
At a glance
Symptoms
- • Microwave powers on, display works, turntable spins, fan runs — but food stays cold
- • Faint humming or buzzing followed by silence after a few seconds
- • Strong burning smell on the first run after the issue started
- • Loud buzz that is noticeably louder than normal operation
- • Circuit breaker trips when you press start
- • Fuse on the back of the appliance has blown
Common causes
- • Failed magnetron — the tube that generates microwave energy ($80-150 part)
- • Burned-out high-voltage diode (rectifies AC to high-voltage DC for the magnetron)
- • Failed high-voltage capacitor (stores energy to drive the magnetron)
- • Broken door interlock switch — the microwave thinks the door is open and refuses to fire
- • Tripped thermal cutout / thermal fuse on the magnetron or cavity
- • Faulty control board failing to send the cook signal to the HV transformer
Safety First — Read Before You Start
- •CRITICAL: A microwave high-voltage capacitor can store a LETHAL electrical charge for days or weeks after being unplugged. You must discharge it before touching any internal wiring. If you have not discharged a microwave capacitor before, stop and call a technician — this is not a beginner repair.
- •Always unplug the microwave AND wait at least 60 seconds before opening the case. Then discharge the capacitor across both terminals and from each terminal to chassis.
- •Never run a microwave with the case open or the door interlocks defeated. Microwave RF energy at close range can cause permanent eye and tissue damage.
- •Older magnetrons may contain beryllium oxide insulators. Do not break, sand, or grind a magnetron — dispose of failed units intact.
- •If the unit is over-the-range and mounted overhead, have a second person help support it during removal — they typically weigh 50-80 lbs.
Tools & supplies you'll need
- Phillips and flat-head screwdrivers
- 1/4-inch nut driver
- Multimeter with diode-test setting (and ideally a high-voltage probe for capacitor work)
- Insulated screwdriver with a plastic-handle and well-insulated shaft (for capacitor discharge)
- Heavy-duty rubber gloves
- Flashlight
- Replacement parts as identified by diagnosis
Step-by-step instructions
Confirm the symptom and isolate easy causes
Start by placing a cup of water inside and running the microwave on high for one minute. If the water remains cold and you heard unusual buzzing or humming, the issue is likely the magnetron or high-voltage components. If the unit is completely quiet—no fan, no hum—a door switch or the control board is a more probable culprit. Ensure the unit is plugged into its own 20-amp circuit; in older homes throughout the Pacific Northwest, shared circuits often lead to voltage drops that mimic these failures.
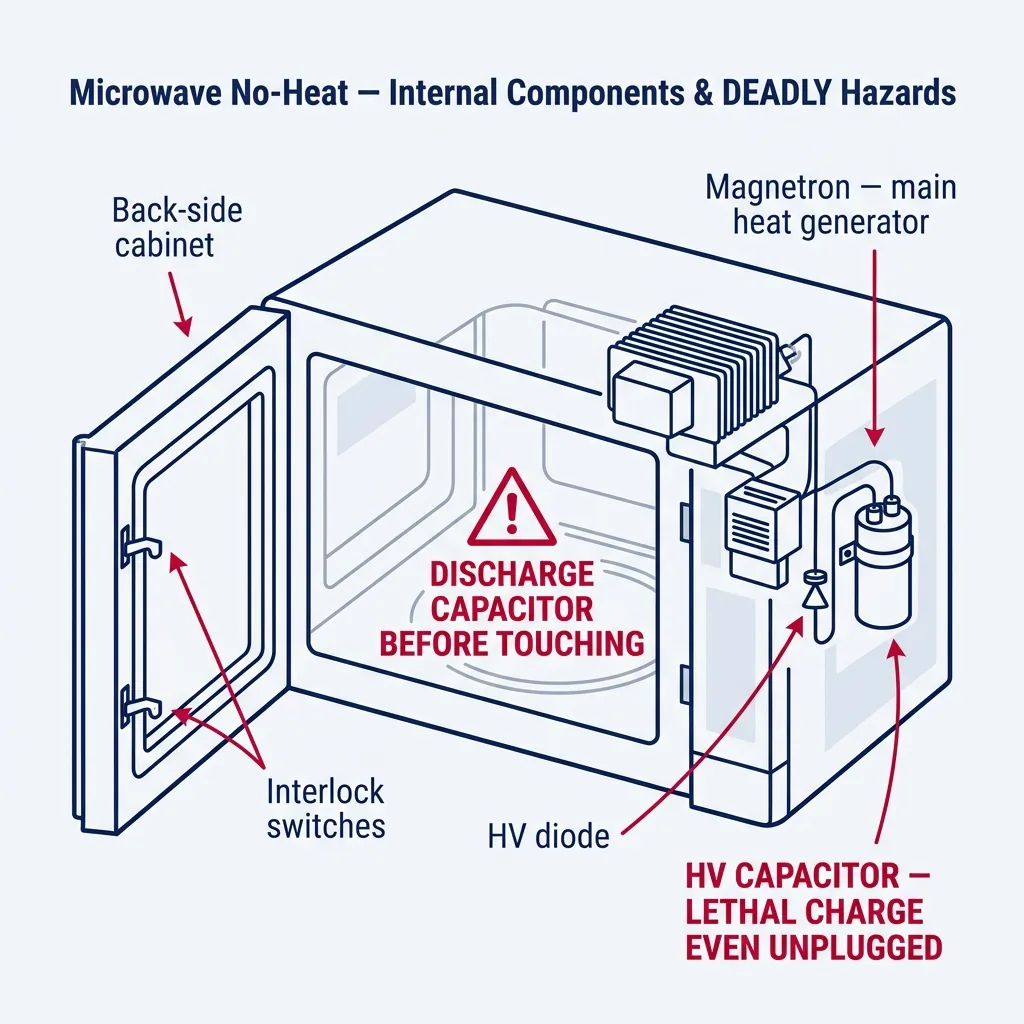
Tip: Inverter-based models, such as many Panasonic or GE Profile units, operate differently. If your microwave uses inverter technology, the board itself is often the failure point rather than the magnetron.
Test the door interlock switches
Microwaves typically feature a trio of door switches: primary, secondary, and monitor. If any of these fail in the open position, the unit will appear to function normally but will prevent the magnetron from activating. After unplugging the microwave, unscrew the cabinet (usually 4-6 screws) to access the latch area. Use your multimeter’s continuity setting to verify the switches change state when the door is engaged. Replacements are inexpensive ($5-15) and generally universal.
Tip: The outer casing must be removed to reach these switches. Remember, even with the cover off, never touch the large capacitor until you have performed the discharge procedure.
Discharge the high-voltage capacitor
The high-voltage capacitor is a soda-can-sized cylinder found near the magnetron. With the unit unplugged for at least a minute, bridge both terminals simultaneously using an insulated screwdriver for several seconds. You might hear a quick pop or see a spark as the energy dissipates. Follow this by shorting each terminal to the chassis. This is a vital safety step; skipping it can result in a fatal shock.
Tip: Always wear thick, insulated gloves and ensure your screwdriver has a fully insulated shaft. If you feel hesitant, contact a professional instead.
Test the high-voltage diode
With the capacitor safely discharged, detach one lead from the HV diode. Using your multimeter’s diode-test setting, check for conductivity. A healthy diode should only conduct in one direction. If it reads open or closed in both directions, it is faulty. Failed diodes often fail in a shorted state, which frequently damages the magnetron. Replacement diodes cost between $10 and $20. Pay attention to the orientation of the cathode band.
Tip: Sometimes a diode will show physical damage, such as a scorch mark or a split in the casing. If you see this, replace it without further testing.
Test the magnetron
The magnetron is the finned, cube-shaped part attached to the side of the cooking cavity. After confirming the capacitor is discharged, disconnect the two wires at the filament. Use your multimeter on the low-ohms range; you should see less than 1 ohm between the two filament terminals. Check for continuity between either terminal and the metal chassis; you should see an open circuit (infinite ohms). Any other reading suggests the magnetron is dead. Replacements cost $80-150.
Tip: For units over a decade old, replacing the magnetron is often not cost-effective, especially if the diode has also failed.
Check the thermal cutout / thermal fuse
Most units contain one or two thermal cutouts, which are small, disc-like components clipped to the magnetron or cavity. These are safety devices that open if the unit overheats. If your multimeter shows infinite ohms across a cutout, it has tripped and must be replaced ($10-15). If you find a tripped fuse, investigate why the unit overheated—perhaps a blocked vent or a failed cooling fan is to blame.
Tip: Never bypass or jumper a thermal cutout. It is a critical fire-prevention component.
Reassemble and test
Replace the outer cabinet, reconnect the power, and repeat the water test. One minute on high should make the water noticeably hot. If the unit hums louder than usual, double-check your part numbers and connections. If there is still no heat, the fault likely lies with the transformer or the main control board, which are better handled by a qualified technician.
Tip: A successful repair will return the appliance to its original quiet, efficient operation.
Brand-specific notes
Some brands have known design quirks worth knowing about before you start.
Samsung
Samsung over-the-range models (especially the ME and SMH series) have a known weak point in the magnetron mounting bracket — the magnetron tends to fail at 5-7 years. If you replace one, also replace the HV diode at the same time — they fail in pairs more often than not.
Whirlpool
Whirlpool countertop and over-the-range models share a common door-switch assembly that fails after years of slamming the door. The whole switch pack is about $25 and snaps in. If your Whirlpool runs but does not heat, replace this assembly before suspecting the magnetron.
GE Profile
GE Profile inverter and Advantium models have a separate inverter board instead of a traditional transformer + capacitor. These boards fail with a no-heat symptom while the unit otherwise runs normally. The inverter board is $150-250 and is not user-friendly to swap. Have a tech confirm before ordering.
LG NeoChef
LG NeoChef inverter microwaves can fail with a no-heat condition that the smart-diagnosis app will sometimes flag as an inverter fault. LG covers the magnetron and inverter for 10 years on most models — check your serial number before paying out of pocket.
Frigidaire
Frigidaire countertop models (FFCE, FFMV, GMOS series) most often fail at the high-voltage diode — a $10-15 fix that is easy to miss because the magnetron looks fine on a meter test. Always check the diode before condemning the magnetron on a Frigidaire.
What our techs see most often
About a third of our 'microwave not heating' calls turn out to be a $10 door switch — the customer assumed the magnetron was dead. Another third are genuinely failed magnetrons on Samsung over-the-range units around the 5-7 year mark. The remainder split between HV diodes, thermal cutouts, and inverter boards on Panasonic / GE Profile inverter models. We always quote a flat diagnostic before opening one up.
When to call a professional
- → You are not 100% confident in your ability to safely discharge a high-voltage capacitor
- → The unit is an over-the-range model and you do not have a second person to help support it during removal
- → You replaced a magnetron, diode, or capacitor and the symptom is unchanged — the next part up the chain is the HV transformer or control board, both of which require more advanced diagnostic skills
- → The breaker trips when you press start, even briefly — this indicates a short in a high-current component
- → The unit is a built-in trim-kit installation (Wolf, Thermador, Miele, KitchenAid Architect) where reinstallation requires special handling
- → The microwave is part of a wall oven combo — these share a control board with the oven and misdiagnosis is expensive
Frequently asked questions
Is it worth repairing a microwave that does not heat?
It depends on the cost of the part and the age of the unit. A $15 door switch on a 3-year-old over-the-range Samsung is worth fixing. A $150 magnetron plus labor on a 12-year-old countertop microwave usually is not — a comparable new unit is $120-180. As a rule of thumb: if the part-plus-labor is more than 50% of replacement cost and the unit is over 8 years old, replace it.
Can a magnetron be safely replaced as a DIY job?
Yes, with two strict prerequisites. First, you must safely discharge the high-voltage capacitor before touching anything inside. Second, you must use the correct replacement magnetron — magnetrons are not universal. Match the part number on the original. The mechanical swap itself is straightforward: four screws, two filament wires, and a waveguide gasket.
Why does my microwave hum loudly but not heat?
A loud hum during a cook cycle followed by no heating almost always means a shorted high-voltage diode. The diode fails in a near-short condition that overloads the transformer, producing the loud hum. Replace the diode (and check the magnetron filament for collateral damage) and the symptom typically clears.
My microwave smells burnt and now will not heat — is it dangerous to use?
Stop using it. A burnt smell with loss of heating usually means an internal arc burned a wire or component. Continuing to run it risks a fire. Unplug it, let it sit overnight to be safe, and either repair or replace it. Open-the-cabinet diagnosis is the only way to know what burned.
How long should a microwave last?
Countertop microwaves typically last 7-10 years. Over-the-range and built-in models last 10-15 years because they are used less heavily. Inverter models generally last longer than transformer-based models. Heavy daily use cuts these numbers roughly in half.
Need a technician in WA or OR?
If the fix above does not work, A-Fix Service repairs microwaves across Washington and Oregon. $90 diagnostic visit.
Related Repair Guides
Microwave Sparking Inside: Causes and What to Do
Sparks inside a microwave are alarming but often simple to resolve. The primary culprit is typically a charred or soiled waveguide cover—the small mica panel located on the interior side wall. Other frequent triggers include food splatter, stray metal items, or a worn turntable hub. While most fixes involve simple cleaning or part replacement, some indicate larger mechanical issues.
Microwave Buttons Not Working: Membrane and Control Board Diagnosis
When your microwave keypad stops responding, the culprit is typically a worn-out membrane switch or a faulty control board. Follow this guide to safely inspect and replace these parts to restore your appliance.
Microwave Door Won't Latch or Stay Closed: Repair Guide
A microwave that won't latch is a significant safety concern and keeps the appliance from functioning. This article guides you through replacing damaged latch hooks, adjusting sagging hinges, and inspecting interlock switches.