
At a glance
Symptoms
- • Visible blue, white, or yellow sparks or arcs inside the cavity during cooking
- • Popping or crackling sound during a cook cycle
- • Small burn marks or pitting on the cavity wall or ceiling
- • A scorched-looking square or rectangle on one cavity wall (the waveguide cover)
- • Burning plastic or burnt-paper smell during cooking
- • Sparks coming from one specific spot every cycle
Common causes
- • Damaged or burnt waveguide cover — the small beige mica panel on a side wall of the cavity (most common cause)
- • Metal accidentally placed in the microwave (twist ties, foil, decorative trim on a plate, brown grocery bag staples)
- • Foil-lined or metallic-paint dishware (some take-out containers, certain travel mugs)
- • Food splatter or grease build-up arcing on the cavity walls or ceiling
- • Worn or damaged turntable coupler / stirrer cover causing sparking near the floor
- • Failing magnetron with arcing inside the antenna cap (rare — usually accompanied by burning smell and loud buzz)
Safety First — Read Before You Start
- •Unplug the microwave before any inspection or cleaning beyond a quick wipe.
- •Never run the microwave empty or with the door open. Always have at least one cup of water in the cavity if you are testing after a repair — it gives the microwave energy somewhere to go.
- •If you see sparks accompanied by a burning smell, stop using the appliance immediately. Continued operation risks a fire inside the cavity.
- •Do not attempt internal high-voltage component work on a microwave unless you have safely discharged the high-voltage capacitor — the capacitor stores a lethal charge even when unplugged.
- •Do not use steel wool or abrasive scrub pads on the cavity walls — small metal fragments left behind will spark on the next cycle.
Tools & supplies you'll need
- Mild dish soap and warm water
- Soft microfiber cloths
- Replacement waveguide cover (universal mica sheet, $5-15)
- Scissors or hobby knife (to trim mica to size)
- Phillips screwdriver
- Pencil and ruler (for tracing the cover)
- Flashlight (to inspect cavity ceiling)
Step-by-step instructions
Stop the cycle and inspect for obvious causes
If you notice arcing, hit the stop button immediately. Check the interior for common culprits like forgotten metal twist ties, staples on paper towels, aluminum foil from leftovers, or takeout containers featuring metallic finishes. Any metal present will arc against the interior walls. Clear these items out before attempting to run the unit again.
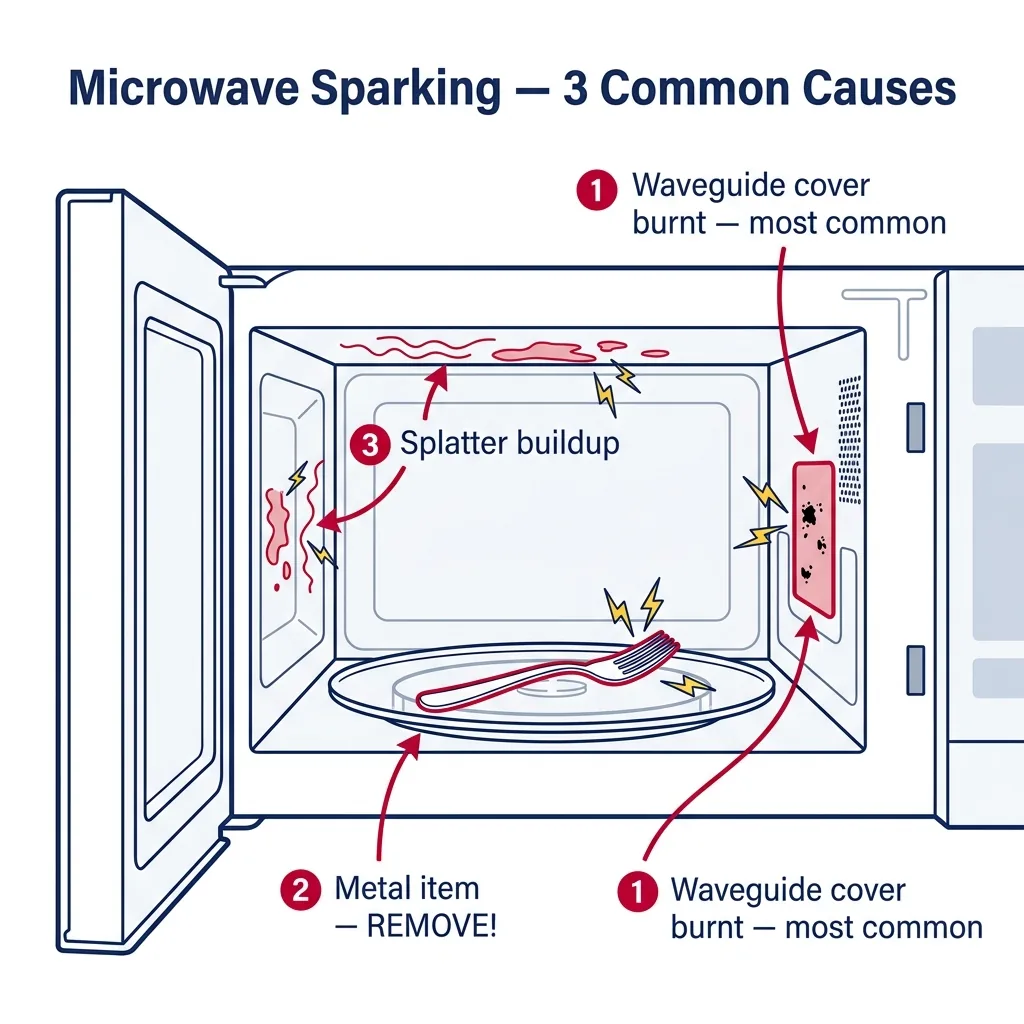
Tip: Even mugs labeled as microwave-safe can develop arcing issues if the stainless steel trim degrades. If your sparking began after introducing a new mug, that container is likely the source.
Clean the cavity thoroughly
Grease and food residue left on the interior walls can carbonize, leading to arcing during operation. Unplug the unit and use a soft cloth with warm, soapy water to clean all surfaces. Pay close attention to the ceiling, which is often neglected. Look for small brown carbon spots; these act as focal points for arcs and require gentle scrubbing to remove. Ensure the interior is completely dry before restoring power.
Tip: For stubborn, baked-on grime, microwave a bowl of water with a tablespoon of vinegar for 3 minutes (if the unit is still functional) to create steam, which helps loosen the residue.
Find and inspect the waveguide cover
Examine the side walls and ceiling for a beige or off-white panel, typically 3 by 4 inches. This is the mica waveguide cover. It should have a uniform, smooth appearance. If you notice charring, holes, or burn marks, the cover is failing. Because mica is porous, once food or moisture penetrates it, the material carbonizes and triggers arcing. It serves a vital role in protecting the energy port, but it is easily replaced.
Tip: Never operate the microwave without this cover in place; the slot it protects must remain sealed to prevent debris from entering the internal waveguide.
Replace the waveguide cover
To replace a damaged cover, remove the retaining screw or slide it out of its clips. If you purchased a universal mica sheet, use the old cover as a template to trace the shape onto the new material, then cut it to size with scissors or a hobby knife, ensuring you match the screw holes. Install the new piece and run a one-minute test with a cup of water inside. A slight odor during the first few cycles is normal as the new material settles.
Tip: Universal mica sheets are a cost-effective solution (usually $8-15) and can be trimmed to fit most models, often providing enough material for multiple repairs compared to expensive brand-specific parts.
Inspect the turntable coupler and stirrer
Rotate the glass tray to ensure the plastic or metal coupler underneath moves freely. If the coupler is warped or wobbly, the tray may shift and touch the cavity walls, causing arcing. In models using a stirrer fan located behind a cover at the top of the cavity, check for looseness or melting. Always replace deformed plastic components with original equipment manufacturer (OEM) parts to ensure they can withstand the heat.
Tip: Avoid generic plastic replacements, as they often lack the heat resistance required for microwave environments.
Test for arcing in the magnetron antenna (advanced)
If you have cleaned the interior and replaced the waveguide cover but sparking persists at a specific point, the magnetron antenna cap may be arcing internally. This usually presents as a loud, abnormal buzzing noise. Replacing a magnetron involves high-voltage components and strict safety protocols regarding capacitor discharge. If you are not experienced with this, please contact a professional. Avoid using the unit until repaired to prevent permanent failure.
Tip: A failing magnetron is a major repair; if you lack training on high-voltage safety, do not open the unit.
Run a final test cycle
Place a cup of water in a microwave-safe mug and run the unit on high for 60 seconds. The water should heat up without any pops, flashes, or abnormal sounds beyond the standard hum. If the unit performs correctly over two cycles, the repair is successful. Should sparks return, note the exact location to help your technician diagnose the issue.
Tip: If the sparks return, note which wall or component they originate from to assist in further troubleshooting.
Brand-specific notes
Some brands have known design quirks worth knowing about before you start.
Whirlpool
Whirlpool over-the-range models typically house the waveguide cover on the right side. It is secured by a single Phillips screw, making it very accessible for DIY repair using universal mica sheets.
Samsung
Samsung SMH and ME series microwaves often experience warping of the waveguide cover due to steam. When installing a replacement, ensure it has a slight curve to match the original fit.
GE Profile
On GE Profile and Advantium units, the halogen lamp can sometimes flicker behind the upper grille, which is often mistaken for arcing. Verify the source before assuming it is a waveguide issue.
LG NeoChef
The easy-clean coating in LG NeoChef models is quite durable, so arcing here is more frequently caused by stray metal fragments trapped near the turntable rollers rather than food buildup.
Frigidaire
On Frigidaire countertop models, check the top stirrer cover if you see flashes at the ceiling, as these covers can loosen or warp over time.
What our techs see most often
Most sparking issues in the PNW are resolved in one visit. About 70% of these cases are simple housekeeping, like cleaning carbonized food or swapping out a damaged waveguide cover. We see many customers who accidentally introduce metallic-rimmed dishes into the microwave, which causes immediate arcing. If a customer mentions a burning smell, we prioritize sending a senior technician, as that often points to magnetron failure.
When to call a professional
- → Sparking continues after replacing the waveguide cover and cleaning the cavity thoroughly
- → You see sparks accompanied by a loud buzz and a burning smell — this points to magnetron failure, which requires high-voltage work
- → Sparking caused visible burn-through to bare metal on the cavity wall — the cavity itself may be compromised
- → You are not comfortable identifying or working with mica components inside the cavity
- → The unit is a built-in or trim-kit microwave (Wolf, Thermador, Miele) where removal alone justifies a tech visit
- → You see sparks even with the cavity empty (no food, just an empty cavity, which you should not run for more than a few seconds for diagnostic purposes only)
Frequently asked questions
Is it safe to use my microwave once the sparking stops on its own?
No. Arcing is a symptom of an underlying problem like a damaged cover or debris. Even if the sparks cease, the damage remains. Continuing to use the unit can lead to a fire.
What is a waveguide cover and why does it burn?
It is a mica panel protecting the energy entry port. Because mica is porous, it absorbs steam and grease over time. Once these contaminants carbonize, they arc. Any cover with holes or charring must be replaced.
Can I just remove the waveguide cover and not replace it?
No. The cover prevents food and moisture from entering the internal waveguide channel. Leaving it off will quickly damage the magnetron, leading to a much more expensive repair.
Why does my microwave only spark with certain dishes?
The dish likely contains metallic elements like gold trim or metallic pigments. Test with a plain glass container; if the sparking stops, the dish is the culprit.
Can sparking damage my microwave permanently?
Yes. Sustained arcing can destroy the cavity wall and the magnetron. Early intervention is key to keeping the repair simple and affordable.
Need a technician in WA or OR?
If the fix above does not work, A-Fix Service repairs microwaves across Washington and Oregon. $90 diagnostic visit.
Related Repair Guides
Microwave Runs but Doesn't Heat Food: Fix Guide
If your microwave operates normally—lights on, turntable rotating—but your food remains cold, you are likely dealing with a failure in one of five high-voltage components: the magnetron, HV diode, HV capacitor, door switches, or a thermal cutout. While some repairs are manageable for homeowners, others are not. Specifically, the HV capacitor holds a dangerous electrical charge even after the unit is disconnected from power.
Microwave Buttons Not Working: Membrane and Control Board Diagnosis
When your microwave keypad stops responding, the culprit is typically a worn-out membrane switch or a faulty control board. Follow this guide to safely inspect and replace these parts to restore your appliance.
Microwave Door Won't Latch or Stay Closed: Repair Guide
A microwave that won't latch is a significant safety concern and keeps the appliance from functioning. This article guides you through replacing damaged latch hooks, adjusting sagging hinges, and inspecting interlock switches.