
At a glance
Symptoms
- • Visible cracks, tears, or mold buildup on the rubber seal.
- • Condensation or frost accumulating inside the fridge or freezer compartment.
- • The dollar bill test fails (a dollar bill slips out easily when the door is closed).
- • The refrigerator runs constantly to maintain temperature.
- • Moisture pooling at the bottom of the fresh food section.
- • Increased electricity bills due to the compressor working overtime.
Common causes
- • Prevents warm, moist air (especially in humid coastal areas like Tacoma or Seattle) from entering and causing frost.
- • Lowers your electricity bill by drastically reducing the compressor's workload.
- • Extends the lifespan of expensive sealed system components like the compressor and evaporator fan.
- • Keeps food fresher longer by maintaining a consistent internal temperature.
- • Prevents structural damage to the cabinet caused by chronic condensation and rust.
Safety First — Read Before You Start
- •Always unplug the refrigerator before starting to avoid electrical shock and to prevent the compressor from running continuously while the door is open.
- •If using a heat gun or hairdryer to soften the gasket, keep it moving and on a low/medium setting to avoid melting the rubber or warping the plastic door liner.
- •Be careful when loosening door liner screws; overtightening them later can easily crack the plastic inner door panel.
Tools & supplies you'll need
- New OEM replacement gasket ($45-$120 depending on brand)
- Hairdryer or heat gun (use cautiously on low/medium)
- Nut driver set (usually 1/4-inch) or Phillips screwdriver
- Putty knife (plastic is preferred to avoid scratching)
- Warm water and mild dish soap
- Petroleum jelly or food-grade silicone grease (optional)
Step-by-step instructions
Prepare and warm the new gasket
As soon as your OEM part arrives, take it out of the packaging. Gaskets are often compressed during shipping, leading to folds that prevent a tight seal. Submerge the seal in a tub of warm water for roughly 15-20 minutes to relax the material, or let it sit out in the sun on a warm PNW afternoon. A stiff, cold gasket won't seal correctly. Once it is flexible, wipe it completely dry.
Tip: Always order your gasket using the exact model number found on the sticker inside your refrigerator compartment. Universal cut-to-fit gaskets rarely seal correctly.
Remove the old gasket
Disconnect the power. Identify how your seal is attached; most modern units feature a 'push-in' design that fits into a door groove. Start at the top corner, pulling the inner lip toward you. If your specific model uses screws located beneath the seal, use a 1/4-inch nut driver to loosen them—do not remove them entirely—to release the old gasket from behind the door liner.
Tip: Do not yank forcefully on screw-in style gaskets without loosening the screws first, or you risk breaking the inner plastic door liner.
Clean the door channel meticulously
With the old seal gone, you will likely see years of debris or mildew, a common issue in our humid coastal environment. Use a damp cloth with mild soap to scrub the channel. A plastic putty knife wrapped in a thin rag helps reach into tight spots. A clean, debris-free track is essential for the new seal to sit flush.
Tip: Dry the track completely with a microfiber towel before attempting to install the new gasket.
Install the new gasket
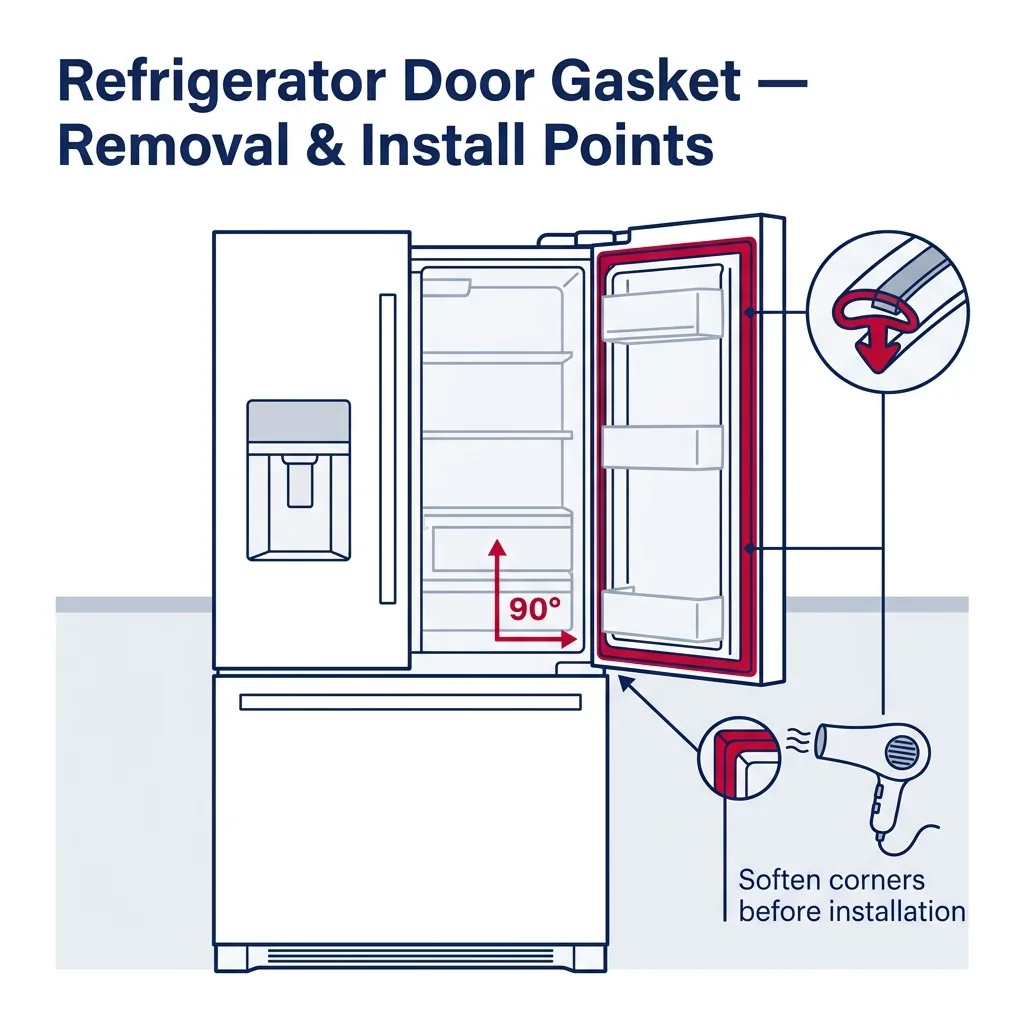
Begin at the top corner by pressing the rigid dart on the back of the gasket into the door track. Continue this process around the entire perimeter, using your thumbs to ensure the seal is firmly seated. If you are working with a screw-in model, tuck the lip behind the liner and tighten the screws until snug—be careful not to overtighten, as this can crack the plastic.
Tip: Ensure the gasket sits evenly without any twisting or bunching.
Seat the seal using the hairdryer trick
Shut the door and check for gaps where the magnetic strip might not be making contact. Use a hairdryer set to medium, keeping it 4-6 inches away from the surface. Move the dryer along any visible gaps to gently warm the rubber, allowing the magnet to pull the seal tight against the cabinet frame.
Tip: Never hold the hairdryer in one spot for too long. If the rubber starts to look glossy, it is getting too hot and may melt.
Final lubrication and testing
If the hinge-side seal rolls inward when closing, apply a very light coating of food-grade silicone grease or petroleum jelly to that section to help it glide. Finally, conduct the 'dollar bill test' by trapping a bill in the door; if you feel consistent resistance as you pull it out, you have a solid seal. Plug the unit back in.
Tip: Ensure the gasket sits evenly without any twisting or bunching.
Brand-specific notes
Some brands have known design quirks worth knowing about before you start.
Whirlpool
Many older Whirlpool and KitchenAid models (especially top-freezers) use a screw-in retainer system. Loosen the 1/4-inch hex screws just enough to slide the old gasket out. Modern French door models use a standard push-in dart system that is much easier to swap.
LG
LG French door refrigerators often have very tight door tracks. If the new gasket's dart won't press in, use the rounded handle of a screwdriver to firmly roll over the gasket, pressing it into the channel. Pay special attention to the mullion (the flapper on the left door)—if it's not sealing, the mullion spring itself might be broken, not the gasket.
Samsung
Samsung gaskets are notoriously prone to arriving with severe kinks. The hot water soak is absolutely mandatory for Samsung OEM gaskets (part costs usually range from $65 to $90). Also, check the bottom edge of the freezer door on bottom-mount units; crumbs easily accumulate there, tearing the gasket over time.
Sub-Zero
Sub-Zero gaskets are thick, high-quality, and secured by screws behind the door panel. Because Sub-Zero doors are incredibly heavy, replacing the bottom gasket on a built-in unit can be physically demanding. Ensure the unit is perfectly level—especially in older hillside homes in the PNW—otherwise, even a new gasket won't seal properly.
GE
GE Profile and Cafe series often use a rigid plastic backing on their push-in gaskets. If you hear a 'snap' as you push it in, that's normal. Be careful not to use too much heat on GE gaskets, as the plastic dart can warp easily, ruining the part.
What our techs see most often
Here in the Pacific Northwest, we see a lot of garage refrigerators suffering from premature gasket failure due to the extreme summer heat baking the rubber. Customers often think their compressor is dying because the fridge runs 24/7, but 40% of the time, it's just a $70 torn gasket letting all the cold air escape.
When to call a professional
- → If the door itself is sagging or physically damaged, preventing a seal even with a new gasket (usually requires hinge replacement or shimming).
- → If you have a built-in unit (like a Sub-Zero or Thermador) and the door needs to be completely removed to access the bottom gasket screws.
- → If you have replaced the gasket and the refrigerator is still not cooling properly, indicating a potential sealed system or compressor issue.
- → If the plastic inner door liner is severely cracked around the retaining screws, requiring liner repair or door replacement.
- → If the mullion heater (the part between the doors that prevents condensation) is shorted out and causing electrical shocks.
Related Refrigerator Troubleshooting
These troubleshooting guides cover problems this task can help solve.
Refrigerator Compressor Running Non-Stop: Troubleshooting and Repairs
Refrigerator Door Not Sealing Properly: How to Fix
Refrigerator Ice Maker Not Working: How to Fix It
Troubleshooting a Refrigerator That Won't Cool
Why Your Refrigerator Is Making Strange Noises and How to Fix It
Frequently asked questions
How much does it cost to replace a refrigerator door gasket?
If you DIY, a genuine OEM gasket typically costs between $45 and $120, depending on the brand and size. If you hire a pro, expect to pay $150 to $250 for labor, bringing the total to $200-$370.
Can I use a universal 'cut-to-fit' gasket from the hardware store?
We strongly advise against it. Universal gaskets rarely have the correct magnetic strength, corner seams, or dart profile to seal properly. Always order the exact OEM part using your refrigerator's model number.
Why is my new gasket not sticking to the fridge?
New gaskets are often stiff from shipping. If it's not sticking, it likely has a crease or hasn't expanded fully. Use a hairdryer on medium heat to warm the rubber, allowing the internal magnet to pull it flush against the metal cabinet.
Can I glue a torn refrigerator gasket back together?
Super glue or silicone sealant is only a temporary band-aid for a minor tear and won't restore the structural integrity or insulation value. If the tear is larger than an inch or letting air escape, replacement is the only permanent fix.
Does it matter if my refrigerator is not perfectly level?
Yes, especially in older PNW hillside homes where floors settle. If the fridge leans too far forward or is twisted, the heavy doors won't align with the cabinet, causing gaps in the seal even with a brand new gasket. Adjust the leveling legs so the fridge tilts slightly backward.
Need a technician in WA or OR?
If the fix above does not work, A-Fix Service repairs refrigerators across Washington and Oregon. $90 diagnostic visit.
Related Repair Guides
Refrigerator Door Not Sealing Properly: How to Fix
A compromised refrigerator seal forces the motor to work harder, driving up utility costs and risking food safety. Discover how to inspect, clean, and install a new gasket to ensure a secure, airtight closure.
Troubleshooting a Refrigerator That Won't Cool
A refrigerator that runs but fails to maintain a cold temperature is a common headache for PNW homeowners. Most of these issues stem from clogged condenser coils, a faulty evaporator fan, or a breakdown in the defrost system—many of which can be resolved in under an hour.
Refrigerator Leaking Water on the Floor: Causes and Fixes
If you find a puddle accumulating under or behind your refrigerator, it typically stems from one of four primary culprits: a blocked defrost drain, a compromised ice-maker supply line, a faulty water inlet valve, or a degraded door gasket allowing humid PNW air to enter. Our guide helps you isolate and resolve these issues.