
At a glance
Symptoms
- • Water pooling on the floor in front of or under the fridge
- • Water inside the fridge under the crisper drawers
- • Ice forming on the bottom of the freezer
- • Drips coming from the bottom of the door
- • Damp or moldy smell
Common causes
- • Clogged defrost drain (frozen ice plug at bottom of freezer)
- • Cracked or disconnected ice-maker / water-dispenser supply line
- • Leaking or stuck-open water inlet valve
- • Failed door gasket allowing humid air in (causing condensation)
- • Drain pan cracked, mispositioned, or overflowing
- • Frost-free defrost system blockage
Safety First — Read Before You Start
- •Always shut off the water supply line before disconnecting fittings.
- •Unplug the fridge before reaching behind for electrical components.
- •Do not use boiling water on the defrost drain — it can crack the plastic.
- •Wipe up water immediately to prevent floor damage and slip hazards.
Tools & supplies you'll need
- Towels and a shallow tray
- Turkey baster or syringe (for clearing the defrost drain)
- Hot water (NOT boiling)
- Phillips screwdriver
- Flashlight
- Small mirror (for inspecting behind unit)
- Pipe wrench (for water-line fittings, if needed)
Step-by-step instructions
Find the source first
Pull your refrigerator out roughly twelve inches and wipe the floor completely dry. Observe the area for four to six hours to pinpoint where moisture returns. (a) Front: usually points to a defrost drain issue or a failing door seal. (b) Back: suggests a water inlet valve or supply line failure. (c) Inside (under crispers): indicates a defrost drain blockage. (d) Inside the freezer (ice on bottom): also confirms a defrost drain issue. Identifying the origin simplifies the repair process.
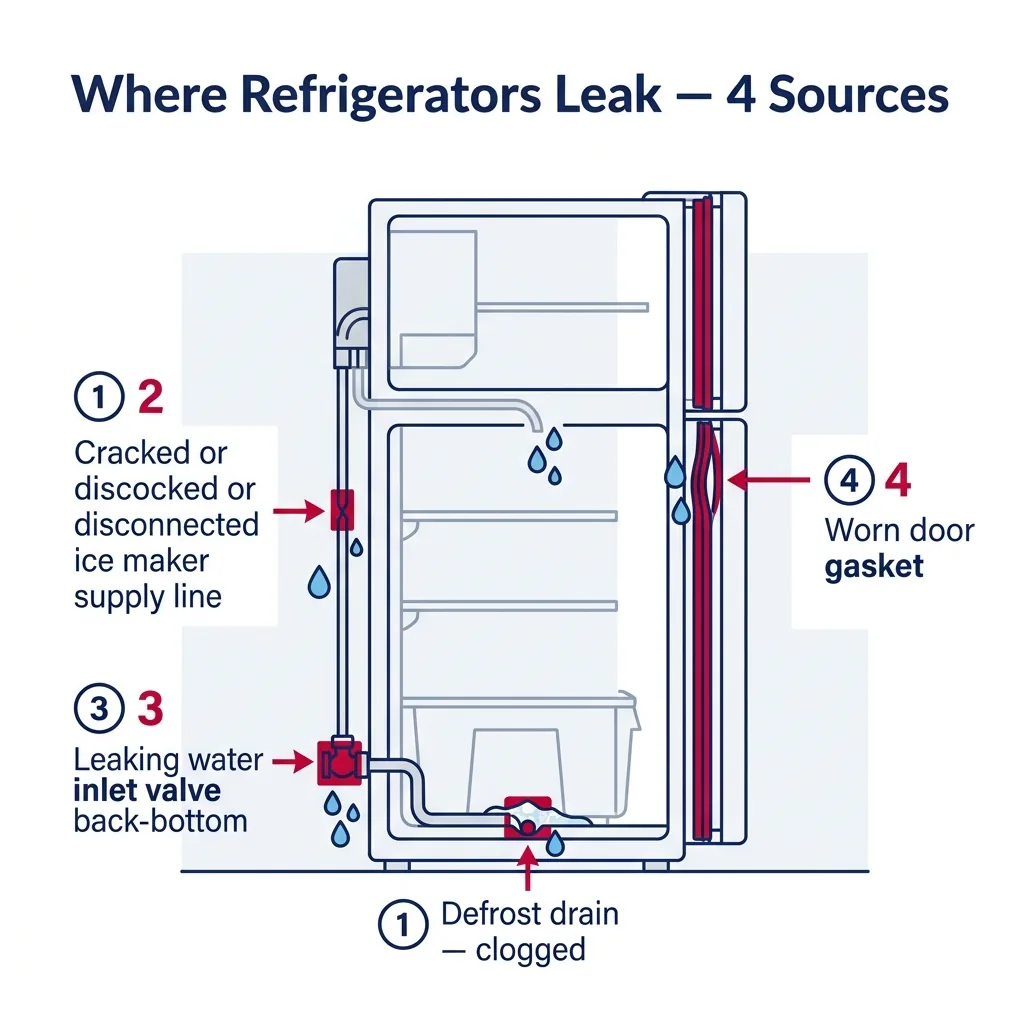
Tip: Lay down a paper towel near the suspected leak; it will show exactly where moisture drips, confirming the leak's path.
Clear a clogged defrost drain (most common cause)
Access the freezer interior by removing the bottom drawer or floor panel. Locate the small drain hole toward the rear. If you notice ice obstructing this hole or a solid ice plug, you have found the blockage. Use a turkey baster to flush 1-2 cups of WARM (never boiling) water through the drain to melt the ice. Alternatively, use a piece of stiff plastic tubing or a pipe cleaner to dislodge the obstruction. Check the drain pan near the compressor at the back of the fridge to ensure water is successfully draining into it.
Tip: Defrost-drain blockage is the #1 cause of refrigerator water leaks — solve this and 60% of leaks are fixed.
Inspect the water supply line
Trace the flexible water line from the rear of the appliance to the saddle valve, which might be located under your sink or in the basement. Examine the tubing for cracks, drips, or loose compression fittings. Use a wrench to snug up any loose nuts. If the plastic line appears yellowed or brittle—common in older homes—replace it entirely with a stainless-steel braided supply line, available at any local hardware store, to prevent future cracking.
Tip: Shut off the saddle valve before disconnecting any fittings. Have a bucket and towels ready — there will be residual water.
Check the water inlet valve
The inlet valve is an electrical solenoid where the supply line meets the fridge. Inspect the valve body and the connection points for signs of moisture. Minor weeping at the fittings can often be stopped by tightening, but if the valve body itself leaks, the part is failing and requires replacement ($25-60). To swap it: turn off the water, disconnect the supply line, remove the electrical connector, unscrew the two bracket screws, and install the new valve in the same configuration.
Tip: A leaky inlet valve sometimes only drips when the ice maker calls for water, so the leak appears intermittently every few hours.
Inspect the door gasket
Check the rubber door seal for tears, mold, or rigid spots. Perform the dollar-bill test: close the door on a dollar bill and attempt to pull it out. If it slides out with no resistance, the seal is compromised. A worn gasket allows humid PNW air to enter, creating condensation that turns into drips. Clean the gasket with warm, soapy water. If the material is torn or permanently hardened, purchase a model-specific replacement ($30-90) and install it according to your manual.
Tip: A hairdryer on low heat can soften a gasket that has stiffened from age — this often improves the seal without replacement.
Verify the drain pan
The drain pan is positioned under the fridge, above the compressor. During normal operation, water from the defrost cycle drips into this pan and evaporates due to compressor heat. If your defrost drain is clear but water persists on the floor, check if the pan is cracked, out of alignment, or overflowing because the compressor isn't generating enough heat for evaporation. Access the pan via the kick-plate to clean, empty, or level it.
Tip: Ensure the pan is seated properly to avoid rattling or overflow.
Brand-specific notes
Some brands have known design quirks worth knowing about before you start.
Samsung
Samsung RF series French-door fridges are notorious for ice forming under the crisper drawers — a known design flaw with the rear-wall drain. Samsung has issued a "drain heater" service kit (~$50 part) that solves it permanently. Check Samsung's service bulletin SVCB-2018-RR-001.
LG
LG ice-and-water dispenser models often leak from the dispenser cap behind the fridge, where the water line tees off. The cap o-ring fails after 5-7 years and weeps slowly — easy fix with a $5 o-ring kit.
Whirlpool
Whirlpool side-by-side models with bottom-front ice makers often leak from a cracked ice-bin housing — water from the ice maker doesn't fully refreeze and escapes. The fix is a replacement bin assembly (~$80).
GE
GE Profile and Cafe French-door fridges sometimes leak from the water reservoir tank inside the rear of the fridge. Symptoms: water inside under the crisper PLUS slow dispenser. The tank is $40-60 and replacement is straightforward.
Sub-Zero
Sub-Zero built-ins have a more complex drainage system with a heated drain to prevent freezing. If the drain heater fails (rare but possible), water will overflow inside. Diagnosis requires a Sub-Zero specialist — incorrect repair can damage cabinetry.
What our techs see most often
In our service area, especially in coastal cities like Seattle and Oceanside, summer humidity worsens defrost-drain clogs because warm humid air enters the freezer faster, creating more condensation that freezes at the drain. We see a noticeable spike in water-leak calls in July and August. Routine defrost-drain flushing every 6 months prevents most of these.
When to call a professional
- → You've cleared the defrost drain, checked all visible water lines, and the leak persists
- → You see water dripping from the compressor area or sealed-system components
- → There's brown or rusty water (indicates internal corrosion)
- → The leak is causing damage to expensive flooring and you cannot stop it quickly
- → Your fridge is a built-in (Sub-Zero, Thermador, Viking) — drain access requires partial disassembly
- → You suspect refrigerant-line condensation rather than water (oily film, hissing sound) — this needs an EPA-certified tech
Refrigerator Maintenance & Replacement Tasks
Step-by-step guides for individual maintenance jobs related to this appliance.
A Guide to Cleaning Refrigerator Condenser Coils
How to Properly Level Your Refrigerator
How to Manually Defrost a Refrigerator or Freezer
DIY Guide: Replacing Your Refrigerator Door Gasket
How to Replace a Refrigerator Water Filter (All Major Brands)
Frequently asked questions
Why is water pooling under my crisper drawers?
Almost always a clogged defrost drain. Water from defrost cycles cannot drain to the back evaporator pan and instead overflows the freezer floor and trickles down into the fridge section under the crispers. Clear the drain (Step 2) and the issue resolves.
How can I tell if it's water or refrigerant leaking?
Water is clear and odorless. Refrigerant leaks are very rare in modern fridges, but if you see oily residue, smell ammonia, or hear hissing — that is refrigerant and requires an EPA 608-certified tech immediately.
My fridge has been leaking for weeks. Should I be worried about damage?
Yes — chronic moisture under a fridge can damage flooring, cause mold, and rust the compressor housing. Move the fridge out and inspect the floor. Stop the leak immediately and dry thoroughly with fans for 48 hours.
Is the drain pan supposed to have water in it?
Yes, a small amount of water in the drain pan is normal — it evaporates from compressor heat. If the pan is overflowing, the compressor is not running enough (a cooling problem) or the pan is cracked.
How can I prevent refrigerator leaks in the future?
Three things: (1) flush the defrost drain with warm water every 6 months as preventive maintenance, (2) replace the water filter on schedule, (3) replace plastic supply lines with braided stainless-steel before they age out (every 7-10 years).
Need a technician in WA or OR?
If the fix above does not work, A-Fix Service repairs refrigerators across Washington and Oregon. $90 diagnostic visit.
Related Repair Guides
Troubleshooting a Refrigerator That Won't Cool
A refrigerator that runs but fails to maintain a cold temperature is a common headache for PNW homeowners. Most of these issues stem from clogged condenser coils, a faulty evaporator fan, or a breakdown in the defrost system—many of which can be resolved in under an hour.
Refrigerator Ice Maker Not Working: How to Fix It
If your ice maker has quit, it is rarely a total unit failure. In our experience across the Pacific Northwest, 8 out of 10 cases come down to a frozen fill tube, a water-supply problem, or a clogged filter — all fixable in 30-60 minutes.
A Guide to Cleaning Refrigerator Condenser Coils
Boost your refrigerator's efficiency and head off costly compressor issues by keeping your condenser coils free of debris. This quick 20-minute maintenance task is vital for the health of your appliance.