
At a glance
Symptoms
- • Water filter indicator light on the control panel is red or flashing
- • Ice tastes stale, metallic, or smells bad
- • Water dispenser flow is noticeably slower than usual
- • Ice maker produces smaller, hollow, or fewer cubes
- • It has been 6 months since your last filter replacement
- • Visible white scale buildup around the dispenser nozzle
Common causes
- • Prevents hard water scale buildup in the dispenser lines and inlet valves (crucial in high-TDS areas)
- • Removes chlorine, lead, rust, and trace pharmaceuticals from your drinking water
- • Maintains optimal water pressure for the ice maker to function correctly without freezing up
- • Prevents bacterial growth inside an old, saturated carbon filter cartridge
- • Ensures your refrigerator's warranty remains valid by performing required routine maintenance
Safety First — Read Before You Start
- •Always verify you have the exact filter model number for your fridge before forcing a new one into the housing.
- •Do not use excessive force to remove an old filter. If it is completely stuck, turning off the home water supply can relieve line pressure and make removal easier.
- •Discard the first 2-3 gallons of water after replacement to clear harmless but unpleasant carbon dust.
- •If you have a whole-home Reverse Osmosis (RO) system, do not use a standard fridge filter, as the double-filtration will drop water pressure too low for the ice maker.
Tools & supplies you'll need
- New OEM or high-quality aftermarket water filter ($35-$60)
- Towel or rag (to catch minor drips)
- Permanent marker (to date the new filter)
- Large pitcher or bucket (for flushing the lines)
- Food-grade silicone grease (optional, for stubborn O-rings)
Step-by-step instructions
Locate the Water Filter
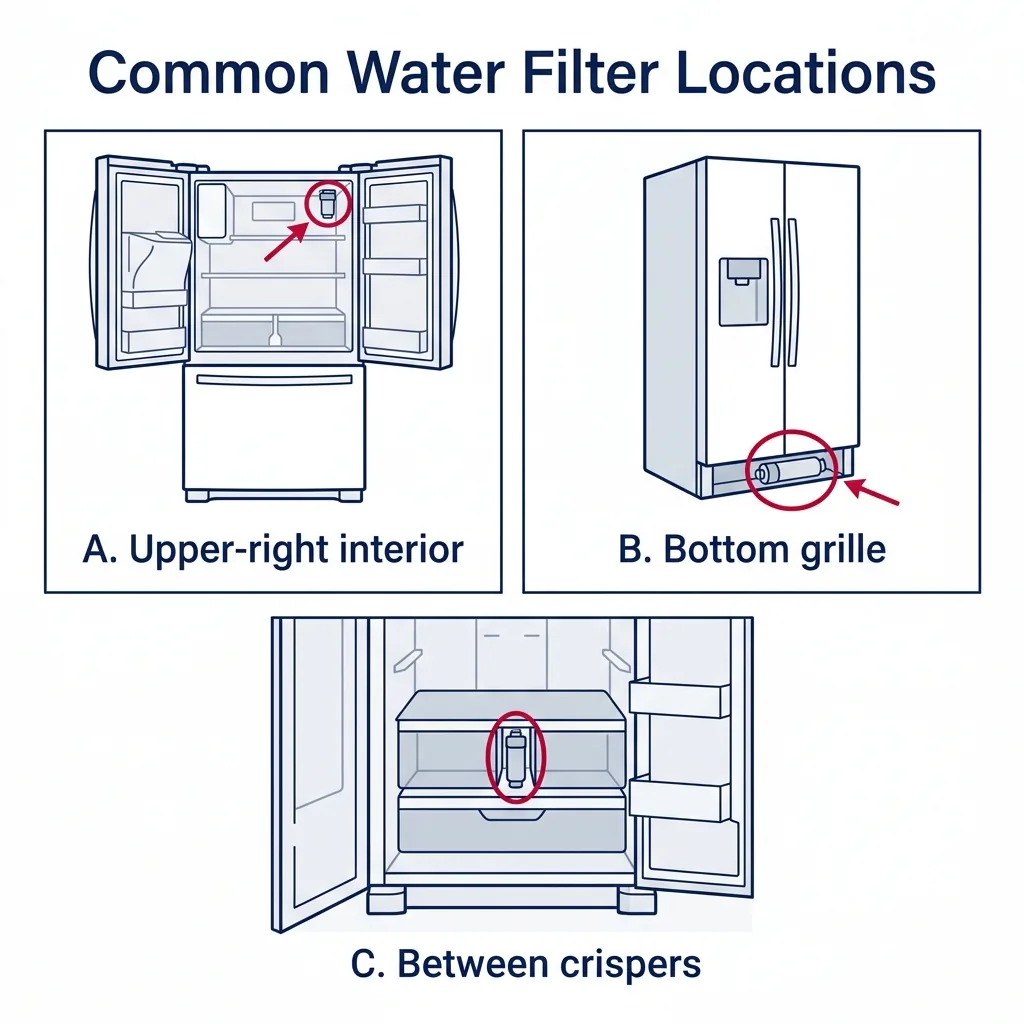
First, you must identify where the filter is situated. Depending on your specific model, it might be tucked behind a small door in the top right corner of the fridge, hidden behind the bottom kickplate near the floor, or positioned between the crisper drawers. If you are struggling to find it, check your owner's manual for the exact location.
Tip: Snap a photo of the existing filter label with your smartphone before removal to ensure you purchase the exact replacement part.
Remove the Old Filter
The removal process varies by design. For 'Twist-and-Pull' styles, rotate the filter a quarter-turn counterclockwise and pull it out. 'Push-Button' versions require you to press the release button to eject the unit. 'Push-to-Release' types need a firm push inward to click and release the spring mechanism. Keep a towel handy, as some water may leak during this process.
Tip: If a twist-in filter refuses to budge, do not use pliers, as this can damage the housing. Instead, turn off the water supply and dispense water from the door to drain line pressure, which will make the filter much easier to remove.
Prepare the New Filter
Unpack your new filter and peel away any protective caps or seals from the O-rings. Double-check that the O-rings are seated correctly. Use a permanent marker to write the current date on the filter so you know exactly when it needs to be replaced again.
Tip: If the filter feels tight during installation, apply a tiny amount of food-grade silicone grease to the O-rings. Never use WD-40 or petroleum jelly.
Install the New Filter
Line up the new filter with the housing tracks. If it is a twist-in model, push it in and turn it clockwise until it locks. For push-in styles, keep pushing until you hear a distinct click. If you feel resistance, stop and verify the alignment.
Tip: If the filter is not fully locked into position, the internal valve will remain closed, preventing water from reaching your dispenser.
Flush the Water System
Place a large container under the dispenser and run water through the system. It may take a moment for the flow to start, and you will likely hear sputtering as trapped air escapes. The initial water may appear gray or black due to carbon dust, which is normal. Continue flushing until you have run 2 to 3 gallons through the system and the water comes out perfectly clear.
Tip: The water used for flushing is safe for your houseplants.
Reset the Filter Indicator Light
Since the fridge doesn't automatically detect the new filter, you must manually reset the light. Usually, you will hold a 'Filter Reset' button for 3 to 5 seconds. If your model lacks this button, check your manual for specific combinations, such as holding the 'Ice Type' and 'Child Lock' buttons simultaneously.
Tip: Consult your owner's manual if the reset combination is not obvious on your display panel.
Brand-specific notes
Some brands have known design quirks worth knowing about before you start.
Samsung
Uses the HAF-CIN/EXP or DA29 series, usually located between the crisper drawers. These are notorious for getting stuck. If it won't twist counter-clockwise, shut off the water supply behind the fridge and hold the dispenser paddle to drain line pressure—it will twist out easily after that.
LG
Typically uses LT1000P or LT700P filters. You'll usually find them behind a drop-down door in the upper left or right ceiling of the fridge. Make sure to pull the filter completely downward before trying to pull it out, or you risk snapping the plastic bracket.
Whirlpool & KitchenAid
These use the EveryDrop series (numbered 1 through 6). Often located in the base grille. The push-button ejectors can get stiff over time. If the button is stuck, push the filter *in* slightly while pressing the button to release the latch.
GE
Modern GE fridges use XWFE filters which contain a proprietary RFID chip. You generally cannot use cheap aftermarket filters on these newer models; the fridge will detect the missing chip and completely disable the water dispenser until an OEM filter is installed.
Bosch
Uses the UltraClarity series. Usually a twist-in style in the upper right. Bosch housings are very sensitive to alignment. If the filter isn't twisted exactly 90 degrees to the lock icon, the internal bypass valve stays shut and you'll get zero water pressure.
Sub-Zero
Typically uses twist-in quarter-turn filters located behind the top louvered grille (Classic series) or inside the fridge (PRO series). Sub-Zero filters are highly pressurized; always turn off the unit at the control panel before swapping to prevent aggressive spraying.
What our techs see most often
Across the Pacific Northwest, from the wet climate of Seattle to the hard water found in Spokane, we frequently see ice makers fail because owners skip filter changes. Mineral buildup from hard water can clog the inlet valve, turning a simple maintenance step into a costly repair.
When to call a professional
- → The old filter is completely stuck and won't turn or eject, even after turning off the water supply.
- → Water leaks continuously from the filter housing inside the fridge after installing the new one.
- → The water dispenser won't work at all, even after confirming the new filter is properly locked in.
- → The plastic filter housing or the receiver head inside the fridge is visibly cracked or damaged.
- → You hear a loud hammering or knocking noise from the back of the fridge when dispensing water with the new filter.
Related Refrigerator Troubleshooting
These troubleshooting guides cover problems this task can help solve.
Refrigerator Compressor Running Non-Stop: Troubleshooting and Repairs
Refrigerator Door Not Sealing Properly: How to Fix
Refrigerator Ice Maker Not Working: How to Fix It
Troubleshooting a Refrigerator That Won't Cool
Why Your Refrigerator Is Making Strange Noises and How to Fix It
Frequently asked questions
Do I really need to use the expensive name-brand filter?
While tempting, cheap aftermarket filters ($15-$25) often lack proper carbon blocks, meaning they don't filter out heavy metals or pharmaceuticals. Worse, their O-rings are notoriously imprecise and frequently cause slow leaks that ruin hardwood floors. OEM filters ($40-$60) are NSF-certified and guaranteed to fit. Additionally, brands like GE use RFID chips, meaning knockoffs simply won't work.
Why is my water dispensing black after a filter change?
That is completely normal. The black color comes from loose carbon dust shedding from the new activated carbon block inside the filter. You need to flush 2 to 3 gallons of water through the dispenser to clear the dust and prime the filter. It is harmless, but tastes unpleasant.
How often should I really change my fridge water filter?
The industry standard is every 6 months. However, if you live in an area with very hard water (like Seattle, WA or Portland, OR), or if you have a large family that uses the dispenser constantly, you may need to change it every 4 to 5 months. A noticeable drop in water pressure is your best indicator that the filter is clogged.
Why is my new filter leaking after I installed it?
Usually, this happens because the filter isn't pushed in or twisted all the way to the locked position. It can also happen if you forgot to remove the plastic shipping caps over the O-rings, or if one of the O-rings tore during installation. Remove the filter, inspect the rubber O-rings, and reinstall it firmly.
Can I bypass the fridge filter if I have a whole-home RO system?
Yes, and you absolutely should. Running a whole-home Reverse Osmosis system through a refrigerator filter drops the water pressure too low, which can cause the ice maker fill tube to freeze solid. Most manufacturers sell a 'bypass plug' ($15-$25) that takes the place of the filter, allowing water to flow freely without double-filtration.
Need a technician in WA or OR?
If the fix above does not work, A-Fix Service repairs refrigerators across Washington and Oregon. $90 diagnostic visit.
Related Repair Guides
Troubleshooting a Refrigerator That Won't Cool
A refrigerator that runs but fails to maintain a cold temperature is a common headache for PNW homeowners. Most of these issues stem from clogged condenser coils, a faulty evaporator fan, or a breakdown in the defrost system—many of which can be resolved in under an hour.
Refrigerator Ice Maker Not Working: How to Fix It
If your ice maker has quit, it is rarely a total unit failure. In our experience across the Pacific Northwest, 8 out of 10 cases come down to a frozen fill tube, a water-supply problem, or a clogged filter — all fixable in 30-60 minutes.
Refrigerator Leaking Water on the Floor: Causes and Fixes
If you find a puddle accumulating under or behind your refrigerator, it typically stems from one of four primary culprits: a blocked defrost drain, a compromised ice-maker supply line, a faulty water inlet valve, or a degraded door gasket allowing humid PNW air to enter. Our guide helps you isolate and resolve these issues.