
At a glance
Symptoms
- • Dishes on the top rack are consistently coming out dirty or covered in grit.
- • You notice a white, chalky buildup (calcium scale) around the small holes on the plastic wash arms.
- • The detergent dispenser door opens, but the soap tablet doesn't fully dissolve during the cycle.
- • The dishwasher sounds quieter than usual during the wash cycle, indicating low water pressure.
- • You find small bits of food debris, citrus seeds, or glass trapped inside the spray arm holes.
- • The spray arms do not appear to have changed position after a full wash cycle completes.
Common causes
- • the Pacific Northwest water (especially in areas like Spokane or the Willamette Valley) often exceeds 300 ppm of hardness, rapidly calcifying the tiny jet holes.
- • Blocked jets prevent the spray arms from rotating, turning your dishwasher into a weak sprinkler rather than a high-pressure washer.
- • Food particles like citrus seeds, popcorn kernels, and eggshells bypass the primary filter and get wedged inside the arms.
- • Labels from jars or paper residue from food packaging disintegrate and clog the water delivery manifold.
- • Neglecting this task forces the circulation pump to work harder against restricted flow, potentially shortening its lifespan.
Safety First — Read Before You Start
- •Always disconnect power to the dishwasher at the breaker before reaching into the tub to prevent accidental starts.
- •Watch out for broken glass or sharp bone fragments that may have settled in the lower sump area beneath the spray arm.
- •Never use metal needles, safety pins, or drill bits to clear the jets—enlarging or scratching the holes will ruin the spray pattern.
- •Allow the dishwasher to cool down completely if it recently ran a heated dry cycle, as the exposed heating element can cause severe burns.
Tools & supplies you'll need
- Distilled white vinegar (at least 1 quart)
- Wooden toothpicks, tweezers, or a thin wire pipe cleaner
- A large baking dish, sink basin, or bucket for soaking
- Old toothbrush or soft-bristled scrub brush
- Nut driver or Torx screwdriver set (for certain upper arm assemblies)
- Flashlight for inspecting the pump sump
Step-by-step instructions
Disconnect Power and Prep the Tub
Start by cutting power to the unit at the breaker box for safety. Open the door fully and slide out the bottom rack to reach the interior. Use your flashlight to check the floor of the tub (the sump) for any remnants like broken glass or food scraps. Clearing these out now protects your hands while you work on the lower spray arm.
Tip: Lay an old towel on the kitchen floor to catch any water runoff when you remove the arms.
⚠ Warning: Avoid putting your weight on the open door, as this can misalign the hinges and lead to leaks.
Remove the Lower Spray Arm
Removal varies by model, though many are designed for tool-free access. Usually, you can grasp the center hub and pull upward to release the arm from the manifold. Some models require a slight counter-clockwise twist to unlock the hub. If the piece doesn't budge, inspect it for a central screw, but avoid using excessive force to prevent cracking the plastic.
Tip: Watch for a small plastic bearing ring beneath the arm and keep it safe so it doesn't drop into the filter area.
Remove the Upper and Middle Spray Arms
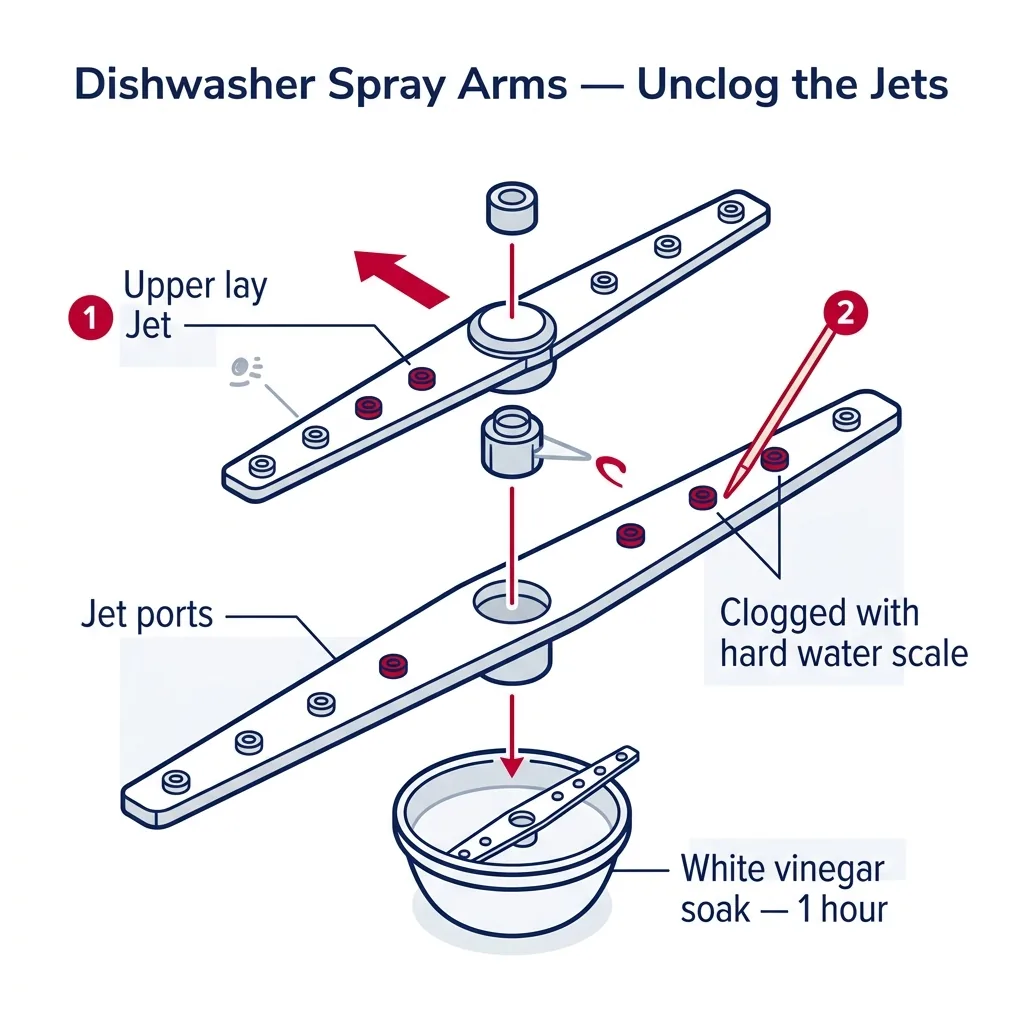
Slide the top rack out to reach the middle spray arm located underneath. These typically release by unscrewing a plastic knob or pressing a retaining tab. If your unit features a third arm at the top of the tub, you can usually remove it by rotating the cap counter-clockwise. Take all pieces to your sink for cleaning.
⚠ Warning: Be careful not to drop the upper spray arm retaining nut; it is easily lost and required for the dishwasher to function properly.
Soak the Arms in Warm Vinegar
To combat the stubborn mineral buildup typical of water in rainy Seattle or the high-desert regions of Oregon, place the arms in a basin or roasting pan. Cover them with warm distilled white vinegar and let them sit for 30 to 45 minutes. The vinegar's acidity works to dissolve calcium carbonate deposits without harming the plastic components. You may notice tiny bubbles as the acid reacts with the mineral crust.
Tip: For heavy buildup, adding a tablespoon of citric acid to the vinegar can speed up the process.
Clear the Jets and Dislodge Debris
Once soaked, use a toothpick, tweezers, or a pipe cleaner to gently probe each jet hole. The goal is to push out softened debris without damaging the plastic. Avoid pushing seeds deeper into the arm; instead, try to pull them out or guide them into the main cavity. Finish by brushing the exterior with an old toothbrush to remove any remaining scale.
⚠ Warning: Never use a sewing needle, safety pin, or metal pick. Scratching the inside of the jet hole will alter the water trajectory, causing the arm to stall during a cycle.
Flush the Spray Arms with High Pressure
After clearing the holes, you must flush out the loosened particles. Hold the center hub firmly against your sink faucet and run the hot water at full pressure. Water should spray forcefully from all the tiny ports. Shake the arm while flushing to ensure any internal debris is washed out through the hub.
Tip: If water doesn't shoot out of a specific hole, repeat the probing step for that jet.
Reinstall and Perform a Spin Test
Replace the arms, ensuring all locking nuts are hand-tight. Snap the lower arm back into its housing. Once reinstalled, flick each arm with your finger; they should spin freely without any rubbing or resistance. If they grind, check the bearing or seating. Restore power and run a quick rinse cycle to confirm the fix.
⚠ Warning: If the arms do not spin freely by hand, do not run the dishwasher. A bound spray arm can cause a localized geyser that may push water past the door seal and flood your floor.
Brand-specific notes
Some brands have known design quirks worth knowing about before you start.
Bosch
On most Bosch models, the lower arm simply snaps out with a firm upward pull. The upper arm usually features a knurled locking ring. While Bosch's triple-filtration system is excellent, we still frequently see citrus seeds bypass the filter and wedge into the very tips of the spray arms. If an arm splits at the seam, a genuine Bosch replacement typically runs $35-$50.
KitchenAid / Whirlpool
Many modern Whirlpool and KitchenAid units feature a lower arm with a central twist-cap—turn it counter-clockwise a quarter turn to release. Be aware that newer top-tier KitchenAid models have a motorized lower arm system. Be very gentle when pulling it off the splined shaft to avoid damaging the stepper motor below.
GE
GE dishwashers often use a retaining nut in the center of the lower arm, requiring a 1/4-inch nut driver or a Torx screwdriver to remove. Pay close attention to the small plastic bearing ring underneath the arm; it is essential for frictionless spinning. If you lose it down the drain, the arm will stall and your dishes won't get clean.
LG
LG uses a 'QuadWash' system featuring four distinct blades. The entire assembly pops off by rotating the center hub. Keep in mind that the oscillating gears inside these arms are water-driven. If hard water scale locks up those internal gears, a thorough vinegar soak is mandatory to get them sweeping side-to-side again.
Samsung
Look out for the 'WaterWall' or 'Linear Wash' mechanisms on high-end Samsung models. Instead of a traditional spinning arm, they utilize a moving deflector bar. You can easily clean the linear manifold jets with vinegar, but if the magnetic drive motor that moves the deflector fails, you're looking at a $150-$250 professional repair.
What our techs see most often
In areas like King County or the Willamette Valley, water hardness can hit 350+ ppm, which is tough on appliances. Most customers calling because their machine 'isn't cleaning' simply have spray arm jets completely blocked by calcium deposits.
When to call a professional
- → The plastic spray arm is physically melted, cracked, or split along the factory seam.
- → The center wash manifold or the vertical water delivery tube at the back of the tub is broken or detached.
- → You've cleaned the arms thoroughly, but they still refuse to spin during a cycle, which often indicates a failing wash circulation pump.
- → The dishwasher begins leaking from the motor shaft seal underneath the tub after you reinstall the arms.
- → You have a high-end built-in unit (like a Sub-Zero/Cove or Thermador) and cannot figure out how to release the specialized wash arms without forcing them.
- → You notice exposed wiring or burning smells coming from the bottom of the tub when the dishwasher runs.
Related Dishwasher Troubleshooting
These troubleshooting guides cover problems this task can help solve.
Why Your Dishwasher Isn't Cleaning: A PNW Repair Guide
Dishwasher Door Won't Latch or Stays Stuck: Fix Guide
Dishwasher Won't Drain: Clearing Standing Water
Dishwasher Soap Dispenser Won't Open or Release
Tackling Dishwasher Odors: A PNW Homeowner’s Guide
Frequently asked questions
Can I use bleach instead of vinegar to clean the spray arms?
No. Bleach will not dissolve the calcium carbonate scale caused by hard water, and it can actually degrade the plastic and rubber seals inside your dishwasher over time. Stick to distilled white vinegar or a commercial citric acid descaler, which usually costs about $10-$15.
How often should I clean my dishwasher spray arms in Washington & Oregon?
In areas with extremely hard municipal water like Portland or King County (250-400 ppm), you should inspect and soak your spray arms every 3 to 4 months. If your home is equipped with a whole-house water softener, inspecting them once a year is usually sufficient.
What if I accidentally enlarge the holes with a metal tool?
If the jet holes are scratched, widened, or deformed, the water pressure will drop, and the spray angle will be permanently altered. This results in poor cleaning performance. You will need to buy a replacement spray arm, which typically costs between $25 and $85 depending on the brand.
Why is there water left in the bottom of the tub when I remove the lower arm?
A small amount of standing water (about a cup or two) underneath the filter area is completely normal. It keeps the rubber pump seals from drying out and cracking. However, if the dirty water completely covers the bottom of the tub, you have a drainage issue, not just a spray arm problem.
The spray arm spins freely by hand, but doesn't spin during the wash. Why?
If the arm isn't physically obstructed, this usually means the water pressure reaching the arm is too low. It could be a clogged chopper blade, a blocked water inlet valve restricting the initial fill, or a failing circulation pump motor—which is typically a $200-$350 professional repair.
Need a technician in WA or OR?
If the fix above does not work, A-Fix Service repairs dishwashers across Washington and Oregon. $90 diagnostic visit.
Related Repair Guides
Why Your Dishwasher Isn't Cleaning: A PNW Repair Guide
If your plates are coming out with a gritty texture, filmy residue, or food flecks, the culprit is rarely the soap. In the Pacific Northwest, high mineral levels in our water supply frequently lead to scale buildup, clogged spray arm ports, and restricted water flow. These issues account for the vast majority of cleaning complaints. Most of these repairs are straightforward and can be completed in 30 to 90 minutes without needing specialized components.
How to Descale a Dishwasher with Vinegar or Citric Acid
Is hard water affecting your dishwasher? Follow this guide to safely descale your appliance using white vinegar or citric acid, which dissolves mineral buildup and restores optimal cleaning efficiency.
How to Clean a Dishwasher Filter (All Brands)
A blocked filter is the primary culprit behind filmy dishes and unpleasant smells. Follow this guide to remove and scrub your filter assembly to maintain optimal cleaning power and protect your drain pump.