
At a glance
Symptoms
- • White chalky film on glassware and the inside of the tub
- • Food particles redeposited on dishes (often on the upper rack)
- • Gritty residue on plates after the cycle
- • Detergent pod or powder still partially undissolved at the end
- • Cloudy glassware that does not clear up with rinsing
- • Dishes on one rack clean, the other rack not — usually the upper rack
Common causes
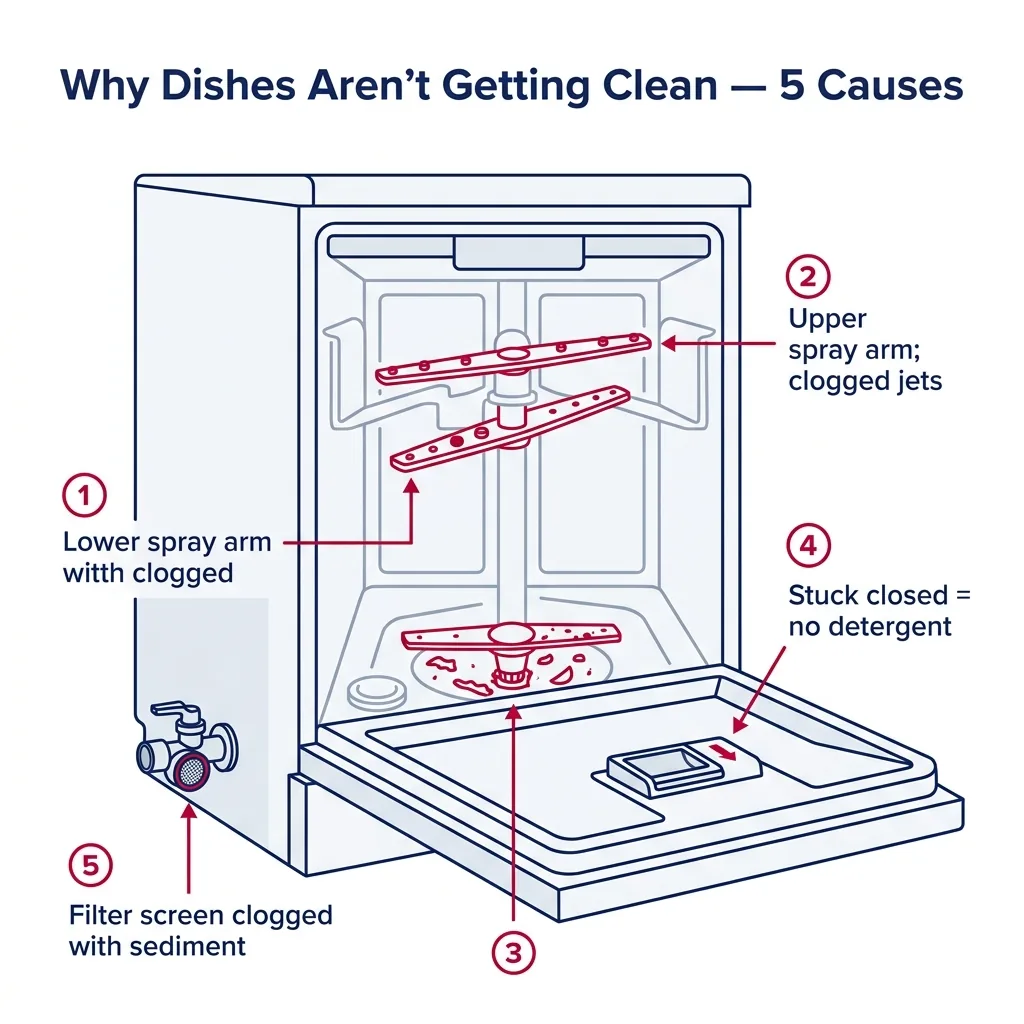
- • Spray arm jets clogged with hard-water mineral scale (the dominant cause in the PNW)
- • Drain filter clogged — dirty wash water gets recirculated onto your dishes
- • Water inlet valve screen clogged with sediment, restricting fill volume
- • Faulty water inlet valve not opening fully, leaving the unit underfilled
- • Spray arm sagging, cracked, or missing an end-cap
- • Wash impeller worn, no longer producing pressure
- • Soap dispenser stuck closed or detergent caked over the door
- • Water heater set below 120°F so detergent enzymes never activate
- • Loading mistakes — pots blocking the upper spray, items nesting
- • Wrong detergent type (powder in soft water, or expired pods that no longer dissolve)
Safety First — Read Before You Start
- •Turn off power at the breaker and the water supply valve before removing the inlet valve or any internal hose.
- •Hot water during a cycle reaches 140-160°F — wait 20 minutes after a cycle before reaching inside the tub.
- •Do not mix bleach and vinegar when cleaning the tub — chlorine gas is toxic.
- •Never bypass the float switch to "force" more water in — overflow can damage the floor and electrical components.
- •Wear gloves when handling spray arms — accumulated grime is bacterial.
Tools & supplies you'll need
- Phillips screwdriver
- Toothpick or unbent paper clip (for poking out clogged spray jets)
- White vinegar (1 gallon) and citric acid (or lemon juice) for descaling
- Soft brush (old toothbrush works)
- Multimeter (for testing the water inlet valve)
- Bucket and small towel
- Cooking thermometer (to verify hot water temp at the kitchen tap)
Step-by-step instructions
Verify hot water temperature at the kitchen sink
Run your kitchen faucet until the water is hot, then fill a glass and measure the temperature with a thermometer. You are aiming for at least 120°F, ideally 125°F. If your water isn't hot enough, the detergent enzymes won't activate, leaving soap and food behind. If your heater is set lower, increase the temperature. In the Pacific Northwest, where cold supply lines are common, always run the sink tap until it's steaming before you start the dishwasher to ensure the first fill isn't cold water.
Tip: Tankless water heaters can take a moment to push hot water through the pipes. Always purge the cold water at the sink first.
Clean the filter and check the sump
Remove the bottom rack and unscrew the cylindrical filter located at the base. Lift out the fine-mesh screen as well. Scrub both pieces with a toothbrush under warm water to remove grease and food debris. Check the sump area for any trapped objects. If the filter is blocked, the dishwasher just moves dirty water around instead of cleaning, which ruins your wash quality. Make this a monthly habit.
Tip: Watch out for broken glass or sharp debris in the sump; use a flashlight and wear protective gloves.
Inspect and unclog the spray arm jets
Detach the lower spray arm—most pull off or unscrew—and check for calcium buildup. In areas with hard water, these ports often get blocked by mineral deposits. Use a toothpick or paper clip to clear every hole. Soak the arms in a mixture of one part white vinegar and one part hot water for 30 minutes. Check the upper arm and any third-rack sprayer as well. Once clear, ensure they spin freely.
Tip: If you can see light through the holes after cleaning, you've succeeded. If they still look cloudy or blocked, repeat the vinegar soak to fix the uneven cleaning pattern.
Descale the entire interior
Run an empty, hot cycle with two cups of white vinegar in a glass bowl on the top rack. Follow this with a second cycle using a cup of citric acid or Lemi Shine in the bottom of the tub. This process removes mineral scale from the heating element, hoses, and pump. Given the mineral content in our local water, we suggest doing this every few months to keep the machine running efficiently.
Tip: Regular descaling is recommended by major brands like Bosch and KitchenAid to prevent scale from damaging the heater coil and spray arms.
Check the water inlet valve and screen
Shut off the power and water supply. Access the water inlet valve behind the lower kick-plate. Disconnect the supply line and inspect the small mesh screen for rust or sediment. If the screen is clogged, clean it; if it's damaged, replace the valve ($35-60). Use a multimeter to check the valve solenoid for continuity; a reading between 500-1500 ohms is standard. If it reads open or shorted, the valve is faulty.
Tip: Ensure the water supply is completely off before disconnecting the line, as there is significant pressure behind it.
Inspect the soap dispenser and dispenser timing
Ensure the detergent door isn't being blocked by tall dishes or items in the silverware basket. If the pod remains intact after a cycle, the door spring or release mechanism may be failing. Use a toothbrush to clean any caked-on soap from the dispenser cavity. If the door still fails to open, you may need to replace the bi-metal release component (~$45).
Tip: If you use gel pods, try switching to powder for a wash. If performance improves, your old pods likely lost their effectiveness due to humidity or age.
Check spray arms for cracks, sags, and missing end caps
Inspect the spray arms for structural damage, such as cracks or missing end caps, and check for warping that might cause them to drag. Ensure the docking gasket for the upper spray arm is intact; a worn gasket allows water to leak out instead of reaching the dishes. Replacing a damaged arm or gasket is a simple way to restore proper water pressure.
Tip: New spray arms generally cost $40-90, while gaskets are usually $5-15, making this a cost-effective fix for better results.
Brand-specific notes
Some brands have known design quirks worth knowing about before you start.
Bosch
Even with self-cleaning filters, Bosch 300, 500, and 800 series models need manual filter cleaning every few months. The 800-series third-rack sprayers are very narrow and prone to clogging; soak them in vinegar regularly.
KitchenAid
KitchenAid models with a sump chopper can get jammed by food debris, which forces the machine to recirculate dirty water. Clear the chopper blade if you notice performance issues. The third-rack jets are very small and require routine descaling.
Samsung
Samsung's linear-wash systems rely on strong water flow. If the inlet valve is restricted, the spray bar won't move properly. Keep the door gasket and dispenser clean to prevent residue buildup.
GE Profile
GE's ultra-fine filtration needs cleaning every 4-6 weeks. If your dishes are wet and dirty, the heating element may be coated in scale, affecting both drying and cleaning performance.
Whirlpool
Whirlpool models are reliable but sensitive to loading. Ensure tall items don't obstruct the spray arms. If your model has an exposed heating element, keep it clear of scale to ensure proper water heating.
What our techs see most often
Hard water is a common issue across the Pacific Northwest, from the rainy streets of Seattle to the drier climates in Spokane. In many of our service areas, mineral content is significantly higher than what standard dishwashers are calibrated for. We frequently respond to 'poor cleaning' calls that turn out to be nothing more than mineral-clogged spray jets. A simple vinegar soak and regular citric acid descaling can save you from an unnecessary service call and extend the life of your appliance by several years.
When to call a professional
- → You have completed descaling and filter cleaning, but performance remains poor
- → The water inlet valve has been replaced but the unit still underfills
- → The wash motor runs but there is no water pressure at the spray arms
- → You have an internal leak that you cannot locate
- → The heating element appears burned or broken
- → The control board is unresponsive or skips cycles
Dishwasher Maintenance & Replacement Tasks
Step-by-step guides for individual maintenance jobs related to this appliance.
How to Clean a Dishwasher Filter (All Brands)
How to Clean Dishwasher Spray Arms (Unclog the Jets)
How to Descale a Dishwasher with Vinegar or Citric Acid
How to Replace a Dishwasher Door Gasket
Frequently asked questions
Why are my dishes coming out with white film?
That film is mineral residue from hard water. Use a rinse aid to help water slide off dishes, and perform a citric-acid descaling cycle every two months to keep the machine clear of buildup.
Should I pre-rinse my dishes before loading?
No. Modern sensors need to detect food particles to determine the correct cycle intensity. Scrape off large chunks of food, but leave the rest for the machine.
How often should I clean my dishwasher filter?
At least once a month. If you use the dishwasher daily without scraping plates, clean it every two weeks to prevent dirty water recirculation.
My dishwasher is on a softened water line — do I still need to descale?
Yes, though less frequently. Mineral and detergent salts still accumulate over time. A vinegar cycle every four months is usually enough for homes with water softeners.
Is it cheaper to buy a new dishwasher than fix one that does not clean?
Usually, no. Simple repairs like replacing an inlet valve or a spray arm are much more affordable than purchasing and installing a new unit. We suggest repairs for machines under 12 years old.
Need a technician in WA or OR?
If the fix above does not work, A-Fix Service repairs dishwashers across Washington and Oregon. $90 diagnostic visit.
Related Repair Guides
Dishwasher Won't Drain: Clearing Standing Water
Finding a pool of gray water at the base of your dishwasher is a common headache for homeowners across the Pacific Northwest. Whether you live in rainy Seattle or deal with the hard water of Spokane, the culprit is often simple. Roughly 70% of these issues stem from a blocked filter or a clogged garbage disposal connection—repairs you can handle in under an hour without specialized equipment.
Dishwasher Leaking Water on the Floor: Causes and Fixes
Finding water pooling in front of your dishwasher is a stressful situation that demands quick attention, as every subsequent cycle can lead to worsening water damage in your home. Fortunately, the culprit is usually limited to five specific areas: the door gasket, improper door closure, the water inlet valve, hose connections, or the float assembly. You can typically identify the source in about 30 minutes, and most repairs are quite affordable, often requiring less than $50 in parts.
How to Clean a Dishwasher Filter (All Brands)
A blocked filter is the primary culprit behind filmy dishes and unpleasant smells. Follow this guide to remove and scrub your filter assembly to maintain optimal cleaning power and protect your drain pump.