
At a glance
Symptoms
- • Water pooling on the kitchen floor directly beneath the front of the dishwasher door.
- • Visible tears, cracks, or missing chunks in the rubber seal surrounding the dishwasher tub.
- • The gasket feels hard, brittle, or overly compressed instead of soft and pliable.
- • Steam escaping from the sides or top of the door during the high-heat wash or dry cycles.
- • The dishwasher door latch feels unusually loose or lacks resistance when closing.
- • Hard water scale buildup heavily encrusting the rubber, causing it to lose its sealing properties.
Common causes
- • Preventing costly water damage to custom cabinetry, baseboards, and hardwood flooring.
- • Maintaining energy efficiency by keeping steam and heat safely contained inside the tub.
- • Avoiding mold and mildew growth in the toe-kick area caused by slow, unnoticed, long-term leaks.
- • Counteracting the effects of hard water buildup, which is especially common in the Pacific Northwest and degrades rubber over time.
- • Restoring proper wash pressure, as a compromised seal can slightly reduce the internal pressure dynamics of the tub.
Safety First — Read Before You Start
- •Always unplug the dishwasher or flip the circuit breaker before starting; water and electricity are a dangerous combination.
- •Allow the dishwasher to cool completely if it recently ran a cycle. The interior tub and exposed heating elements can cause severe burns.
- •Be cautious of sharp metal edges along the stainless steel tub lip when pressing the new gasket into the channel.
- •Never use sharp tools to force the new gasket into place, as you can easily puncture the new rubber and ruin the seal.
- •If you notice any exposed wiring or electrical damage near the door latch while working, stop immediately and call a professional.
Tools & supplies you'll need
- Replacement OEM dishwasher door gasket ($15-$45)
- Needle-nose pliers
- Mild dish soap or warm water
- Soft cleaning cloth, sponge, or old toothbrush
- Hairdryer (optional, for softening the new gasket)
- Small flathead screwdriver (for gentle prying if needed)
Step-by-step instructions
Prepare the Appliance and Workspace
Prioritize safety by cutting power to the unit at the breaker or unplugging it from its power source. Open the door fully and pull out the bottom rack to clear your work zone. Wipe away any moisture or detergent residue from the tub edges to ensure a slip-free grip. Clearing the area will make the rest of the repair much smoother.
Tip: Lay a towel on the kitchen floor under the door to catch any stray drips or debris.
Examine and Remove the Old Gasket
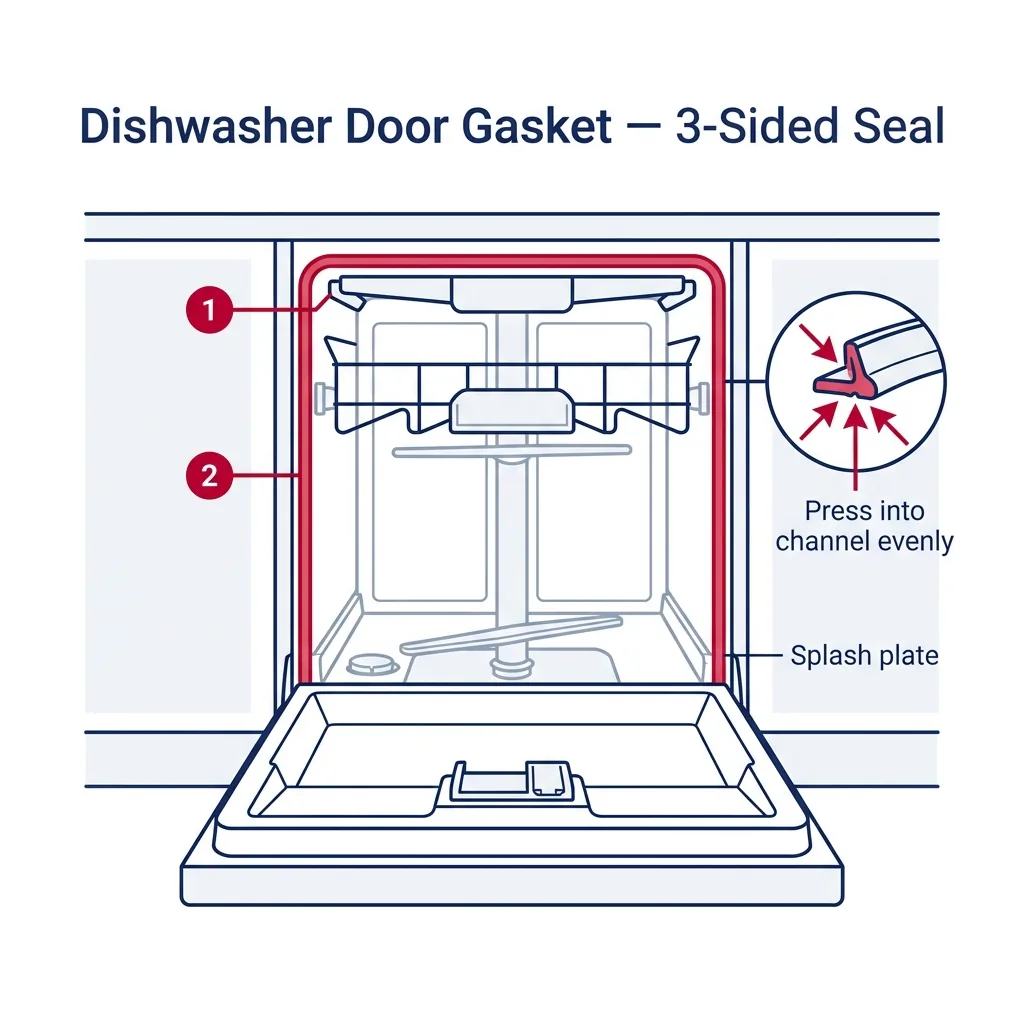
Observe how the current seal is positioned—specifically the orientation of the ribbed side and its termination points near the bottom. Most seals follow a U-shape, running up the sides and across the top. Use your fingers or needle-nose pliers to pull the old gasket from the channel, starting at one of the bottom ends and working your way around.
Tip: Avoid yanking the seal forcefully; if it is brittle, it may snap into small pieces that are harder to extract.
Thoroughly Clean the Gasket Channel
A clean channel is vital for a tight seal. In the Pacific Northwest, high mineral content in our water often leaves calcium deposits that prevent the seal from seating. Use a mixture of warm water and mild soap with a toothbrush or a cloth-wrapped screwdriver to scrub the track until it is spotless and dry.
Tip: Use a vinegar-dipped Q-tip to help dissolve stubborn hard water scale in the track.
Prepare the New Gasket for Installation
New gaskets often arrive folded or coiled, making them too stiff to install correctly. To restore flexibility, soak the seal in warm (not boiling) water for 15 minutes or gently warm it with a hairdryer. Once the rubber is pliable and the kinks are gone, wipe it completely dry before moving to the next step.
Tip: Confirm you have the exact OEM part number for your model, as universal seals rarely provide a sufficient fit.
Install the New Gasket (Starting at the Top Center)
Identify the midpoint of the gasket and press it firmly into the top center of the tub channel. Ensure the ribbed side faces the tub correctly. Work outward toward the corners and down the sides, pressing the seal into the track as you go. Do not pull or stretch the rubber during this process, as it will cause the seal to bunch up later.
Tip: Avoid stretching the gasket, as this leads to excess material at the bottom and gaps at the top corners.
Seat the Bottom Corners and Check the Fit
The gasket should terminate in the same location as the original—typically just above the bottom of the tub. Press these ends firmly into the track. Run your fingers along the entire length to ensure the seal is flush and ripple-free. If any section looks twisted or bulged, gently lift and reseat it without stretching.
Tip: Do not trim the gasket unless specifically instructed by your appliance manual; some designs account for extra length.
Test the Seal and Run a Cycle
Replace the bottom rack and close the door. It may feel tighter than before because the new rubber hasn't yet compressed, which is normal. Let it sit for a few hours if possible to allow the material to conform. Restore power and run a short rinse cycle while inspecting the perimeter with a flashlight to confirm no water or steam escapes.
Tip: The seal may require two or three hot wash cycles to fully break in and for the door latch to regain its normal feel.
Brand-specific notes
Some brands have known design quirks worth knowing about before you start.
Whirlpool & KitchenAid
These models feature a distinct ridge on the gasket; ensure it faces the tub. These parts are usually pre-cut, so if you have excess, you have stretched the material during installation.
Bosch
Bosch units often use two seals: the main tub gasket and a bottom sweep. If the main gasket replacement doesn't stop the leak, the bottom sweep—which requires door panel disassembly—is likely the issue.
GE
GE Profile and Cafe units may include a magnetic strip in the gasket. Pay attention to the orientation of the ribs. A tiny dab of soapy water can help if the gasket is difficult to slide into the groove.
Samsung
Samsung channels are notoriously tight. Avoid using tools to force the seal; instead, warm the gasket with a hairdryer and use soapy water to help it glide into place.
LG
LG gaskets often feature a colored mark to indicate the center, making installation easier. These seals can be sensitive to harsh chemicals, so use only mild soap for cleaning.
What our techs see most often
We receive frequent calls from homeowners in areas like Issaquah or the coast dealing with water-damaged floors. Often, it is just a $30 seal that has succumbed to the hard water common in the Pacific Northwest. It is a quick repair that can save you a service call fee.
When to call a professional
- → If replacing the seal doesn't stop the leak, as the door or hinges might be warped.
- → If the bottom door sweep needs replacing and you are uncomfortable disassembling the door panel.
- → If you see electrical damage or scorching near the latch.
- → If you have a panel-ready or integrated model that requires removing custom cabinetry.
- → If the mounting channel is rusted or damaged.
Related Dishwasher Troubleshooting
These troubleshooting guides cover problems this task can help solve.
Why Your Dishwasher Isn't Cleaning: A PNW Repair Guide
Dishwasher Door Won't Latch or Stays Stuck: Fix Guide
Dishwasher Won't Drain: Clearing Standing Water
Dishwasher Soap Dispenser Won't Open or Release
Tackling Dishwasher Odors: A PNW Homeowner’s Guide
Frequently asked questions
How much does a replacement dishwasher door gasket cost?
Genuine OEM gaskets run between $15 and $45. We recommend avoiding cheap universal parts, as they often fail quickly.
Why is my dishwasher door so hard to close after replacing the gasket?
This is normal. The new, thicker rubber needs a few hot cycles to compress and mold to your door.
Should I use glue or silicone sealant to hold the new gasket in place?
No. The gasket relies on friction. Adhesives make future repairs difficult and can prevent a proper seal.
Can I just tape or patch a torn gasket instead of replacing it?
No. The high heat and pressure inside the dishwasher will cause any tape or patch to fail immediately.
What is the difference between a tub gasket and a bottom door seal?
The tub gasket runs along the sides and top of the tub. The bottom seal is a separate piece on the door itself that often requires more involved disassembly to replace.
Need a technician in WA or OR?
If the fix above does not work, A-Fix Service repairs dishwashers across Washington and Oregon. $90 diagnostic visit.
Related Repair Guides
Dishwasher Leaking Water on the Floor: Causes and Fixes
Finding water pooling in front of your dishwasher is a stressful situation that demands quick attention, as every subsequent cycle can lead to worsening water damage in your home. Fortunately, the culprit is usually limited to five specific areas: the door gasket, improper door closure, the water inlet valve, hose connections, or the float assembly. You can typically identify the source in about 30 minutes, and most repairs are quite affordable, often requiring less than $50 in parts.
Dishwasher Door Won't Latch or Stays Stuck: Fix Guide
A dishwasher door that refuses to latch means your cycle won't start and your kitchen cleanup comes to a halt. In this guide, we will walk you through diagnosing and fixing a stubborn door, from clearing simple rack blockages to replacing a faulty latch assembly or tension spring.
How to Clean a Dishwasher Filter (All Brands)
A blocked filter is the primary culprit behind filmy dishes and unpleasant smells. Follow this guide to remove and scrub your filter assembly to maintain optimal cleaning power and protect your drain pump.