
At a glance
Symptoms
- • Clothes take more than one cycle to dry completely.
- • The top of the dryer or the laundry room feels unusually hot during operation.
- • Lint builds up heavily around the door seal or outside the lint screen area.
- • You notice a faint burning or dusty smell when the dryer is running.
- • The lint screen itself is physically difficult to push all the way back into its slot.
- • The dryer displays an airflow restriction error code (common on modern smart dryers).
Common causes
- • Prevents devastating house fires, as lint is highly combustible and can easily ignite if it reaches the heating element.
- • Reduces energy bills by shortening drying cycles and improving overall thermal efficiency.
- • Extends the life of the dryer's heating element, thermistors, and thermal fuses by preventing chronic overheating.
- • Prevents internal moisture buildup and rust, which is especially problematic for garage installations in humid coastal areas like Seattle or Tacoma.
Safety First — Read Before You Start
- •Always unplug the dryer from the wall outlet before removing any panels to completely eliminate the risk of electrical shock.
- •If you have a gas dryer, do not pull the unit away from the wall forcefully. Check the flexible gas line to ensure you aren't stretching or crimping it, which can cause dangerous gas leaks.
- •Wear heavy-duty work gloves when reaching inside the dryer cabinet. The internal stamped sheet metal edges are notoriously sharp and will easily slice bare hands.
- •Never use a leaf blower or compressed air to blow lint out from the inside. This forces highly flammable lint directly into the motor winding and heating element housings.
Tools & supplies you'll need
- Screwdriver set (Phillips and flathead)
- Putty knife or 5-in-1 painter's tool
- Shop-vac with a crevice attachment
- Flexible dryer lint brush (usually $10-$15 at hardware stores)
- Work gloves (leather or cut-resistant)
- Isopropyl rubbing alcohol and a microfiber cloth
Step-by-step instructions
Unplug the Dryer and Remove the Lint Screen
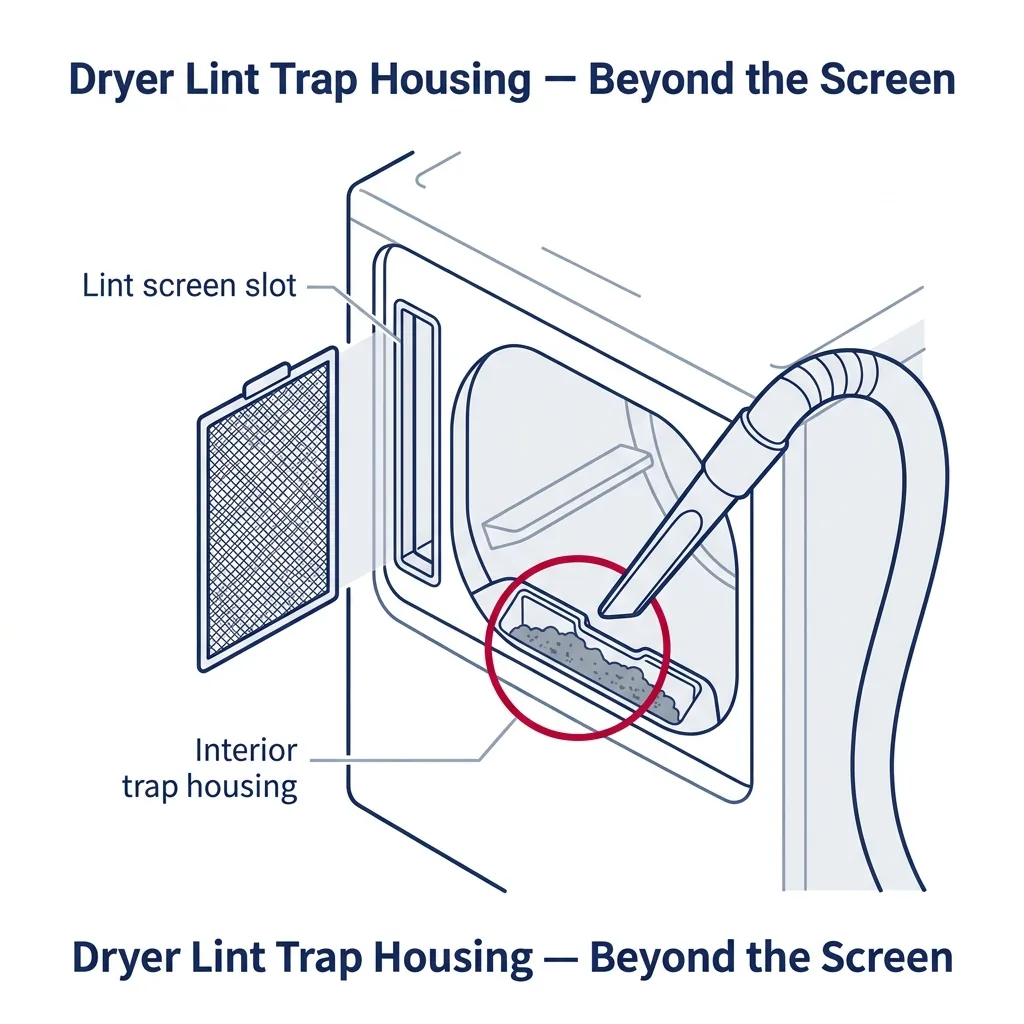
Start by fully disconnecting the machine from its power source. For electric units, remove the heavy-duty 240V cord; for gas units, disconnect the 120V plug. If you must shift the dryer, do so carefully to avoid stressing gas lines or vent connections. Pull the lint screen out entirely. Use this downtime to wash the mesh with warm, soapy water and a gentle brush to clear out waxy fabric softener residue, then let it dry completely.
Tip: If water beads up on the screen instead of passing through, it is clogged with softener residue. A thorough scrub with dish soap will restore proper airflow.
⚠ Warning: Never attempt this while the unit is plugged in. Even when inactive, the terminal block and internal switches carry dangerous voltage.
Release and Lift the Top Panel
Accessing the internal housing depends on your specific model. For many modern LG, Samsung, or Whirlpool front-loaders, remove the two or three screws located at the top rear, then slide the panel back and lift it away. For top-load units where the screen sits in the door, slide a putty knife into the gap between the front and top panels to release the internal spring clips. Once the clips pop, the top panel will hinge open; prop it securely against the wall.
Tip: Wrap your putty knife blade in masking tape to protect your dryer's finish from scratches while you disengage the clips.
⚠ Warning: Ensure the panel is propped securely so it does not fall while you are working inside.
Vacuum the Primary Lint Chute
With the housing exposed, use a shop vacuum with a crevice tool to reach deep into the lint screen slot. Extract all loose debris. Follow this by inserting a flexible lint brush into the chute, rotating it to snag and pull out stubborn lint clumps clinging to the interior walls. Repeat the vacuuming and brushing until the chute is clear.
Tip: Be cautious when inserting the brush. If you encounter resistance, stop immediately to avoid damaging the moisture sensors or thermistor wiring at the base.
⚠ Warning: Do not force the brush into the bottom of the housing.
Access and Clean the Blower Wheel Housing
For a thorough cleaning, you must reach the blower wheel. On front-lint-trap models, remove the front panel screws and carefully disconnect the door switch wiring. Remove the ducting that connects the drum to the blower motor. Use your vacuum and brush to clear the blower blades and surrounding cavity of compacted lint, which often resembles felt.
Tip: In PNW garages, temperature fluctuations often cause condensation. This moisture can turn lint into a sticky paste on the blower blades. A stiff nylon brush works best to scrub this buildup off.
⚠ Warning: Handle the ducting carefully and ensure all wiring harnesses are disconnected gently.
Clean the Moisture Sensors
Locate the moisture sensors—typically two curved metal strips near the lint housing or inside the front of the drum. These frequently get coated in a waxy film from laundry products, causing the dryer to terminate cycles prematurely. Clean them thoroughly with a microfiber cloth dampened with isopropyl alcohol until the metal is shiny and free of residue.
Tip: Keeping these sensors clean is the most effective way to ensure your 'Auto-Dry' cycles finish when the clothes are actually dry.
⚠ Warning: Use only isopropyl alcohol for cleaning these sensors.
Reassemble and Run a Test Cycle
Once everything is clean, reattach the ductwork, front panel, and top panel. Ensure all screws are tight and the door switch is reconnected. Slide the dry lint screen back into its slot. Plug the dryer back in and run a 10-minute 'Air Fluff' cycle to clear out any remaining dust through the vent.
Tip: Ensure all seals are tight during reassembly to maintain proper airflow.
⚠ Warning: If internal ducting is not sealed correctly, the dryer will draw in room air rather than air from the drum, which significantly degrades performance.
Brand-specific notes
Some brands have known design quirks worth knowing about before you start.
LG
Many newer LG dryers use a folding lint screen. Lint often slips past the hinge and collects on the moisture sensors. Vacuum this area frequently to avoid 'check filter' alerts.
Samsung
Samsung lint housings are located at the front. Deep cleaning requires removing the top panel, control console, and front panel to reach the blower housing and thermistor.
Whirlpool
On older 29-inch wide models, the lint chute is vertical and located at the back. You will need to remove the rear panel to access and vacuum the entire length of the chute.
GE
GE front-load dryers feature a plastic lint housing screwed into the bulkhead. Be careful not to strip these threads during reassembly, as a loose fit will cause air leaks.
Bosch
Common in Portland and Seattle condos, these ventless dryers require cleaning both the door filter and the base heat exchanger filter, as they do not exhaust to the outside.
What our techs see most often
During the rainy winter months here in the PNW, we see a surge in thermal fuse failures. Usually, this happens because garage-installed dryers have lint trap housings packed with damp, heavy lint, which causes the motor and heating system to struggle and overheat.
When to call a professional
- → You detect a gas odor when moving the unit.
- → You find scorched wiring, melted plastic, or burn marks inside the cabinet.
- → The dryer continues to overheat or blow fuses even after a deep clean.
- → The appliance is in a tight closet or stacked, making it unsafe for you to move.
- → You identify cracked or broken internal ducting that requires replacement.
Related Dryer Troubleshooting
These troubleshooting guides cover problems this task can help solve.
Dryer Drum Not Spinning: Troubleshooting and Repairs
Dryer Making Loud Noises: Identify Squeaks, Thumps, and Grinding
Dryer Not Heating: Troubleshooting and Repair
Dryer Overheating and Stopping Mid-Cycle: How to Fix
Dryer Takes Too Long to Dry: Troubleshooting Guide
Frequently asked questions
How often should I deep-clean the internal lint housing?
Once a year is standard for most homes. If you have pets or do heavy laundry loads, aim for twice a year to save on professional service fees.
Why is the lint inside my dryer slightly damp or sticky?
This is common in PNW garages due to condensation. When warm, moist air meets the cold metal of the vent, it creates a paste-like lint that sticks to the blower wheel.
Can I just use a leaf blower to blow the lint out from the front?
Never do this. A leaf blower pushes lint into the motor and onto the heating element, which creates a severe fire risk and will likely damage your motor.
What if my lint screen has a small rip in the mesh?
Replace the screen immediately. A damaged mesh lets lint bypass the trap, clogging the internal components and increasing fire danger.
How much does a professional dryer vent and internal cleaning cost?
In Washington and Oregon, expect to pay between $125 and $250, depending on the complexity of the unit and the accessibility of the vent.
Need a technician in WA or OR?
If the fix above does not work, A-Fix Service repairs dryers across Washington and Oregon. $90 diagnostic visit.
Related Repair Guides
Dryer Takes Too Long to Dry: Troubleshooting Guide
When your dryer runs but fails to dry clothes in a single cycle, the culprit is usually restricted airflow rather than a broken internal component. Buildup of lint, vent obstructions, or dirty moisture sensors are common triggers for slow drying in Pacific Northwest homes. Most of these issues are solvable in under 30 minutes without needing replacement parts.
Dryer Not Heating: Troubleshooting and Repair
If your dryer is spinning but failing to warm up, you are likely dealing with one of three culprits: a blocked exhaust vent, a tripped thermal fuse, or a failed heating component (electric element or gas igniter). A clogged vent is the most frequent issue and a major fire risk—restricted airflow is the primary cause of dryer-related house fires in the Pacific Northwest.
Dryer Overheating and Stopping Mid-Cycle: How to Fix
An overheating dryer is a serious fire hazard, not just a minor inconvenience. If your machine feels dangerously hot or shuts down during a cycle, use this guide to locate airflow blockages or failing thermal components.