
At a glance
Symptoms
- • Dryer powers on, control panel lights up, but pressing Start does nothing
- • You hear a humming sound from the motor but the drum does not turn
- • Drum spins by hand with no resistance (belt is broken or off the pulley)
- • Drum is hard to spin by hand or makes a thumping sound when turned
- • Loud rumbling, squealing, or thumping just before the drum stopped turning altogether
- • Burning rubber smell from the dryer (belt slipping on a frozen idler or roller)
Common causes
- • Broken drive belt — the most common cause, and audible: motor hums, drum free-spins by hand
- • Worn or seized idler-pulley tensioner — the spring-loaded pulley that keeps tension on the belt
- • Worn drum support rollers or front glides causing the motor to overheat and shut off on thermal overload
- • Failed drive motor (humming sound, no movement, motor hot to the touch and clicking on thermal protector)
- • Broken or misaligned door switch — the dryer thinks the door is open and refuses to start
- • Failed start switch on the control panel — push-to-start button is dead
- • Seized drum bearing on rear bulkhead (especially on Whirlpool 27" platforms) — drum binds against rear felt
- • Foreign object (coin, underwire bra) lodged between drum and front bulkhead, jamming the drum
Safety First — Read Before You Start
- •ALWAYS unplug the dryer before removing any panel. On gas dryers, also close the gas shutoff valve at the wall before pulling the front panel off — the gas line attaches near the burner assembly.
- •The drive motor and burner housing stay hot for 20-30 minutes after a cycle. Wait before reaching inside.
- •Dryers are awkward and front-heavy when the front panel is off. Have a partner stabilize the cabinet, or rest the drum on a folded blanket so it does not fall when the belt is slack.
- •Never bypass the door switch. The drum spinning at 50+ RPM with the door open can entangle hands or hair and cause serious injury.
- •Sharp edges inside the cabinet — wear gloves when reaching around the blower housing or rear bulkhead.
Tools & supplies you'll need
- Phillips and flat-head screwdrivers
- 1/4-inch and 5/16-inch nut drivers or socket set
- Putty knife or trim tool (for releasing top-panel clips on Whirlpool/Maytag platforms)
- Multimeter (for switch and motor continuity testing)
- Flashlight
- Channel-lock pliers
- Replacement drive belt (have on hand before starting — a $25 belt that fits 90% of 27" Whirlpool/Maytag dryers)
- Optional: drum-roller tool for Whirlpool platforms ($10) — saves 30 minutes of cursing
Step-by-step instructions
Quick triage: spin the drum by hand
Start by opening the dryer door and manually rotating the drum. The movement will help you narrow down the fault: (1) If the drum spins with no resistance, the drive belt has likely snapped. (2) If the drum feels gritty, makes thumping noises, or is difficult to initiate movement, the drum rollers or rear bearing are likely worn down. (3) If the drum is completely stuck, a foreign object like a stray coin or bra wire might be wedged in the bulkhead, or the rear bearing has seized. This quick assessment saves significant diagnostic time.
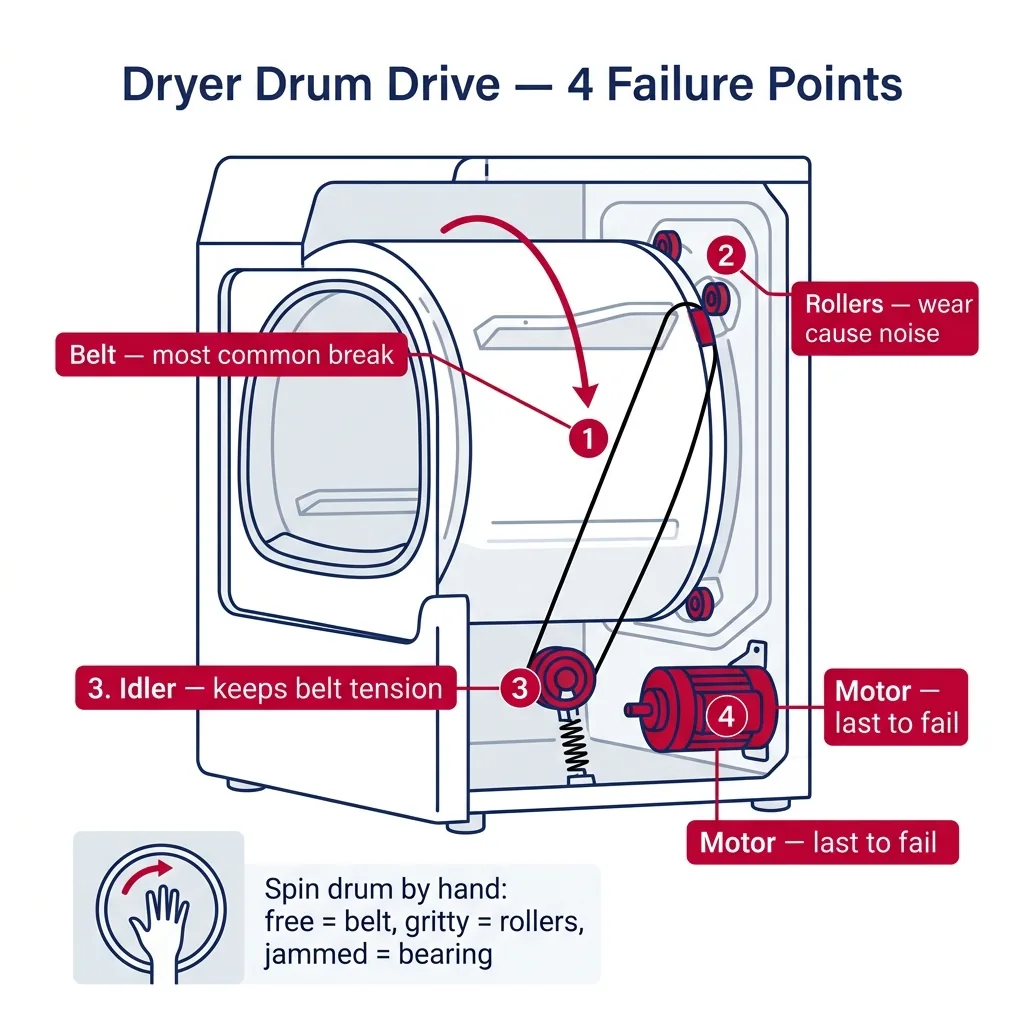
Tip: If you hear a clicking sound from the back when you press Start, that is the drive motor trying to engage but unable to start under load — most often a broken belt or seized idler.
Verify the door switch and start switch
Before taking the machine apart, confirm it is receiving the start signal. Open and firmly shut the door to ensure the switch plunger isn't stuck. If you hear a click, the switch is likely engaging. If there is no sound, unplug the unit, locate the switch—typically hidden behind the top panel—and check it for continuity with a multimeter. If faulty, these switches are inexpensive and simple to replace. While the top is off, verify the push-to-start button on your control panel as well; it should only show continuity while depressed.
Tip: On front-load dryers, the door is held closed by a magnetic strike, not a latch. If the strike on the door has fallen out (you'll see a small empty pocket where a magnet used to sit), the dryer will think the door is open. The magnet is a $5 part.
Open the cabinet to inspect the belt
For common 27" Whirlpool, Maytag, or Kenmore units, remove the lint trap and the two 1/4-inch screws within the lint chute. Use a putty knife to carefully release the clips at the front corners of the top panel. Disconnect the door switch wiring, remove the two front panel screws, and tilt the panel forward. Support the drum with a towel or have an assistant hold it while you inspect the belt, idler, and motor. For LG, Samsung, or GE models, you will typically access the internals by removing the rear panel screws.
Tip: On gas dryers, the gas line passes through the bottom rear of the cabinet. Be careful not to flex or kink it when shifting the cabinet around.
Replace the drive belt
If the belt has snapped, you will find it lying at the base of the unit or tangled around the motor shaft. This narrow belt wraps around the drum, motor pulley, and idler. To install the new one, loop it around the drum with the grooves facing inward. Snake the end underneath the idler pulley arm and around the motor pulley. Apply pressure to the idler arm to create slack, slip the belt over the motor pulley, and release the arm so the spring-loaded tensioner takes over. Rotate the drum manually a few times to ensure the belt is seated properly.
Tip: Most 27" Whirlpool/Maytag/Kenmore dryers from 1985 to today use the same belt: part number 341241 (also sold as 8066065). Buy two — they are cheap and the second one will save you a future service call.
Inspect the idler pulley and drum rollers
With the cabinet open, check the idler pulley; it should spin silently and smoothly. If it drags or wobbles, swap it out. Next, examine the two drum rollers on the rear bulkhead. They should rotate effortlessly. If they feel gritty or don't spin, replace them in pairs. Ignoring worn rollers puts excessive strain on the motor, which often leads to thermal overload—a frequent reason dryers stop working shortly after a belt replacement.
Tip: Do not just replace the belt and skip the idler/rollers. The most common reason a freshly-replaced belt breaks again within 90 days is a frozen idler that wears the new belt at one spot.
Test the drive motor (humming but not spinning)
If the belt and idler are in good shape but the motor hums without rotating the drum, the motor might be the issue. Unplug the dryer, take off the belt, and attempt to turn the motor pulley by hand. If it rotates freely without grinding, the issue is likely electrical, such as a faulty start capacitor or internal switch. If the pulley is seized, the motor must be replaced. Note that internal thermal protectors can stay open for a while after an overload; let the unit sit for an hour before deciding the motor is dead.
Tip: Before condemning the motor, check the thermal overload protector. After a stuck-belt event the motor's internal thermal switch can stay open for hours. Let the dryer sit unplugged for 60 minutes, then test again before buying a $150 motor.
Reassemble and test
Once you have installed the new belt, verified the idler, and confirmed the rollers are smooth, put the front panel back on. Reconnect the door switch, snap the top panel into place, and replace the lint chute screws. Plug the unit in, open any gas valves, and run a test cycle. The dryer should operate quietly. If you hear scraping or thumping, shut it down immediately to check for improper belt routing or misaligned panels.
Tip: A correctly running dryer makes a low rumble plus the motor hum. Squealing = idler bearing. Thumping every revolution = bad rear bearing or off-balance drum. Scraping = front glide worn through to metal contact.
Brand-specific notes
Some brands have known design quirks worth knowing about before you start.
Whirlpool / Maytag / Kenmore (27" platform)
These three brands share the same chassis and belt (P/N 341241). Front-access design — pop the top, remove front panel, and the entire drum lifts out. Drum rollers, idler, and belt are all visible at once. This is the easiest dryer to repair in the entire industry, and parts are universally available. If you do not own a 27" Whirlpool, this is the brand to buy next.
LG (DLE/DLG)
LG dryers use a different belt (P/N 4400EL2001A) and rear-access design. Pull the back panel; the motor and belt are visible there. LG drum bearings are notably long-lived but the drive motor itself fails more often than competitors — symptoms are humming with the belt off and a hot motor casing. LG's 10-year warranty does NOT cover belts or rollers but DOES cover the inverter direct-drive motor on some models — check before buying parts.
Samsung (DV series)
Samsung DV dryers are notorious for blower-wheel set screws coming loose and seizing the impeller, which then locks the motor and prevents drum rotation. Symptom: humming sound + drum will not turn, but the belt is intact. Pull the rear panel, check the blower wheel for play. A drop of thread locker on the set screw at install time prevents this entirely. Samsung also uses a ribbed multi-V belt rather than a flat belt — installation is fussier and the belt costs about $35.
GE Profile
GE dryers use a unique 'rear drum bearing' design where the entire drum is supported on a single rear shaft and bearing rather than two rollers. When that bearing fails, drum rotation gets stiff and the motor overloads. Replacement is a 90-minute job and the bearing kit runs about $50. Check by spinning the drum slowly by hand from cold — gritty resistance is the bearing. GE drive belts are also model-specific; bring the model number when ordering.
Maytag Bravos top-load
Bravos top-load dryers (the round-window pedestal style) have a different access path — the entire top hinges open like a clamshell. The belt routes around a much larger drum and there is a separate splutch (a clutch-like coupling) that wears over time. Replacement parts cost about double what a standard 27" dryer costs. If your Bravos is past 8 years old, weigh the cost of repair vs. replacement carefully.
What our techs see most often
For 27-inch Whirlpool, Maytag, Kenmore, and Amana models, our service vans are stocked with a comprehensive 'spin kit' containing a belt, idler pulley, drum rollers, and front glides—totaling roughly $70 in parts. We recommend replacing all these components simultaneously. While it might seem unnecessary to replace parts that haven't failed yet, these components experience similar wear cycles. Replacing them all at once prevents a return visit for a separate component failure just months later. LG and Samsung dryers often see motor failures more frequently than belt issues due to their design.
When to call a professional
- → You've replaced the belt and the new belt broke again within a few cycles (indicates a deeper alignment or rear-bearing issue)
- → The drum will not turn at all by hand (seized rear bearing or jammed foreign object) and you cannot identify what is locking it
- → The motor hums and is hot to the touch even with the belt removed (bad motor — replacement is $120+ and a 2-hour job)
- → Your dryer is a heat-pump or ventless condenser model where the drum is integrated with the heat-pump assembly
- → You smell burnt rubber and see scorched belt residue on the drum (high-friction failure that can damage the drum surface)
- → You are not comfortable removing the front panel of a gas dryer with the burner assembly attached
Dryer Maintenance & Replacement Tasks
Step-by-step guides for individual maintenance jobs related to this appliance.
How to Properly Clean a Dryer Exhaust Vent to Prevent Fires
Deep-Cleaning Your Dryer Lint Trap Housing: A Maintenance Guide
How to Replace a Dryer Drive Belt
How to Swap Out an Electric Dryer Heating Element
How to Replace a Dryer Thermal Fuse
Frequently asked questions
My dryer hums but the drum will not turn — what does that mean?
A hum without rotation almost always means the motor is trying to start but cannot overcome the load. Most common cause: broken or off-track drive belt (drum will spin freely by hand). Second most common: seized idler pulley or drum bearing creating too much friction (drum is hard to spin by hand). Third: failed motor start winding (motor pulley itself will not turn even with the belt off).
How much does it cost to replace a dryer drive belt?
DIY: the belt itself is $20-35 depending on brand. Tools you probably already have. Total time: 60-90 minutes for your first one. Professional repair: $150-220 including parts, labor, and diagnostic. We strongly recommend replacing the idler pulley and drum rollers at the same time — adds $40 in parts and 15 minutes of labor while you are already in there.
How long does a dryer drive belt last?
8-12 years on average for a Whirlpool/Maytag flat belt with normal use. Belts wear faster on dryers with bad idler pulleys (rough surface chews up the belt at one spot), overloaded dryers (excess strain), or units with worn drum rollers (the drum runs slightly off-axis and stresses the belt). When you replace a belt, replacing the idler at the same time roughly doubles the life of the new belt.
Is it safe to run a dryer with worn drum rollers for a few weeks?
Not really. Worn rollers make the motor work much harder, which causes the thermal overload protector inside the motor to trip more often, which weakens the motor windings over time. What started as a $30 roller job can become a $180 motor replacement if you ignore it for too long. The thumping and squealing sounds will also get progressively worse. Fix it the same week you notice the sound.
Can I replace just the belt without removing the entire front panel?
On Whirlpool/Maytag/Kenmore 27" dryers, no — the belt routes around the drum and the drum has to come out (or at least come forward) to install it. There is no shortcut. On LG and Samsung rear-access platforms, you can sometimes route a new belt without pulling the drum, but it is fiddly. Plan on a full disassembly your first time. The good news is that once the panels are off, the entire job takes 20 minutes.
Need a technician in WA or OR?
If the fix above does not work, A-Fix Service repairs dryers across Washington and Oregon. $90 diagnostic visit.
Related Repair Guides
Dryer Not Heating: Troubleshooting and Repair
If your dryer is spinning but failing to warm up, you are likely dealing with one of three culprits: a blocked exhaust vent, a tripped thermal fuse, or a failed heating component (electric element or gas igniter). A clogged vent is the most frequent issue and a major fire risk—restricted airflow is the primary cause of dryer-related house fires in the Pacific Northwest.
Dryer Takes Too Long to Dry: Troubleshooting Guide
When your dryer runs but fails to dry clothes in a single cycle, the culprit is usually restricted airflow rather than a broken internal component. Buildup of lint, vent obstructions, or dirty moisture sensors are common triggers for slow drying in Pacific Northwest homes. Most of these issues are solvable in under 30 minutes without needing replacement parts.
How to Properly Clean a Dryer Exhaust Vent to Prevent Fires
A blocked dryer vent is a major fire risk and the primary reason clothes stay damp after a cycle. This guide provides step-by-step instructions for scrubbing your exhaust duct from the dryer's rear port to the exterior wall cap.