
At a glance
Symptoms
- • Dryer turns on and tumbles but produces absolutely no heat (common in electric dryers)
- • Dryer is completely dead and won't start when you press the button (common in gas dryers and some electric models)
- • You've tested the heating element and thermostats, and they have continuity, but the dryer still fails to heat
- • The dryer shut off mid-cycle and now refuses to power back on
- • You recently noticed the dryer getting exceptionally hot on top before it stopped working entirely
Common causes
- • The thermal fuse is a one-time use safety device designed to break electrical continuity to prevent dryer fires
- • Clogged dryer vents (especially long runs in hillside the Pacific Northwest homes) cause severe heat buildup, tripping the fuse
- • Coastal humidity can cause lint to clump and stick to the exhaust duct, restricting airflow over time
- • A failed cycling thermostat can cause runaway heating, blowing the thermal fuse as a backup safety measure
- • Replacing the fuse without addressing the underlying airflow restriction guarantees the new fuse will blow immediately
Safety First — Read Before You Start
- •ELECTRICAL SHOCK HAZARD: Always unplug the dryer completely from the wall outlet before removing any panels.
- •FIRE HAZARD: Never bypass a blown thermal fuse to run the dryer. This safety device is the last line of defense against a house fire.
- •GAS HAZARD: If you have a gas dryer, be extremely careful not to stress, pull, or kink the flexible yellow gas supply line when moving the unit.
- •SHARP EDGES: The stamped metal inside a dryer cabinet is razor-sharp. Wear protective gloves when reaching inside the chassis.
Tools & supplies you'll need
- Digital Multimeter (for continuity testing)
- 1/4-inch and 5/16-inch nut drivers or socket set
- Phillips and flathead screwdrivers
- Putty knife (for popping top panels on some front-load models)
- Work gloves (dryer internals have sharp sheet metal edges)
- Dryer vent cleaning brush kit or shop vac
Step-by-step instructions
Disconnect Power and Gas
Safety is our priority. Pull the power plug from the wall. For gas models, find the shut-off valve behind the unit and rotate the handle so it sits at a 90-degree angle to the pipe. Carefully slide the dryer away from the wall, being cautious not to strain the gas line or crush the vent hose.
⚠ Warning: Never attempt to work on a dryer while it is plugged in. Even if the dryer appears 'dead,' 240V (electric) or 120V (gas) power is still present at the terminal block.
Access the Internal Components
Access methods vary by design. On traditional top-lint-filter units from brands like Whirlpool, Kenmore, or Maytag, use a 1/4-inch driver to pull the back panel. For front-loading units like Samsung, LG, or GE, you typically need to release the top panel by removing rear screws, then slide it back, pull the console, and remove the front face to reach the blower and heater.
⚠ Warning: Keep your screws organized in a tray, as mixing up machine screws and sheet metal screws can cause assembly issues later.
Locate the Thermal Fuse
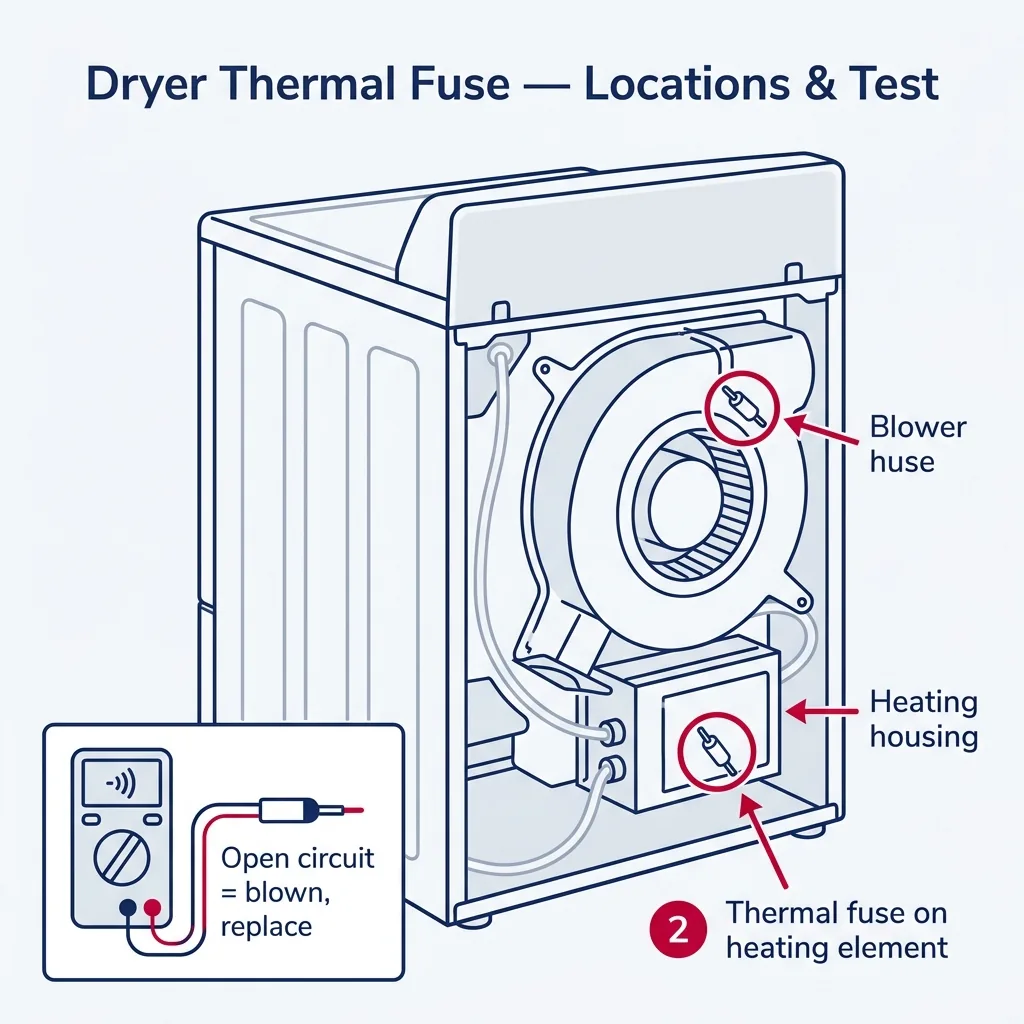
Look for a small, white plastic or silver metal component roughly an inch long, usually mounted on the blower wheel housing or the burner funnel/heating element assembly. It will have two wire terminals and is often positioned near the cycling or high-limit thermostat.
⚠ Warning: Snap a quick photo of the wiring before pulling the connectors so you remember exactly how to reconnect them.
Test the Thermal Fuse for Continuity
Set your multimeter to the continuity or lowest ohm setting. Unplug the two wires from the fuse terminals. Touch a probe to each terminal. If the meter stays silent or shows 'OL' (Open Loop), the fuse is blown. If you hear a beep or see a reading near zero, the fuse is still functional.
⚠ Warning: You must remove at least one wire from the fuse before testing. Testing the fuse with the wires attached can give a false reading by measuring the rest of the dryer's circuit.
Install the New Thermal Fuse
Undo the mounting screw to remove the dead fuse. Slide the new OEM replacement into place and secure it with the screw. Reconnect the wires, ensuring they fit tightly. If the spade connectors feel loose, use pliers to tighten them slightly before sliding them onto the new fuse.
⚠ Warning: Always use an OEM (Original Equipment Manufacturer) replacement part. Cheap aftermarket fuses are notorious for blowing prematurely or, worse, failing to blow when they should.
CRITICAL: Clean the Dryer Exhaust Vent
This is non-negotiable. A blown fuse indicates overheating caused by trapped lint. Disconnect the vent hose from both the wall and the machine. Use a vacuum or a vent brush kit to clear the entire path to the outside. Check the exterior flap to ensure it opens easily and isn't blocked.
⚠ Warning: If you replace the thermal fuse but leave a clogged vent in the wall, the brand new fuse will likely blow within the first 1-2 loads of laundry.
Reassemble and Test the Dryer
Put the panels back in their original spots. Reattach the vent, turn your gas supply back on, and plug the unit in. Run a 5-minute high-heat cycle without any laundry to confirm the drum turns and the exhaust air is heating up properly.
Brand-specific notes
Some brands have known design quirks worth knowing about before you start.
Whirlpool, Maytag & Kenmore
In the classic 29-inch wide models (lint filter on top), the thermal fuse is incredibly easy to reach by removing the rear panel. It's a small white plastic rectangle on the blower housing. These are the most DIY-friendly dryers on the market.
LG
Accessing the fuse usually requires taking off the top panel, control board, and front panel to reach the blower housing at the bottom front. LG electric dryers often have a resettable thermostat on the heater box, but the primary thermal fuse on the blower is a one-shot device that must be replaced.
Samsung
Similar to LG, you're going in from the front. Samsung thermal fuses are often mounted directly on the side of the heating element housing on the right side of the cabinet. Be careful with the drum belt and tensioner pulley when removing and reinstalling the front panel and drum.
GE
On newer GE models, you might find the thermal fuse on the heater assembly in the rear. Watch out for the sharp edges on GE cabinets—they are notorious for slicing fingers if you aren't wearing work gloves.
Bosch
Compact European dryers often have the thermal fuse integrated into the heating element assembly at the rear. You will need a set of Torx (T20) screwdrivers, rather than standard hex nut drivers, to access Bosch components.
What our techs see most often
Across Washington and Oregon, we frequently see this issue in condos or older homes where the dryer vent runs a long distance through the walls or roof. Customers often swap the fuse themselves but ignore the blocked vent, leading to a repeat failure within days.
When to call a professional
- → If you smell gas at any point during the repair process or cannot confidently reconnect the gas line.
- → If your dryer vent runs vertically into a wall or roof and you cannot verify that it is completely clear of lint.
- → If you've replaced the thermal fuse and it blows again immediately, which indicates a deeper airflow restriction or a shorted heating element.
- → If the wiring harness connecting to the thermal fuse looks melted, scorched, or the insulation is brittle.
- → If you cannot safely move the dryer out of its tight closet or alcove without straining the gas line or electrical cord.
Related Dryer Troubleshooting
These troubleshooting guides cover problems this task can help solve.
Dryer Drum Not Spinning: Troubleshooting and Repairs
Dryer Making Loud Noises: Identify Squeaks, Thumps, and Grinding
Dryer Not Heating: Troubleshooting and Repair
Dryer Overheating and Stopping Mid-Cycle: How to Fix
Dryer Takes Too Long to Dry: Troubleshooting Guide
Frequently asked questions
How much does a thermal fuse cost to replace?
The part itself is very inexpensive, usually ranging from $10 to $25 depending on the brand. If you hire a professional, expect to pay between $150 and $250 total for the part, labor, and a proper diagnostic to ensure the vent isn't the root cause.
Can I just bypass the thermal fuse temporarily to dry my clothes?
Absolutely not. Bypassing the thermal fuse removes the primary safety mechanism preventing the dryer from catching fire. Never run the dryer with a bypassed fuse, even for a single load. It is a severe fire hazard.
Why did my thermal fuse blow in the first place?
In about 95% of cases, a blown thermal fuse is caused by restricted airflow due to a clogged dryer vent. Coastal the Pacific Northwest humidity can make lint sticky, building up faster in the ductwork and trapping dangerous heat inside the machine.
Do I need to replace the thermostat when replacing the fuse?
Not necessarily, but many manufacturers sell the thermal fuse and cycling thermostat together as a $30-$45 kit. If your vent is completely clean and the fuse still blew, a faulty cycling thermostat that failed in the 'closed' position might be causing runaway heating.
How do I know if the fuse is blown without a multimeter?
You can't safely or accurately know without one. A blown thermal fuse looks identical to a working one; there is no visual indicator. A basic digital multimeter costs about $15-$20 at any hardware store and is essential for confirming the fuse lacks electrical continuity.
Need a technician in WA or OR?
If the fix above does not work, A-Fix Service repairs dryers across Washington and Oregon. $90 diagnostic visit.
Related Repair Guides
Dryer Not Heating: Troubleshooting and Repair
If your dryer is spinning but failing to warm up, you are likely dealing with one of three culprits: a blocked exhaust vent, a tripped thermal fuse, or a failed heating component (electric element or gas igniter). A clogged vent is the most frequent issue and a major fire risk—restricted airflow is the primary cause of dryer-related house fires in the Pacific Northwest.
Dryer Overheating and Stopping Mid-Cycle: How to Fix
An overheating dryer is a serious fire hazard, not just a minor inconvenience. If your machine feels dangerously hot or shuts down during a cycle, use this guide to locate airflow blockages or failing thermal components.
Dryer Won't Start: How to Diagnose and Fix
A dryer that refuses to start doesn't always need to be replaced. Use this guide to determine if you are dealing with a simple electrical issue, a door switch failure, or a tripped thermal fuse.