
At a glance
Symptoms
- • Drum spins normally but clothes stay cold and damp at the end of the cycle
- • Dryer runs for a full cycle but laundry is barely warmer than room temperature
- • You feel weak or no airflow at the exterior vent hood when the dryer is running
- • Burning, scorched, or hot-plastic smell during operation
- • Gas dryer cycles on but you never hear the burner whoosh-ignite
- • Lint builds up unusually fast in the lint screen, or the screen is hot to the touch
Common causes
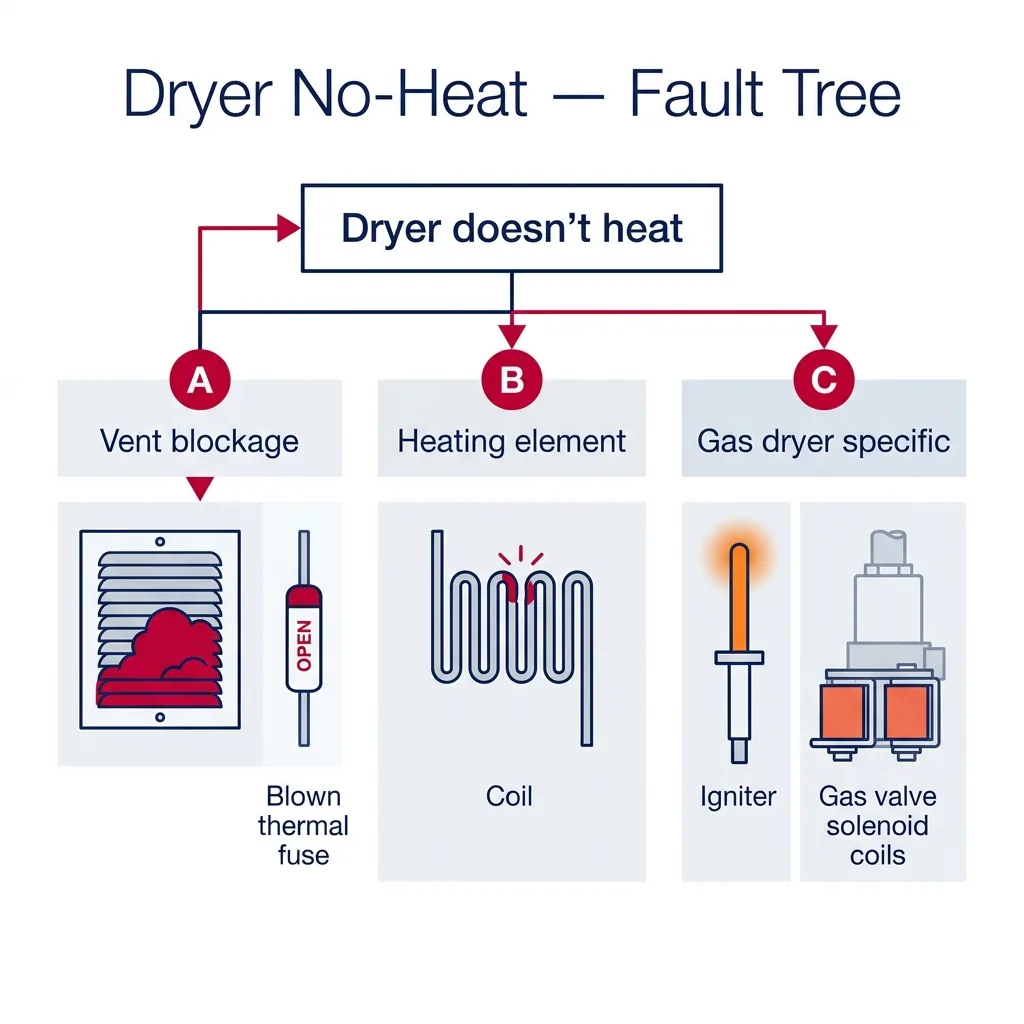
- • Clogged dryer vent restricting airflow and tripping the high-limit thermostat or thermal fuse
- • Blown thermal fuse — almost always a downstream symptom of a vent blockage, not a random failure
- • Failed heating element on electric dryers (open coil, sagging into the housing, or shorted to ground)
- • Bad igniter or gas-valve solenoid coils on gas dryers (igniter glows but valve never opens)
- • High-limit thermostat or cycling thermostat stuck open after an overheat event
- • Interrupted gas supply, closed shutoff valve, or empty propane tank on LP-converted dryers
- • Power-supply issue: only 120V instead of 240V reaching an electric dryer (one tripped breaker leg)
Safety First — Read Before You Start
- •ALWAYS unplug the dryer before removing any panel, and on hardwired models shut the breaker off and verify with a non-contact tester.
- •For gas dryers, close the gas shutoff valve at the wall before disconnecting any line near the burner assembly. After reconnecting, leak-test every joint with soapy water — never with an open flame.
- •Lint dust is highly flammable. Do not work near the burner assembly with a hot soldering iron, lit cigarette, or open flame, and vacuum lint out before any electrical testing.
- •A blown thermal fuse means the dryer overheated. Replacing it without clearing the vent will simply blow the new fuse, or worse, cause a fire next cycle. Always clean the vent first.
- •Heating elements and burner housings stay scalding hot for 20-30 minutes after a cycle. Let the unit cool before reaching inside.
Tools & supplies you'll need
- Phillips and flat-head screwdrivers
- 1/4-inch and 5/16-inch nut drivers or socket set
- Multimeter (continuity and 240V check)
- Vent-cleaning brush kit and shop vac (24-foot brush minimum)
- Flashlight
- Putty knife or trim tool to release the top panel clips
- Adjustable wrench (for gas-line shutoff and reconnection)
- Soap solution in a spray bottle for gas-leak test
Step-by-step instructions
Verify the lack of heat and check basic power
Run a 5-minute timed cycle on high heat with an empty machine. Check the outside vent hood; you should feel a robust, hot breeze within a minute. If the air is cool or weak, you have a heat issue. Ensure you haven't accidentally selected 'Air Fluff' and double-check your circuit breaker. Electric dryers require a full 240V. If one leg of your double-pole breaker trips, the motor will spin, but the heater will stay dead.
Tip: Use your multimeter at the wall outlet to check for 240V between the two hot pins. If you only see 120V, toggle your breaker fully to the 'OFF' position before flipping it back 'ON'.
⚠ Warning: Never operate your dryer without the lint filter; debris will clog your blower and internal components.
Clear the exhaust ducting
Pull your dryer away from the wall and disconnect the flexible hose. Vacuum out the lint trap cavity thoroughly. Use a long vent-cleaning brush to scrub the entire length of the rigid ducting out to the exterior hood. Check the outside flapper for bird nests or heavy lint buildup, which are common in coastal or wooded PNW areas. Use only metal foil tape to reconnect ducting; avoid standard duct tape, which loses its grip when it gets hot.
Tip: Keep your total vent run under 25 feet. Every 90-degree turn counts as 5 feet of resistance. If your vent is too long, consider a booster fan.
⚠ Warning: Never use thin plastic or white vinyl vent hoses. These are extreme fire hazards and violate building codes.
Check the thermal fuse
This safety component trips if the internal temperature exceeds 196°F. It is usually located near the blower housing. After unplugging the unit and removing the necessary access panel, look for a small cylindrical part with two wires. Test it with your multimeter; if you don't get continuity, it has blown and must be replaced. Only install a new fuse once the vent is completely clear.
Tip: Some models also feature a round, resettable high-limit thermostat. It is worth checking this while you are inside the cabinet.
⚠ Warning: Replacing a thermal fuse without fixing the airflow issue is a recipe for another immediate failure.
Inspect the electric heating element
The element is a wire coil mounted in a metal frame. With the power disconnected, remove the access panel. Test the coil with a multimeter; you should see between 8 and 30 ohms. If the circuit is open, the coil is broken. Also, check for continuity between the terminals and the metal housing; any reading here indicates a ground fault, which likely caused the thermal fuse to blow.
Tip: If you replace the element, swap out the high-limit thermostat on the housing as well, as it is likely fatigued.
⚠ Warning: A sagging coil touching the metal housing is a major fire hazard.
Evaluate gas dryer components
Observe the burner through the inspection port during a cycle. You should see the igniter glow bright orange, followed by the gas valve clicking open to create a flame. If the igniter glows but no flame appears, the solenoid coils are likely dead. If the igniter never glows, use your multimeter to check its resistance (50-400 ohms). An open reading indicates a failed igniter.
Tip: If the igniter and valve seem fine, the radiant flame sensor might be the culprit.
⚠ Warning: Always shut off the gas supply at the wall before touching any burner parts.
Test thermostats
If your dryer heats but quits prematurely, the cycling thermostat is likely failing. This component regulates the drum temperature. Check it for continuity while the unit is cool. The high-limit thermostat acts as a secondary safety and should be checked if the unit won't heat at all. Both are relatively inexpensive and should be replaced as a pair if one is faulty.
Tip: After repairs, use an infrared thermometer at the exterior vent. A reading between 130°F and 160°F is ideal.
⚠ Warning: Temperatures exceeding 180°F at the vent indicate your airflow is still restricted.
Final assembly and safety check
Put your panels back on and reconnect the vent hose. If you have a gas model, use a soapy water solution on all gas joints to check for bubbling, which indicates a leak. Run a test load with a damp towel to ensure the dryer is heating properly within 40-60 minutes.
Tip: Schedule a professional vent cleaning annually to keep your home safe and your dryer efficient.
⚠ Warning: Never use an open flame to check for gas leaks.
Brand-specific notes
Some brands have known design quirks worth knowing about before you start.
Whirlpool / Maytag (Duet, Cabrio, Bravos)
Whirlpool and Maytag share the same chassis on most modern dryers. The thermal fuse sits on the blower housing inside the cabinet — access from the front by removing the toe-kick and tilting the front panel down (two screws inside the lint chute). On gas Duets, the gas-valve solenoid coils (W10448876) fail predictably around year 8 and are a 15-minute swap.
LG (DLE/DLG and TrueSteam models)
LG dryers have a notoriously sensitive thermistor that throws a tE error before the unit will even attempt heat. On TrueSteam models, a clogged steam-water inlet screen can also block heat operation entirely — clean the screen behind the cold-water hose. LG's 10-year sealed-system warranty does NOT cover heating elements, but the inverter motor and compressor (heat-pump models) are usually covered.
Samsung (DV series)
Samsung DV series dryers commonly throw a heE or hE error when the heating element fails. The element ($60-90) and housing assembly are bolted together — replace as a unit. Samsung also uses a small ceramic thermistor next to the element that fails at the same time; replace both. The lint-trap housing on these traps lint deep behind the screen — vacuum it monthly or you will keep blowing thermal fuses.
GE Profile and GE front-load
GE dryers often use a different wiring scheme: the heating element is fed through a control board relay, so a "no heat" complaint can trace back to a stuck or fried relay on the main board, not the element itself. If your element tests good and thermostats are fine, listen for the relay click when heat is called — silence means board replacement (~$180) or board repair.
Electrolux / Frigidaire
Electrolux front-load dryers use a unique high-limit thermostat with a manual reset button on the back of the housing. Before replacing anything, push the small red button on the high-limit — if it clicks, you just fixed the dryer for free. This is the single most common Electrolux dryer call we close on the phone.
What our techs see most often
In the Pacific Northwest, we frequently see LG and Samsung dryers in tight, stacked closet installations. These setups often have long, convoluted vent runs that trap lint easily. We recommend keeping a vent brush kit handy. For Whirlpool gas models, the solenoid coils are a common failure point that we often see around the 8-year mark.
When to call a professional
- → You smell gas at any point during diagnosis (close the shutoff valve, ventilate, and call the gas company first, then a tech)
- → The breaker trips repeatedly when the dryer is plugged in or when heat is called
- → You've replaced the thermal fuse and it blows again within one or two cycles (indicates a serious airflow or element-grounding issue)
- → The vent run is inside a wall or attic and you cannot fully access it for cleaning
- → You are not comfortable opening the gas valve assembly or doing a soap-bubble leak test
- → The dryer is a stacked combo unit (washer/dryer combo) where the heat-pump or condenser is integrated and not user-serviceable
Dryer Maintenance & Replacement Tasks
Step-by-step guides for individual maintenance jobs related to this appliance.
How to Properly Clean a Dryer Exhaust Vent to Prevent Fires
Deep-Cleaning Your Dryer Lint Trap Housing: A Maintenance Guide
How to Replace a Dryer Drive Belt
How to Swap Out an Electric Dryer Heating Element
How to Replace a Dryer Thermal Fuse
Frequently asked questions
Why does my dryer get hot at first and then stop heating mid-cycle?
Classic symptom of restricted airflow. The cycling thermostat is doing its job — shutting off heat when the drum overheats — but the high-limit is on the edge of tripping. Clean the full vent run end-to-end before doing anything else. If the problem persists after a thorough vent cleaning, replace both the cycling and high-limit thermostats as a pair.
My electric dryer drum spins but produces no heat. Could it be the breaker?
Yes, this is one of the most common causes. Electric dryers need 240V (both legs of a double-pole breaker). If only one leg trips, the motor still gets 120V and the drum spins, but the heating element gets nothing. Reset the breaker fully (push firmly to OFF, then back to ON) and try again before tearing the dryer apart.
How much does it cost to fix a dryer that is not heating?
DIY part costs: thermal fuse $10-15, heating element $40-90, igniter $25-50, gas-valve coils $40-60. Professional repairs typically run $180-350 including parts and labor. At A-Fix we charge a $90 diagnostic fee that applies toward the repair, and 70% of no-heat calls finish in a single visit.
Is a clogged dryer vent really a fire hazard?
Yes — the U.S. Fire Administration attributes around 2,900 home fires every year to dryers, and lint accumulation in the vent and lint-trap housing is the leading cause. Clean the screen after every load, and clean the full vent run from the dryer to the exterior hood at least once a year. If you cannot remember the last time it was cleaned, do it before your next load.
Can I convert my natural-gas dryer to LP propane myself?
Most gas dryers ship with an LP conversion kit in the parts bag, and the procedure is documented in the manual. That said, we strongly recommend a licensed pro. An incorrect conversion can cause incomplete combustion (carbon monoxide) or a delayed-ignition flash. The labor cost is small compared to the safety cost of getting it wrong.
Need a technician in WA or OR?
If the fix above does not work, A-Fix Service repairs dryers across Washington and Oregon. $90 diagnostic visit.
Related Repair Guides
Dryer Takes Too Long to Dry: Troubleshooting Guide
When your dryer runs but fails to dry clothes in a single cycle, the culprit is usually restricted airflow rather than a broken internal component. Buildup of lint, vent obstructions, or dirty moisture sensors are common triggers for slow drying in Pacific Northwest homes. Most of these issues are solvable in under 30 minutes without needing replacement parts.
Dryer Drum Not Spinning: Troubleshooting and Repairs
If your dryer turns on and hums, or even produces heat, but the drum fails to rotate, you are likely dealing with a mechanical failure. Common culprits include a snapped drive belt, a locked idler pulley, or worn drum rollers. A broken drive belt accounts for over 50% of our service calls for this issue; since the part costs roughly $25, it is an incredibly cost-effective repair for homeowners in the Pacific Northwest.
How to Properly Clean a Dryer Exhaust Vent to Prevent Fires
A blocked dryer vent is a major fire risk and the primary reason clothes stay damp after a cycle. This guide provides step-by-step instructions for scrubbing your exhaust duct from the dryer's rear port to the exterior wall cap.