
At a glance
Symptoms
- • The dryer tumbles normally but produces absolutely no heat.
- • Clothes take multiple cycles to dry completely, coming out damp.
- • The dryer cabinet feels completely cold to the touch during operation.
- • Visual inspection shows a broken, charred, or separated coil on the element assembly.
- • A multimeter continuity test on the element terminals reads 'OL' (Open Loop) or infinite resistance.
Common causes
- • Restricted airflow from clogged vents (very common in older the Pacific Northwest hillside homes with long vent runs) causes the element to overheat and burn out.
- • Normal wear and tear over 5-10 years of expanding and contracting thermal cycles.
- • Power surges or frequent voltage fluctuations degrading the coil wire.
- • Running the dryer constantly with oversized loads, which traps heat inside the drum area.
- • Failure of the cycling thermostat or thermal cutoff, causing runaway heating that melts the element wire.
Safety First — Read Before You Start
- •Always completely unplug the dryer from the 240V wall outlet before starting. 240 volts is lethal.
- •Never bypass a blown thermal fuse or high-limit thermostat to make the element work; this is a severe fire hazard.
- •Wear thick work gloves when reaching into the dryer cabinet; interior sheet metal edges will easily slice your hands.
- •If you have a gas dryer, stop immediately. This guide is for electric dryers only. Gas burner assemblies require professional handling.
Tools & supplies you'll need
- Digital Multimeter (capable of measuring resistance/Ohms)
- 1/4-inch and 5/16-inch nut drivers or socket set
- Phillips and flathead screwdrivers
- Work gloves (stamped dryer cabinet edges are notoriously sharp)
- Needle-nose pliers
- Shop-vac or vacuum with a hose attachment (for lint removal)
Step-by-step instructions
Disconnect Power and Prep the Area
Begin by pulling the heavy 240V plug from its socket—do not skip this. Move the machine away from the wall to create space. If you are working in a cramped Seattle apartment closet or a tight garage corner, you may need to detach the exhaust ducting to gain access.
Tip: Snap a photo of the vent hose layout before removing it so you can reinstall it without kinks later.
Access the Heating Element Housing
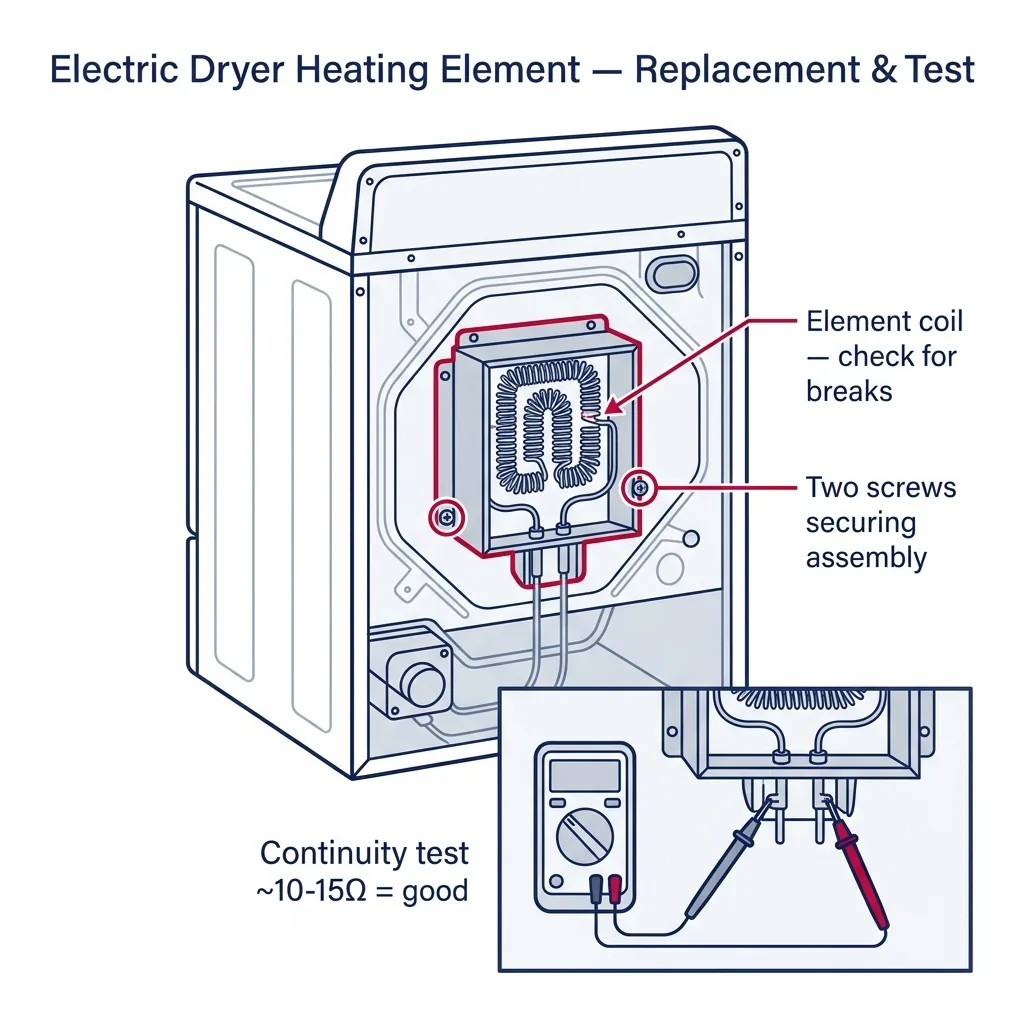
Your access method depends on your specific model. For standard Whirlpool or Maytag units, you can simply unscrew the rear panel's 1/4-inch hex screws to reveal the heater box. For Samsung, LG, and many GE front-loaders, you will need to disassemble the top panel, control console, and front cabinet to reach the heater tube located near the bottom.
Tip: Keep your hardware organized in a magnetic tray or labeled containers, as screw lengths often vary between panels.
Test the Old Element with a Multimeter
Verify the failure before taking things apart. Set your multimeter to the resistance (Ohms) setting or continuity mode. Detach the wires from the heating element terminals and place a probe on each terminal. A functional element should show 10 to 50 Ohms. If you see 'OL' or '1' on your screen, the coil is snapped and requires replacement.
Tip: Ensure your meter is set to the lowest Ohms scale for the most accurate reading.
Remove the Heating Element Assembly
Document the wiring layout with a photo. Use needle-nose pliers to disconnect the spade terminals by holding the metal base, not the wire itself. Extract the mounting screws holding the assembly to the frame and slide the unit out.
Tip: Use your vacuum to clear any lint buildup inside the cabinet and around the blower wheel while the assembly is removed to minimize fire risk.
Transfer Thermostats and Install the New Element
Check your new part. If you have a bare coil, you must thread it through the ceramic brackets of the old housing, though we suggest using a pre-assembled unit to prevent hot spots. Move any existing thermal cut-offs or thermostats to the new housing if they weren't pre-installed. Secure the assembly back into the machine.
Tip: Check that the new unit is seated correctly before tightening the mounting screws.
Reconnect Wires and Reassemble the Cabinet
Reattach the wire connectors firmly to the terminals using your previous photo as a guide. Connections must be tight to prevent electrical arcing. Reassemble the panels in the reverse order of removal, ensuring the door switch is properly reconnected if it was detached.
Tip: Wiggle the connectors to ensure they are fully seated and cannot vibrate loose.
Test Run and Vent Check
Reattach the exhaust, plug the dryer in, and slide it back. Run a 'High Heat' cycle for a few minutes. Check the interior for heat, then step outside to ensure the exhaust vent is pushing air effectively.
Tip: If the exterior vent flaps aren't opening, your ductwork is blocked and must be cleaned to prevent the new element from burning out immediately.
Brand-specific notes
Some brands have known design quirks worth knowing about before you start.
Whirlpool & Maytag
The classic 29-inch wide Whirlpool-built dryers have the easiest element to replace. Just remove the back panel (about 10-15 1/4-inch hex screws), and the tall, silver heater box is right there on the right side. OEM elements usually run $45-$65.
Samsung
To get to the element on most front-load matching Samsung dryers (like the DV42H series), you have to take off the top, the control board, the front panel, and often the front bulkhead. The element sits in a long tube on the bottom right. Watch out for sharp edges on the drum rollers when reaching in!
LG
Similar to Samsung, LG requires a full front teardown. Their elements are often sold as a complete heater assembly tube containing the element and thermostats, costing around $80-$130. Don't buy cheap aftermarket coils online; they tend to sag when hot and short against the metal housing within months.
GE
Many GE models have the element located behind the drum. You'll need to remove the top and front panels, and sometimes lift the drum out entirely to access the heater pan at the rear. GE OEM coils can be re-strung into the old pan, but buying the whole pan assembly saves an hour of frustrating, tedious work.
Electrolux & Frigidaire
These often use a dual-element system or a large circular heater located behind the rear bulkhead. They require removing the top, front, and drum. Make sure to check the thermal limiter mounted on the heater housing, as it almost always blows out at the exact same time the element shorts.
What our techs see most often
We see blown heating elements constantly here in the Pacific Northwest, and 80% of the time, the root cause is an exhaust vent packed with lint. If your dryer is stuffed into a tight condo closet in Bellevue or a dusty garage in the Valley, that element is going to overheat and snap if it can't breathe properly.
When to call a professional
- → If you have a gas dryer (never attempt to DIY gas valves, igniters, or burner tubes).
- → If your multimeter shows the heating element still has continuity, meaning the no-heat issue is likely a failed control board, timer, or motor centrifugal switch.
- → If the wiring harness connecting to the element is melted, charred, or fused to the terminal.
- → If you are uncomfortable moving a heavy appliance or working around 240V high-voltage electrical systems.
- → If your dryer is stacked on top of a washer in a tight closet and you cannot safely dismount the top unit yourself.
Related Dryer Troubleshooting
These troubleshooting guides cover problems this task can help solve.
Dryer Drum Not Spinning: Troubleshooting and Repairs
Dryer Making Loud Noises: Identify Squeaks, Thumps, and Grinding
Dryer Not Heating: Troubleshooting and Repair
Dryer Overheating and Stopping Mid-Cycle: How to Fix
Dryer Takes Too Long to Dry: Troubleshooting Guide
Frequently asked questions
How much does it cost to replace a dryer heating element?
If you DIY, the part costs between $30 and $150 depending on if you buy just the bare wire coil or the full OEM metal assembly. Hiring a professional typically costs $180 to $350 including parts, labor, and a warranty.
Can I just buy the coiled wire and re-string it myself?
Yes, re-stringing a bare coil is cheaper (often under $25), but we highly recommend buying the complete pre-strung assembly. Stretching the coil unevenly by hand creates 'hot spots' that will cause the wire to burn out again in a few weeks.
Why did my new heating element burn out after only a month?
The number one cause of premature element failure is poor airflow. If your house vent is clogged with lint, the heat cannot escape, tripping safety limits and eventually melting the new element wire. Always clean your wall vents when replacing an element!
Should I replace the thermostats while I'm replacing the element?
It's a very good idea. Many manufacturers sell a 'heater kit' that includes the element, high-limit thermostat, and thermal cut-off fuse for around $60-$90. Since a restricted vent often damages all three components, replacing them together ensures a reliable, long-lasting repair.
Need a technician in WA or OR?
If the fix above does not work, A-Fix Service repairs dryers across Washington and Oregon. $90 diagnostic visit.
Related Repair Guides
Dryer Not Heating: Troubleshooting and Repair
If your dryer is spinning but failing to warm up, you are likely dealing with one of three culprits: a blocked exhaust vent, a tripped thermal fuse, or a failed heating component (electric element or gas igniter). A clogged vent is the most frequent issue and a major fire risk—restricted airflow is the primary cause of dryer-related house fires in the Pacific Northwest.
Dryer Takes Too Long to Dry: Troubleshooting Guide
When your dryer runs but fails to dry clothes in a single cycle, the culprit is usually restricted airflow rather than a broken internal component. Buildup of lint, vent obstructions, or dirty moisture sensors are common triggers for slow drying in Pacific Northwest homes. Most of these issues are solvable in under 30 minutes without needing replacement parts.
How to Properly Clean a Dryer Exhaust Vent to Prevent Fires
A blocked dryer vent is a major fire risk and the primary reason clothes stay damp after a cycle. This guide provides step-by-step instructions for scrubbing your exhaust duct from the dryer's rear port to the exterior wall cap.