
At a glance
Symptoms
- • You hear the motor running and humming normally, but the drum stays completely still.
- • The drum spins far too easily by hand with absolutely no resistance.
- • A loud snapping, popping, or slapping sound occurred right before the dryer stopped tumbling.
- • Clothes are taking forever to dry because they aren't tumbling through the hot air.
- • You hear a repetitive thumping noise while it runs, indicating a frayed belt that is about to break.
Common causes
- • Restores the tumbling action essential for actually drying your clothes efficiently.
- • Prevents the heating element from overheating and burning out due to a lack of airflow through tumbling clothes.
- • Saves you from running the motor continuously under a zero-load condition, which can cause premature motor wear.
- • Allows you to deeply clean the cabinet interior and inspect the idler pulley and drum rollers while the machine is open, preventing future breakdowns.
Safety First — Read Before You Start
- •Always unplug the dryer from the wall receptacle before beginning. The 240V power in electric dryers is highly lethal.
- •If you have a gas dryer, turn off the gas supply valve before moving the unit. Do not over-stress or kink the flexible gas line.
- •The internal sheet metal edges of a dryer cabinet are incredibly sharp. Always wear heavy-duty work gloves when reaching inside, especially during the blind threading step.
- •If you have a stacked washer/dryer unit, have a helper available. Never attempt to unstack heavy appliances alone.
Tools & supplies you'll need
- Phillips and flathead screwdrivers
- 1/4-inch and 5/16-inch nut drivers or socket set
- Stiff putty knife (for popping top panel spring clips)
- Heavy-duty work gloves (dryer cabinet edges are razor sharp)
- Replacement drive belt (OEM recommended, usually $15-$35)
- Shop vacuum (for cleaning out lint while the cabinet is open)
- Headlamp or flashlight
Step-by-step instructions
Disconnect Power and Open the Top Panel
Start by pulling the plug from the wall outlet. Shut off the gas supply if your unit is gas-powered. Slide the dryer away from the wall to create workspace. For most modern units, the top lid must come off first. Pull out the lint screen if it is top-mounted. Insert your stiff putty knife into the gap between the front and top panels to release the spring clips located roughly 4 inches from each corner. Pivot the top panel upward and back. If your laundry area is in a chilly Pacific Northwest garage, work carefully, as cold plastic clips can become brittle and crack.
Tip: Use a piece of tape to secure the lid to the wall, or ask a helper to hold it so it doesn't fall while you work inside.
⚠ Warning: Never skip unplugging the machine. Even if the dryer is off, live voltage is present at the terminal block.
Remove the Front Panel and Door Switch
With the top panel open, locate the screws holding the front panel to the sides. Before detaching the panel, find the door switch wiring harness and disconnect it carefully. Once the wires are free, use your nut driver to back out the mounting screws. Pull the top of the front panel toward you, lift it off the lower clips, and set it aside. The drum will now be exposed and might shift downward, as it is no longer supported by the front bulkhead.
Tip: Snap a photo of the door switch wiring connection before you unplug it so you can match it up exactly during reassembly.
Remove the Old Belt and Vacuum the Interior
Extract the snapped belt from the cabinet. If the belt is still intact but slipped, simply slide it off the front of the drum. With the cabinet interior accessible, use a shop vacuum to clear out the lint and dust from the motor, base, and heater housing. Excess lint buildup is a major fire hazard and can cause the motor to overheat, which dries out the rubber belt and leads to premature failure.
Tip: Spin the idler pulley by hand. If it wobbles, grinds, or feels stiff, replace it now. A failing pulley will quickly ruin a new belt.
Position the New Drive Belt
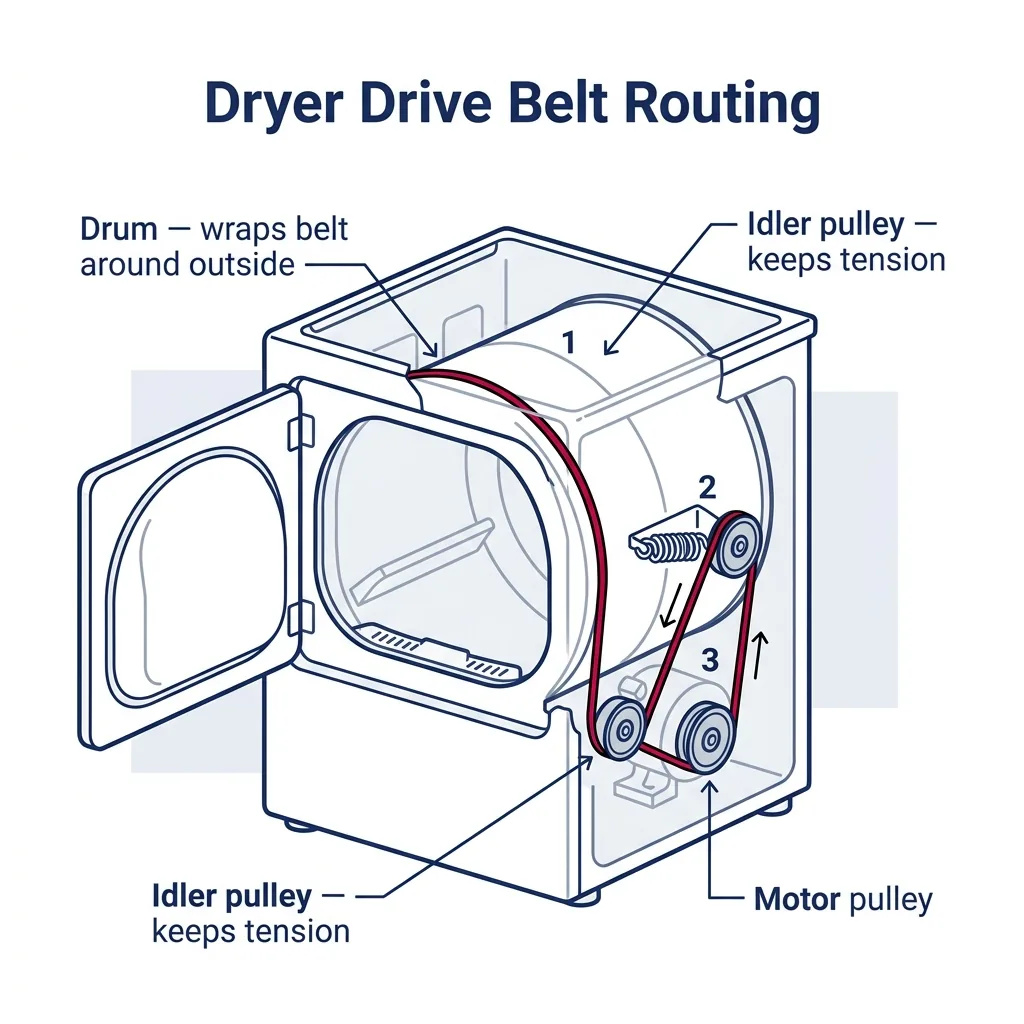
Loop the new belt over the front of the drum and center it. Look for a faint wear line on the drum surface to help you position the belt correctly. The grooved side of the belt must face the drum, while the smooth side points outward. If the drum fell off its rear rollers while you were working, lift it back into place now.
⚠ Warning: Installing the belt inside-out (smooth side against the drum) will cause severe slipping, burning rubber smells, and poor tumbling.
Thread the Belt Through the Idler Pulley
This is often a tactile process performed by feel. Reach under the drum to find the motor shaft and the spring-loaded idler pulley. Use your hand to push or pull the idler arm to release tension. Thread the belt under the idler wheel and then over the motor pulley in a zig-zag pattern. Carefully release the idler arm to allow the spring to pull the belt tight against the drum.
Tip: If you cannot visualize the path, look for a routing diagram sticker, which is frequently hidden on the back of the front panel or inside the cabinet.
Reassemble the Cabinet
Rotate the drum counter-clockwise by hand for two full turns to ensure the belt tracks correctly and isn't twisted. Replace the front panel by seating it on the bottom clips first. Plug the door switch harness back in and tighten the mounting screws. Close the top panel, pressing down on the front until the spring clips snap into place. Replace the lint filter.
⚠ Warning: Forgetting to reconnect the door switch is the most common DIY mistake. If you forget, the dryer will remain completely dead when you try to start it.
Test the Dryer
Plug the unit back in and turn on the gas supply if applicable. Ensure the drum is empty, then run a short cycle. The dryer should tumble smoothly and quietly. Let it run for two minutes to confirm the belt is tracking well and there are no squeaks or thumps.
Tip: If you hear a rhythmic thumping sound, the belt is likely twisted. Open the top panel, release the tension, and flatten the belt.
Brand-specific notes
Some brands have known design quirks worth knowing about before you start.
Whirlpool
On 29-inch Whirlpool and Maytag dryers (particularly those with the lint filter on the top panel), the belt threading is notoriously tricky. You'll need to reach under the drum completely blind to thread the idler pulley. Take a picture of the old setup if it's still intact before removing it.
Samsung
Samsung dryers often require removing the top control panel console before you can take off the front panel. Be very careful with the delicate ribbon cables connecting the user interface board to the main control—they tear easily and are expensive to replace.
LG
LG uses a very specific multi-ribbed belt. Make sure the grooved side is facing down against the drum. LG drums also rest heavily on the front bulkhead, so you might need to support the drum with your knee or a block of wood while threading the belt underneath.
GE
Older GE models have a unique setup where the front panel and sides are one continuous piece of sheet metal. This means you access the belt by removing the top and reaching down from above, or by pulling the entire drum out the front. Newer GE models follow standard front-panel removal.
Bosch
Bosch compact dryers (often found in PNW condos and apartments) are tightly packed. Replacing the belt usually means taking the entire side panels off, not just the front. Given their complex European engineering and tight clearances, take plenty of photos during disassembly.
What our techs see most often
Here in the Pacific Northwest, we see a huge spike in broken dryer belts during the winter months when families are washing heavier blankets and jeans. Overloading is the number one belt-killer we see out in the field—if you have to force the door shut, you're stressing that belt to its breaking point!
When to call a professional
- → You smell gas after reconnecting your gas dryer or feel unsure about the integrity of the flexible gas line.
- → The dryer is stacked in a tight laundry closet and cannot be safely unstacked without risk of injury or property damage.
- → You replace the belt, but the motor just hums loudly and trips the breaker (this indicates a seized motor, not just a belt issue).
- → The idler pulley bracket has sheared completely off the motor base plate, which requires welding or a full base replacement.
- → You are uncomfortable working blindly around sharp sheet metal to thread the motor pulley.
Related Dryer Troubleshooting
These troubleshooting guides cover problems this task can help solve.
Dryer Drum Not Spinning: Troubleshooting and Repairs
Dryer Making Loud Noises: Identify Squeaks, Thumps, and Grinding
Dryer Not Heating: Troubleshooting and Repair
Dryer Overheating and Stopping Mid-Cycle: How to Fix
Dryer Takes Too Long to Dry: Troubleshooting Guide
Frequently asked questions
How much does a replacement dryer belt cost?
OEM (Original Equipment Manufacturer) drive belts typically cost between $15 and $35. Generic aftermarket belts might be cheaper (around $10), but they tend to stretch and snap much faster under heavy loads. Always opt for the OEM belt for longevity.
How do I know if the belt is broken or if the motor is dead?
If you press start and hear the motor humming or running normally, but the drum isn't moving, the belt is likely broken. If you press start and hear absolutely nothing, or a loud buzzing followed immediately by a click, it's an electrical or motor issue.
Do I need to replace the idler pulley at the same time?
It's highly recommended. The idler pulley (usually a $15-$25 part) maintains tension on the belt. If the old pulley is stiff, squeaky, or has a worn bearing, the friction will burn through your brand new belt in a matter of weeks.
My new belt feels way too tight and won't reach the motor pulley. Did I buy the wrong one?
Dryer belts are meant to be under high tension. You have to push or pull the spring-loaded idler pulley quite far to get enough slack to loop the belt over the motor shaft. If it's still physically impossible after fully extending the idler arm, double-check your model number.
Which side of the belt goes against the drum?
The grooved or ribbed side of the belt should always face inward, gripping the drum. The smooth side faces outward. Installing it backward will result in severe slipping and a burning rubber smell.
Need a technician in WA or OR?
If the fix above does not work, A-Fix Service repairs dryers across Washington and Oregon. $90 diagnostic visit.
Related Repair Guides
Dryer Drum Not Spinning: Troubleshooting and Repairs
If your dryer turns on and hums, or even produces heat, but the drum fails to rotate, you are likely dealing with a mechanical failure. Common culprits include a snapped drive belt, a locked idler pulley, or worn drum rollers. A broken drive belt accounts for over 50% of our service calls for this issue; since the part costs roughly $25, it is an incredibly cost-effective repair for homeowners in the Pacific Northwest.
Dryer Making Loud Noises: Identify Squeaks, Thumps, and Grinding
Is your dryer sounding like a freight train or a flock of angry birds? Learn how to identify the source of squeaks, thumps, and grinding noises, and fix the underlying issues like worn rollers or a bad idler pulley.
How to Properly Clean a Dryer Exhaust Vent to Prevent Fires
A blocked dryer vent is a major fire risk and the primary reason clothes stay damp after a cycle. This guide provides step-by-step instructions for scrubbing your exhaust duct from the dryer's rear port to the exterior wall cap.