
At a glance
Symptoms
- • Visible blistering, pitting, or a clean break on the bottom heating element.
- • The oven fails to reach the set temperature or takes significantly longer to preheat.
- • Food is consistently undercooked on the bottom or bakes unevenly.
- • The element fails to glow a uniform red when the oven is set to bake.
- • Sparks, smoke, or a loud 'pop' occurred inside the oven during your last baking cycle.
Common causes
- • Restores proper baking temperatures so you don't ruin expensive groceries or holiday meals.
- • Prevents dangerous electrical shorts that can damage the main control board (a $300+ repair).
- • Avoids potential fire hazards from a compromised, sparking element inside the cavity.
- • Saves you $150 to $250 in professional labor costs for a highly accessible, beginner-friendly repair.
- • Ensures even heat distribution, which is critical for baking breads, cakes, and delicate pastries.
Safety First — Read Before You Start
- •Always turn off the dedicated 240V dual-breaker for the oven at your home's electrical panel before starting. Unplugging isn't always possible for built-in wall ovens.
- •Never rely solely on the oven's front control knob being 'Off'. 240V power is still present at the terminals and can be lethal.
- •Wait at least an hour if the oven was recently used; bake elements reach temperatures over 800°F and retain heat for a long time.
- •Do not let the terminal wires slip back into the rear insulation of the oven cavity, as retrieving them is extremely difficult.
- •If you see melted or burnt wire insulation at the terminals, do not proceed. High-temperature wire repair requires specialized ceramic nuts and fiberglass sleeving.
Tools & supplies you'll need
- 1/4-inch hex nut driver or Phillips head screwdriver
- Needle-nose pliers
- Non-contact voltage tester or multimeter
- Work light or headlamp
- Binder clips or clothespins (to secure wires)
- Replacement bake element (specific to your model, typically $25-$85)
Step-by-step instructions
Disconnect the Power
Head to your main electrical panel. If you are in an older home in the Pacific Northwest, you might find a subpanel in your garage or a secondary service box. Locate the double-pole breaker marked 'Oven' or 'Range'—usually 40 or 50 amps—and flip it to OFF. For freestanding ranges, pull the unit away from the wall and disconnect the 240V plug. To verify the power is gone, try turning the oven to 'Bake'; the display or heating cycle should remain completely silent.
Tip: Use a non-contact voltage tester on the wires once you reach them. 240V current is extremely dangerous.
⚠ Warning: Never skip this step. Electric ovens use 240 volts of electricity, which is highly dangerous. Turning off the oven display is not enough to cut power to the element.
Access and Inspect the Element
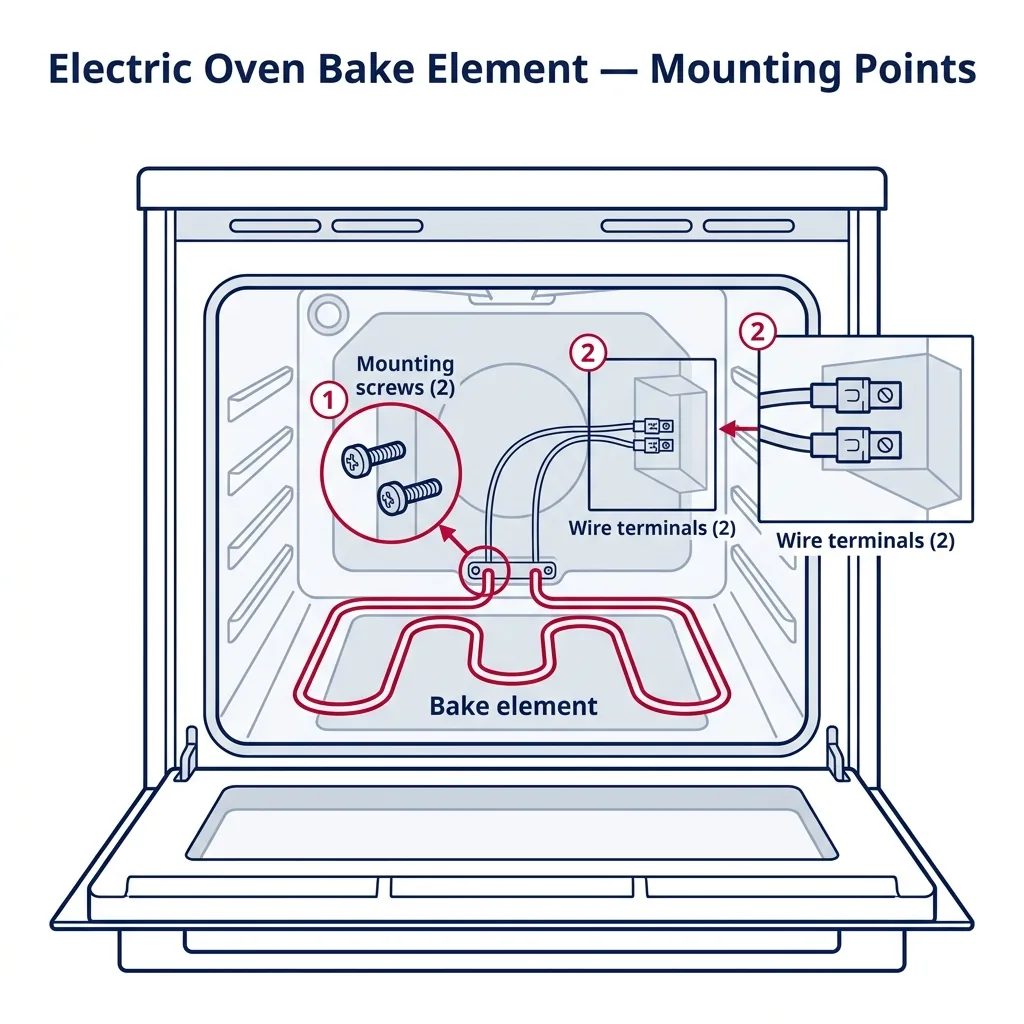
Open the door and pull out all racks to maximize your workspace. Use a headlamp or work light to get a clear view of the cavity's back wall. The bake element is the tubular metal coil on the bottom. Examine it for obvious damage: white blisters, deep pitting, or a physical break in the metal. If your unit features a 'hidden bake element' beneath the floor panel, you will need to unscrew and remove that panel first to reveal the coil.
Tip: Cover the open oven door with a towel. This protects the glass from accidental tool drops and makes leaning in much more comfortable.
Remove the Mounting Screws
The element is secured to the back wall by a metal bracket. You will see two screws holding this in place. Use a 1/4-inch hex nut driver or Phillips screwdriver to back these out. Some models have small support feet on the floor; check if those are screwed down as well. Keep your hardware in a magnetic tray so they don't get lost.
Tip: Magnetic drivers are a lifesaver here. Losing a screw into the gap behind the wall insulation will turn a quick task into a massive headache.
⚠ Warning: Do not pull the element out forcefully. The wiring attached to the back is often very short.
Carefully Disconnect the Wires
Slowly pull the element into the oven until you see the two wires connected via spade terminals. Stop pulling immediately. Use a binder clip or clothespin to secure each wire to the back wall so they don't retract into the insulation. Using needle-nose pliers, grasp the spade connector—not the wire itself—and gently wiggle it back and forth to slide it off the prong. Repeat this for the second wire.
Tip: If the connectors are stuck, wiggle them gently. Avoid pulling hard, as you don't want to damage the wire crimp.
⚠ Warning: Check the terminals. If the metal is brittle, heavily corroded—which we often see in humid coastal areas like Bellingham or Tacoma—or if the insulation looks charred, the terminals must be replaced before proceeding.
Connect the New Bake Element
Position your new element near the back wall. While holding the wires with your clips, slide the spade connectors onto the new prongs. They should fit snugly. A loose connection will cause arcing and heat damage, leading to another early failure. Once both are attached, remove the clips.
Tip: Before pushing the element in, ensure the wiring harness isn't twisted. Keeping the wires straight prevents unnecessary strain.
Mount the New Element
Carefully guide the element back into position, allowing the wires to tuck behind the wall. Align the mounting bracket with the holes and secure it with the screws. Tighten them firmly, but be careful not to strip the metal wall. Verify that the element's feet are resting level on the oven floor.
Tip: If the holes don't align perfectly, you can slightly adjust the mounting bracket on the new element with your hands.
Restore Power and Perform a Burn-Off
Close the door and return to your electrical panel to flip the breaker back on. Set the oven to 350°F. You will notice some light smoke and a burning scent; this is normal as the factory-applied protective oil burns off. Let it run for 15-20 minutes, then turn it off and put your racks back in.
Tip: Run your kitchen range hood or open a window to vent the smoke during this initial burn-off.
Brand-specific notes
Some brands have known design quirks worth knowing about before you start.
GE / Profile
Many modern GE and GE Profile ovens use a 'hidden bake element' located under the floor panel. You'll need to remove the two screws at the back of the floor pan, lift it from the rear, and slide it out to access the element.
Whirlpool / KitchenAid
The factory terminal connectors on these brands can be notoriously tight. Wiggle the spade connectors side-to-side gently with pliers; pulling straight back too hard can rip the wire right out of the terminal crimp.
Samsung
Samsung ranges are known for having very short wiring harnesses. If you pull the element forward and the wires barely clear the back wall, immediately clip a binder clip to the wires so they don't snap back into the insulation.
LG
Many newer LG ranges feature a brilliant blue porcelain interior. Be incredibly careful not to scratch this enamel with your tools or the metal feet of the new element while maneuvering it, as the porcelain can flake and degrade.
Frigidaire / Electrolux
These brands almost exclusively use a 1/4-inch hex head for the mounting bracket. Keep a magnetic nut driver handy, as the angle makes it very easy to drop a screw into the rear cavity.
What our techs see most often
We receive many calls during the holidays from Seattle to Spokane regarding ovens that 'popped' and stopped working. Usually, it's just a failed bake element that could have been replaced for a modest cost if the homeowner addressed the early warning signs.
When to call a professional
- → The wire terminals connecting to the element are melted, burnt, or severely corroded, requiring high-temperature wire splicing.
- → The wire accidentally slipped completely behind the back wall of a built-in wall oven, requiring the entire heavy unit to be uninstalled and pulled from the cabinet.
- → You have a gas oven. This guide is strictly for electric models; gas ovens require handling delicate hot surface igniters and safety gas valves.
- → Replacing the element doesn't fix the heating issue, which indicates a potential main control board or relay board failure.
- → You are uncomfortable verifying that the 240V power is safely disconnected at the breaker panel.
Related Oven Troubleshooting
These troubleshooting guides cover problems this task can help solve.
Oven Broiler Not Working: Causes and Fixes
Oven Won't Heat: Troubleshooting Gas and Electric Models in the PNW
Fixing an Oven That Won't Complete a Self-Clean Cycle
Oven Smoking: Identifying Causes and Solutions
Why Your Oven Bakes Unevenly: Professional Troubleshooting Guide
Frequently asked questions
How much does a replacement electric bake element cost?
Genuine OEM bake elements typically run between $35 and $85 depending on the brand and model. Generic universal elements might be as cheap as $20, but we highly recommend spending the extra money on an OEM part for proper fit, correct wattage, and longevity.
Can I still use my oven if the bake element is broken?
No. Even if your top broiler element still works, a broken bottom bake element often has exposed internal wiring. This poses a severe electrical shock and fire hazard. Leave the breaker off until the part is replaced.
Why did my bake element spark and catch fire?
As heating elements age, the outer metal sheath expands and contracts with every heat cycle. Eventually, it weakens and cracks, exposing the high-resistance inner wire to oxygen. This causes a bright spark, a loud pop, and sometimes brief flames before the wire completely burns out and breaks the circuit.
Do I need to recalibrate my oven after replacing the element?
Usually, no. A new OEM element should return your oven to its factory heating specifications. However, if you notice it's consistently running 15-20 degrees cool or hot after the repair, check your owner's manual for the simple keypad sequence to adjust the thermostat offset.
Is it normal for a brand new bake element to smoke?
Yes, absolutely. New elements have a protective oil coating applied at the factory to prevent rust during shipping. When you first turn it on, it will smoke slightly and smell like burning oil for about 10 to 20 minutes. Open a window or turn on your range hood until it clears.
Need a technician in WA or OR?
If the fix above does not work, A-Fix Service repairs ovens across Washington and Oregon. $90 diagnostic visit.
Related Repair Guides
Oven Won't Heat: Troubleshooting Gas and Electric Models in the PNW
When an oven powers on but fails to produce heat, it is one of the most frequent service calls we handle across Washington and Oregon. Whether you are dealing with the damp climate affecting electrical contacts in Seattle or hard water mineral buildup in Spokane, the diagnostic path differs significantly between gas and electric units. For electric ovens, a faulty bake element or sensor accounts for roughly 70% of issues. In gas models, a weak igniter is usually the culprit. Most repairs take 1-2 hours and cost between $30 and $180 for parts.
Oven Broiler Not Working: Causes and Fixes
When your broiler quits, searing a steak or finishing a casserole becomes a real headache. We break down the usual suspects—like failed gas igniters or burnt-out electric elements—to help you get your oven back in working order.
Why Your Oven Bakes Unevenly: Professional Troubleshooting Guide
If your cookies brown inconsistently, your cakes lose their shape, or your casseroles only bubble on one side, you are dealing with uneven oven heating. This common issue often stems from a failing convection fan, a drifting temperature sensor, a weak heating element, or simply how you load your pans. Most of these repairs can be completed in under an hour, and some require no parts at all.