
At a glance
Symptoms
- • Oven powers on and shows preheat but never reaches temperature
- • Oven runs but stays cold or only mildly warm
- • Bake mode does nothing, broil mode works (or vice versa)
- • Gas oven: igniter glows orange but burner never lights
- • Gas oven: no glow, no click, no flame at the burner tube
- • Electric oven: top half of the display lights but cooktop also dead (half-tripped 240V breaker)
- • F1, F2, F3, F7 error codes on the display
Common causes
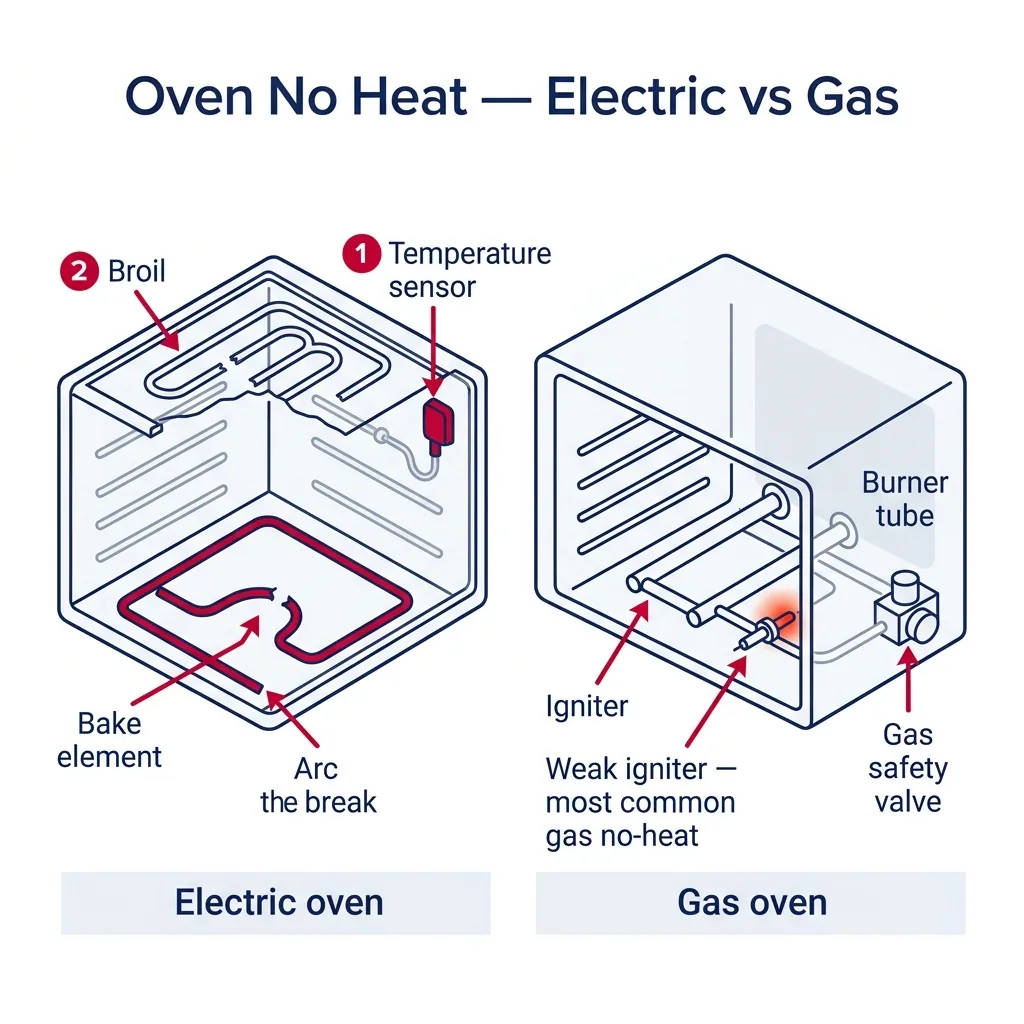
- • Electric: broken bake element (visible blister, burn-through, or open circuit)
- • Electric: failed broil element (broiler stops, bake sometimes still works)
- • Electric: drifted or open oven temperature sensor (most common cause of "won't reach temp")
- • Electric: failed thermostat / temperature limiter
- • Electric: blown thermal fuse (after a runaway temperature event)
- • Electric: half-tripped 240V breaker — one leg dead, control board lights but no heat
- • Electric: control board (ERC) failure — no relay click on bake call
- • Gas: weak or failed igniter (does not draw enough current to open the safety valve)
- • Gas: broken bake or broil burner tube (rust-through, cracked weld)
- • Gas: failed gas safety valve (rare — usually misdiagnosed igniter)
- • Gas: gas supply shut off, manual valve closed, or LP/natural-gas regulator issue
- • Gas: control board not energizing the igniter circuit
Safety First — Read Before You Start
- •ELECTRIC: Trip the dedicated 240V double-pole breaker before removing the back panel or any element. Test with a voltage pen — both legs must be dead.
- •GAS: Shut off the gas supply at the appliance shutoff valve before opening the bottom of the oven or replacing the igniter. Do not work on gas with the supply live.
- •NEVER bypass the gas safety valve. It exists to prevent unburned gas from filling your kitchen if the burner fails to light.
- •If you smell gas at any point, stop work, leave the gas supply off, ventilate the kitchen, and call your gas utility before continuing.
- •Heating elements are extremely hot for hours after use. Confirm cool-to-touch before reaching in.
- •On wall ovens or built-ins, do not pull the unit out unsupported — they are heavy and can tip; have a helper or use a furniture dolly.
Tools & supplies you'll need
- Multimeter with continuity and resistance modes
- Phillips and 1/4-inch nut driver
- Clamp meter (for measuring igniter current draw on gas models — the gold-standard test)
- Flashlight
- Replacement oven thermometer (independent of the oven's sensor) for sanity-check
- Cordless drill (for oven removal on some built-in models)
- Voltage tester or non-contact pen (for confirming 240V live legs at the breaker)
Step-by-step instructions
Identify whether it is gas or electric and verify power/gas supply
For electric units, check your main service panel for the 240V double-pole breaker labeled 'Range' or 'Oven'. Cycle it completely off then back on, as one leg can trip independently. Use a voltage tester at the rear terminal block to ensure both 120V legs are active. If you have a gas oven, verify the manual shutoff valve is fully open (handle in line with the piping) and confirm other gas appliances in your home are functioning; if your cooktop is also out, the problem is likely your main gas supply.
Tip: In many PNW homes, built-in ovens and cooktops share a breaker. A partially tripped breaker is a frequent 'no heat' culprit that often leads to unnecessary service calls.
⚠ Warning: Do not assume power is good just because the display turns on. The control electronics only require 120V, but heating requires both 120V legs.
ELECTRIC — visually inspect the bake and broil elements
With the power disconnected, inspect the bake element at the floor of the oven and the broil element at the top. Look for physical damage like blistering, holes, or visible insulation. During a test bake cycle, observe the bottom element; it should glow orange uniformly within 90 seconds. If only part of the element glows or it stays dark, it is likely faulty. Bake elements typically cost $30-90 and broil elements $40-110. Replacing them is a straightforward 10-minute task involving just two screws.
Tip: Replace damaged elements immediately. A failing element can short against the oven housing, potentially tripping your breaker or causing electrical arcing.
⚠ Warning: Always replace an element the moment you see a burn-through. Continuing to use it can short to the oven cavity and trip the breaker — or worse, arc to a rack.
ELECTRIC — multimeter-test the bake element, broil element, and sensor
Disconnect one wire from each element and test for resistance. A functional bake element usually shows 19-115 ohms, while a broil element typically reads 13-35 ohms. An 'OL' reading indicates an open, dead circuit. Next, check the temperature sensor (RTD) located at the back of the oven. It should read roughly 1080 ohms at room temperature. If it is open or far from this value, replace it ($25-55). Sensor drift is the primary reason an oven fails to reach the set temperature.
Tip: When in doubt, swap a $30 sensor before you spend hours chasing the control board. We do this preemptively on every 'low temperature' call.
⚠ Warning: Ensure power is fully disconnected before using your multimeter to check resistance.
ELECTRIC — check thermal fuse and thermostat
If your elements and sensor test correctly, inspect the thermal fuse on the back panel. After disconnecting power and removing the rear panel, locate the small, disc-shaped thermal fuse. Use your multimeter to check for continuity; if it is open, replace the fuse ($15-30). These fuses usually blow due to an overheating event, such as a self-clean cycle gone wrong. On older models with mechanical thermostats, the thermostat assembly itself ($60-130) may be the source of the failure.
Tip: Always investigate why a thermal fuse blew before assuming it was a random failure.
⚠ Warning: A repeatedly blowing thermal fuse means an underlying overheat issue (stuck relay, shorted element). Do not just keep replacing the fuse.
GAS — observe the igniter on a bake call
Remove the bottom panel if necessary to view the burner tube. Set the oven to 350°F and watch the igniter. It should glow bright orange-white within 90 seconds, followed by the gas valve opening. If it never glows, check the wiring or the control board signal. If it glows weakly or fails to trigger the gas valve, the igniter is likely aged and failing to draw the necessary 3.2-3.6 amps. Replacing the igniter ($40-110) is a common 30-minute fix.
Tip: A weak igniter test without a clamp meter: if the igniter takes more than 90 seconds to reach full orange, replace it. They go weak before they go fully open.
⚠ Warning: Never strike a match or lighter to 'help' the burner light. If the igniter is not opening the safety valve, no gas is flowing, and adding a flame is pointless. If gas is flowing but not igniting, an open flame causes a flash.
GAS — clamp-meter the igniter current draw
The most accurate test for a gas igniter is measuring current draw with a clamp meter while the oven is in a bake cycle. Carborundum igniters should draw 3.2-3.6 amps, while flat ceramic (Norton-style) units should draw 2.5-3.0 amps. If your reading is lower than these specs, the igniter lacks the strength to open the safety valve, even if it appears to glow. This is frequently misdiagnosed, so prioritize this test.
Tip: Igniters are the wear-out part of a gas oven. On most brands they last 4-8 years. If your oven is over 5 years old and showing intermittent ignition, just replace it.
⚠ Warning: Use caution when testing live circuits with a clamp meter.
Reassemble, calibrate, and verify with an independent thermometer
Once repairs are complete, test the oven by running it at 350°F for 30 minutes with an independent thermometer inside. It should be within 25°F of the set temperature. If it is off by more than that, use the oven's internal calibration settings (often found in the Settings menu) to adjust it. If the oven still fails to heat correctly after a new sensor, the control board may be the issue, though replacing a board on an older unit may not be cost-effective.
Tip: Always use a reliable analog or digital thermometer for this verification step.
⚠ Warning: Ensure all panels are properly secured before final operation.
Brand-specific notes
Some brands have known design quirks worth knowing about before you start.
GE Profile / Cafe
GE Profile and Cafe wall ovens often suffer from sensor drift after repeated self-clean cycles. If your oven reaches 250°F instead of 350°F, start by replacing the sensor. If that fails, the control board is the next most likely failure point on 2017-2021 models.
Whirlpool / KitchenAid
These gas models frequently use Norton flat ceramic igniters that degrade within 4-7 years. Often, the oven works fine in warmer months but struggles to ignite in the cold PNW winters. A new igniter usually solves this.
Samsung
Samsung NX, NE, and NV series have higher rates of control board failure. Codes like F1E1 or F1E2 usually indicate a board issue, though you should check the sensor and elements first, as Samsung boards sometimes throw false errors if a sensor is open.
LG
LG models often display F19 or F9 codes for heating faults. The sensor is located behind a rear cover plate. These units are very easy to calibrate through the digital menu once the sensor is replaced.
Frigidaire / Electrolux
On many Frigidaire electric models, the thermal fuse is located near the broil vent, causing it to trip during high-heat usage. If your oven stops heating after a heavy broil session, the fuse is likely the cause. Sometimes it needs to be relocated slightly to prevent repeat failures.
What our techs see most often
For gas ovens, clients often tell us the igniter glows, so the gas valve must be the problem. In reality, the igniter is almost always the culprit; it glows but fails to draw the current required to open the safety valve. We replace dozens of igniters monthly across our service area, while replacing a gas safety valve is an extremely rare occurrence.
When to call a professional
- → Gas smell at any point during diagnosis or repair — stop and call utility
- → Suspected gas safety valve failure (igniter is confirmed good with clamp meter, no gas flow)
- → Control board (ERC) replacement on a built-in or high-end unit — wiring is unforgiving
- → Wall oven that requires removal — these are heavy, often 100+ lbs, and tip easily
- → Repeatedly blowing thermal fuse despite element and sensor replacement — there is an underlying short
- → Burnt or melted wiring at the back terminal block (240V faults are not DIY territory)
- → Oven is under manufacturer warranty — DIY voids most coverages on heating components
Oven Maintenance & Replacement Tasks
Step-by-step guides for individual maintenance jobs related to this appliance.
Frequently asked questions
My oven preheats but never reaches the set temperature — what is wrong?
This is typically caused by a drifted temperature sensor. The sensor tells the board the oven is hotter than it actually is, causing the heat to cycle off too early. Replacing the sensor usually fixes this.
How do I know if my gas oven igniter needs replacing?
If it takes longer than 90 seconds to glow, or if it glows but the burner doesn't ignite, it is likely weak. A clamp meter test showing less than 3.2 amps confirms it needs replacement.
Is it safe to use my oven if only the bake or only the broil works?
You can use it temporarily, but you should repair it soon. A damaged element can short out and cause electrical issues or trip your home's breaker.
How much does it cost to fix an oven that is not heating?
Parts typically cost between $15 and $480 depending on the component (element, sensor, igniter, or board), with professional labor adding to that. Our $90 diagnostic fee at A-Fix is credited toward your repair.
Why does my oven heat but the food still comes out raw or undercooked?
This is almost always a calibration issue. Use an independent thermometer to verify the actual temperature. If it is consistently more than 25°F off, adjust the calibration in your oven's settings menu.
Need a technician in WA or OR?
If the fix above does not work, A-Fix Service repairs ovens across Washington and Oregon. $90 diagnostic visit.
Related Repair Guides
Why Your Oven Bakes Unevenly: Professional Troubleshooting Guide
If your cookies brown inconsistently, your cakes lose their shape, or your casseroles only bubble on one side, you are dealing with uneven oven heating. This common issue often stems from a failing convection fan, a drifting temperature sensor, a weak heating element, or simply how you load your pans. Most of these repairs can be completed in under an hour, and some require no parts at all.
Oven Broiler Not Working: Causes and Fixes
When your broiler quits, searing a steak or finishing a casserole becomes a real headache. We break down the usual suspects—like failed gas igniters or burnt-out electric elements—to help you get your oven back in working order.
How to Calibrate Your Oven Thermostat
Stop burning your cookies or serving undercooked roasts. Calibrating your oven's thermostat is a simple, no-tools-required tweak that ensures the temperature on your display matches the actual heat inside.