
At a glance
Symptoms
- • Cookies on the sheet brown more on one side than the other
- • Cakes rise lopsided or have a sunken corner
- • Top of dish browns long before bottom is cooked through
- • Convection mode no longer makes a noticeable difference
- • Independent oven thermometer disagrees with the displayed temperature by 30°F+
Common causes
- • Convection fan motor failed or running slow (convection ovens only)
- • Oven temperature sensor reading low — oven runs hotter than displayed
- • Weak bake element: still works but no longer reaching full wattage
- • Door gasket worn or torn, leaking heat from one side
- • Mis-calibrated thermostat (drift over years of use)
- • Cooking before the oven has fully heat-soaked (preheat pattern issue)
- • Cookware: dark-bottom pans absorb radiant heat unevenly vs. light pans
- • Oven not level — heat circulates unevenly, batter pools to one side
Safety First — Read Before You Start
- •Trip the oven's 240V breaker before removing any internal panels — even an "off" oven can have live elements.
- •On gas convection ovens, shut off the gas valve before pulling the convection fan housing.
- •Heating elements stay hot for at least an hour after use — verify cool to touch.
- •Use oven mitts when sliding in a thermometer or cookie sheet during a calibration test — door surfaces near the gasket reach 180°F+.
- •Do not adjust the calibration offset more than the manufacturer's allowed range (usually +/- 35°F). A larger discrepancy means a hardware problem, not a calibration problem.
Tools & supplies you'll need
- Independent oven thermometer (mercury or bimetal, around $10)
- Refrigerated tube of slice-and-bake cookies (the "cookie test")
- Phillips and 1/4-inch nut driver
- Multimeter (for sensor and element resistance)
- 4-foot bubble level
- Flashlight
Step-by-step instructions
Perform the 3-pack cookie test
This is the most effective way to pinpoint your heating issue. Grab a tube of refrigerated slice-and-bake cookies, place nine of them on a single sheet, and bake at 350°F according to the package. The resulting color pattern reveals the culprit: (a) evenly browned = your oven is fine, look at your cookware; (b) front darker than back = check the door gasket or floor leveling; (c) one side darker = convection fan issue or unlevel oven; (d) edges dark/center pale = weak bottom element; (e) all too pale = sensor drifted high; (f) all too dark = sensor drifted low.
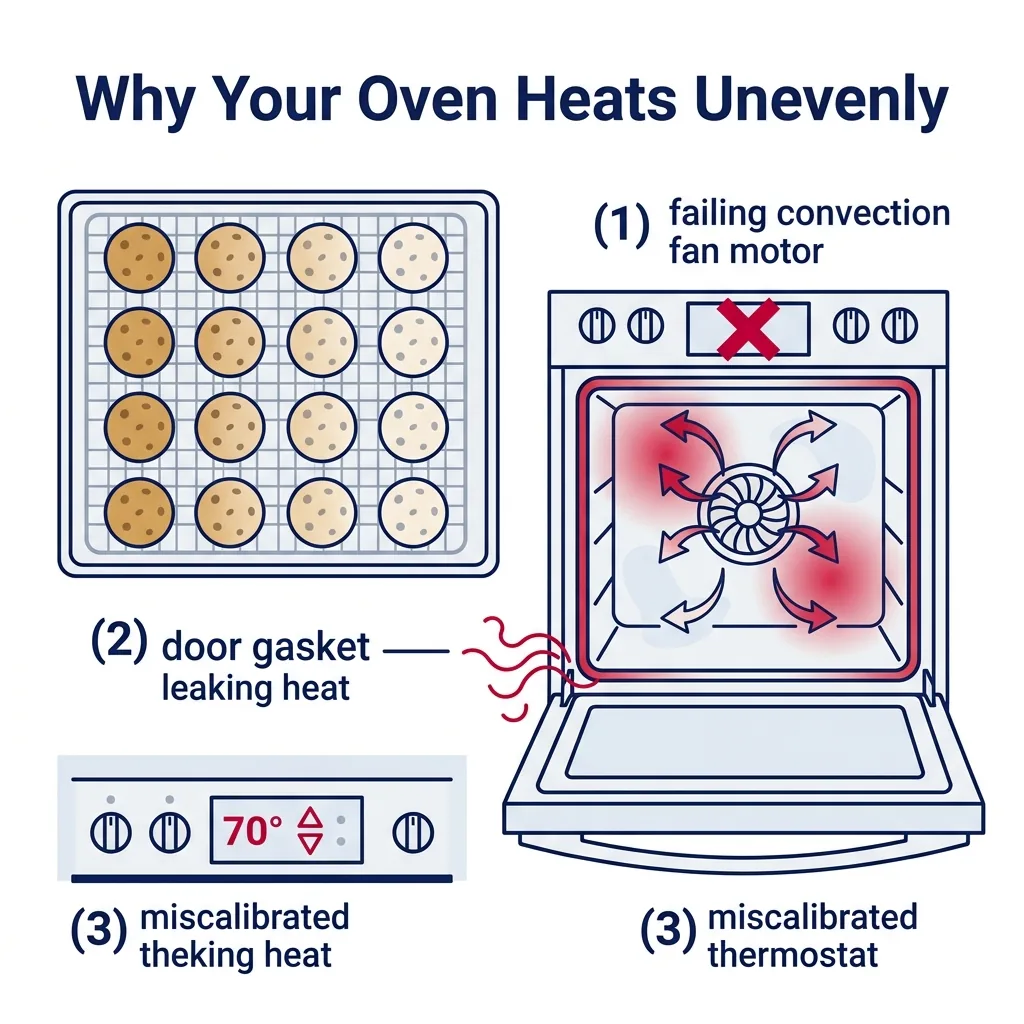
Tip: Snap a photo of the finished cookies to compare against the patterns above rather than relying on your memory.
Use an independent thermometer to verify heat
Place a reliable bimetal or mercury thermometer on the center rack and heat the oven to 350°F for 30 minutes. If the reading is within 25°F of your target, the oven is likely working as intended. If it deviates by more than 25°F, you are likely looking at a sensor or calibration error. Check both the top and bottom racks; a non-convection oven should naturally be 15-25°F hotter at the top. A difference exceeding 40°F indicates a weak element or airflow blockage.
Tip: Most home bakers start too early. Even if your oven beeps at 8 minutes, the interior walls remain cold. Give your oven an extra 10 minutes to soak up heat before putting your food inside.
Ensure your range is level
Use a 4-foot level on your center rack in both directions. If the bubble is off-center, your batter will settle unevenly and heat will circulate poorly. Adjust the leveling feet at the base of the range using a wrench. For wall ovens, you may need to add shims behind the frame to ensure the unit sits perfectly flat.
Tip: An unlevel oven is a common issue in older PNW homes where floors may have settled over time.
Inspect the convection fan
With the power disconnected, remove the back panel inside the oven to access the fan. It should spin freely by hand. If it feels stiff or grinds, the bearings are shot. Clean off any built-up grease, as this adds weight and slows the fan down. If the fan is silent or wobbles during operation, the motor needs replacing ($80-180). Check the hub nut on the motor shaft to ensure it hasn't vibrated loose, especially on Whirlpool or KitchenAid models.
Tip: True convection models feature a third heating element around the fan; check for signs of a break or burn-through while you have the panel open.
Test the bake element
A failing element might still heat up but struggle to maintain temperature. Look for physical blisters or burn marks. With the power off, use a multimeter to check the resistance; a healthy 3000-3500W element should read between 19-30 ohms. If it reads significantly higher, replace the part ($30-90).
Tip: If you see a specific spot on the element that has burned through, that area will create a localized hot zone that burns food directly above it.
Calibrate or replace the temperature sensor
If your thermometer test shows consistent hot or cold operation, use the oven's calibration menu to adjust the offset by up to 35°F. If the oven temperature is wildly inconsistent or exceeds the calibration range, the sensor itself is likely failing. Pull the sensor from the back of the cavity and check for a resistance of roughly 1080 ohms at room temperature. If it is out of spec, a new sensor ($25-55) is required.
Tip: Always reset your calibration to zero after installing a new sensor, as factory parts are typically very accurate.
Examine the door gasket for leaks
After running the oven at 400°F for 20 minutes, carefully check the perimeter of the door with your hand (keeping a safe distance). If you feel hot air escaping, the gasket may be brittle, or the hinges may be worn. A compromised seal is a frequent cause of uneven browning in coastal areas like Bellingham or Tacoma where humidity can affect materials over time. Replacement gaskets cost $35-90.
Tip: Avoid touching the glass, as it will be extremely hot during high-temperature testing.
Review your cookware and habits
Dark non-stick pans absorb heat much faster than light aluminum, which often leads to burnt bottoms. Try switching to lighter pans or dropping your oven temperature by 25°F when using dark bakeware. Ensure there is at least 2 inches of space around your pans for proper air circulation, and avoid covering racks with foil, which blocks airflow.
Tip: If your cookie test comes out perfect, your oven is working correctly—try adjusting your baking technique instead.
Brand-specific notes
Some brands have known design quirks worth knowing about before you start.
GE Profile / Cafe
These models often see convection motor torque loss after 6-9 years. If the fan is silent, it likely needs replacement ($90-160). Inspect the third convection element simultaneously.
KitchenAid
KOSC/KOSE models often experience sensor drift after 4-7 years. Use the +35°F calibration offset to compensate, but replace the sensor if it remains under-temp.
Samsung
Twin-element convection designs can fail on one side. If your bakes are only brown on the top or bottom, check if both convection rings are glowing during preheat.
LG
Door gaskets on LRE/LSE series often flatten by year 5-7. If you replace the gasket, allow about 50 cooking cycles for it to fully seat and seal.
Frigidaire / Electrolux
Hidden bake elements under the floor panel are common in these units. Replacing them requires removing the oven, so budget about 2 hours for this repair.
What our techs see most often
Many calls we receive in the Seattle area turn out to be simple habit adjustments rather than hardware failures. Customers often switch from an older range to a modern convection model without adjusting their timing, leading to burnt or uneven results. We always suggest the cookie test first, as it often saves the customer the cost of a service visit when the appliance is actually in perfect working order.
When to call a professional
- → Cookie test shows a clear pattern but you have replaced the sensor and element with no improvement
- → Convection fan replaced but convection still has no measurable effect
- → Calibration offset is at the maximum +/- 35°F and the oven still reads incorrect
- → Wall oven removal is needed for repair (heavy, two-person job)
- → Repeated bake element burnouts in a short time (suggests an underlying short or relay sticking)
- → Smoke or scorching from the convection fan housing
Oven Maintenance & Replacement Tasks
Step-by-step guides for individual maintenance jobs related to this appliance.
Frequently asked questions
Why are my cookies always darker on one side of the sheet?
Consistent browning on one side points to an airflow issue—either a failing convection fan, an unlevel oven, or a damaged heating element. If the dark spot moves, it is likely your pan placement.
My oven thermometer reads 25°F lower than the displayed temperature — is this a problem?
A 15-25°F variance is standard for residential ranges. Use the calibration offset menu to fix anything over 25°F after a full 30-minute heat soak.
Should I always preheat my oven longer than the beep tells me?
For delicate baking like cakes or pastries, adding 10-15 minutes of soak time after the beep ensures the oven walls are actually hot.
Does it matter if I use dark non-stick pans vs. light aluminum?
Yes, dark pans absorb significantly more heat. You may need to lower your oven temperature by 25°F when using them to avoid burning the bottom of your food.
How much does it cost to fix uneven oven heating?
Parts typically range from $25 to $180 depending on the component. At A-Fix, we credit our $90 diagnostic fee toward any completed repair.
Need a technician in WA or OR?
If the fix above does not work, A-Fix Service repairs ovens across Washington and Oregon. $90 diagnostic visit.
Related Repair Guides
Oven Won't Heat: Troubleshooting Gas and Electric Models in the PNW
When an oven powers on but fails to produce heat, it is one of the most frequent service calls we handle across Washington and Oregon. Whether you are dealing with the damp climate affecting electrical contacts in Seattle or hard water mineral buildup in Spokane, the diagnostic path differs significantly between gas and electric units. For electric ovens, a faulty bake element or sensor accounts for roughly 70% of issues. In gas models, a weak igniter is usually the culprit. Most repairs take 1-2 hours and cost between $30 and $180 for parts.
Oven Broiler Not Working: Causes and Fixes
When your broiler quits, searing a steak or finishing a casserole becomes a real headache. We break down the usual suspects—like failed gas igniters or burnt-out electric elements—to help you get your oven back in working order.
How to Calibrate Your Oven Thermostat
Stop burning your cookies or serving undercooked roasts. Calibrating your oven's thermostat is a simple, no-tools-required tweak that ensures the temperature on your display matches the actual heat inside.