
At a glance
Symptoms
- • Oven consistently runs 20-50 degrees hotter or cooler than the set temperature.
- • Baked goods are consistently undercooked or burnt on the outside and raw inside.
- • The oven control board displays an error code related to the RTD (Resistance Temperature Detector) sensor (e.g., F3, F4, C-21, or F30).
- • The oven takes an unusually long time to preheat or fails to reach the target temperature.
- • The sensor probe inside the oven shows visible signs of damage, burning, or cracking.
- • The oven shuts off randomly during the preheat cycle.
Common causes
- • A failed sensor sends incorrect resistance readings to the control board, ruining your baking precision.
- • Ignoring a drifting sensor can lead to wasted food and frustrating holiday meals.
- • A shorted sensor can occasionally cause the oven to overheat dangerously, risking damage to surrounding cabinetry.
- • Prolonged extreme temperature fluctuations can prematurely wear out your bake and broil elements.
- • Excessive use of the high-heat self-cleaning cycle degrades the sensor's internal wiring over time.
Safety First — Read Before You Start
- •Always disconnect power at the breaker panel or unplug the oven before starting. 240V power can be lethal.
- •If working on a gas oven, do not disturb the gas supply line. If you smell gas at any point, stop and call a professional.
- •Let the oven cool completely before reaching inside; the cavity and racks retain heat for hours.
- •Watch out for sharp sheet metal edges on the back panel if you need to pull the oven out.
- •Never bypass the temperature sensor to force the oven to heat; this removes a critical safety limit and can cause a fire.
Tools & supplies you'll need
- Digital Multimeter (capable of measuring Ohms/Resistance)
- 1/4-inch or 5/16-inch nut driver (depending on brand)
- Phillips-head screwdriver
- Work gloves (to protect against sharp sheet metal)
- Flashlight or headlamp
- Needle-nose pliers
- Binder clip or clothespin (to secure the wire harness)
Step-by-step instructions
Power Down and Prep the Workspace
Safety is the priority. For electric units, unplug the 240V power cable. If you have a hardwired wall oven, head to your breaker panel and switch off the double-pole breaker. Confirm the power is dead by checking the digital display or light. If you need to move a freestanding range to reach the back, do so with care. In PNW homes, ranges are often secured by anti-tip brackets; pull the unit straight out to detach it. Use a piece of cardboard to protect your kitchen floor from potential scratches.
Tip: Place cardboard or a mat under the oven's front feet before sliding it out to prevent damaging your flooring.
⚠ Warning: Do not rely on the display being blank. Always verify the power is disconnected at the source; 240V is dangerous.
Locate the RTD Sensor
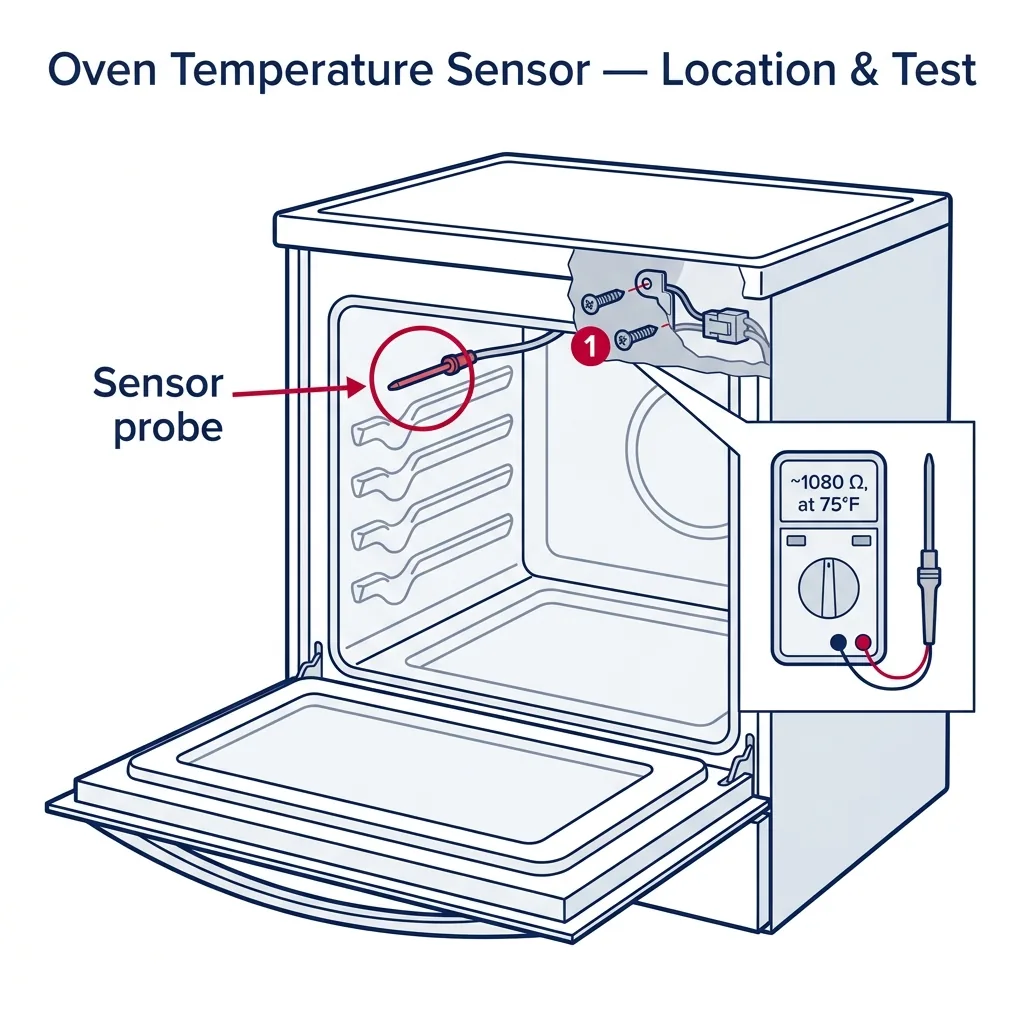
Open the door and inspect the interior. You are looking for a small, thin metal rod, roughly 3 to 4 inches long, usually anchored to the back wall in a corner. It is held in place by a small mounting plate and screws. Use your light to identify the screw type—usually a 1/4-inch hex head or a Phillips screw.
Tip: Pull the oven racks out entirely to give yourself more room to maneuver inside the oven.
Remove Mounting Hardware
Use the appropriate driver to undo the screws on the sensor's mounting plate. Keep a steady hand so the sensor doesn't drop as you release it. Once loose, pull it gently toward you until you see the wire harness connection. Be careful not to tug too hard, as the internal wiring can be delicate.
⚠ Warning: CRITICAL: Do not allow the wire harness to retract into the wall insulation. If it slips back, you will have to remove the oven's rear panel to retrieve it.
Secure the Harness and Unplug
As soon as the connector appears, clamp a binder clip or clothespin onto the wires just behind the plug to keep it from slipping back. Press the tab on the plastic Molex connector to release it, wiggling it gently until the old sensor comes free. Put the old part aside.
Tip: If the connector is grimy from years of cooking, use a little rubbing alcohol to clean it for a better grip.
Verify the Faulty Sensor
Before installing the new part, confirm the old one is bad using your multimeter. Set it to the 2k Ohm range. Probe the two metal pins in the connector. At a standard room temperature of 75°F, you should see about 1080-1100 Ohms. If your meter displays 'OL', zero, or a number wildly outside this range, the sensor has failed.
Tip: Remember that RTD resistance shifts by roughly 2 Ohms per degree Fahrenheit, so adjust your expectations if your kitchen is particularly cold.
Install the Replacement Sensor
Connect your new OEM sensor to the harness until you hear a clear click. Remove the binder clip and carefully guide the wiring back through the hole. Secure the mounting plate with the original screws. Ensure the sensor sits straight and is not touching the oven walls.
⚠ Warning: Ensure no wires are trapped between the sensor plate and the oven wall during installation, as this will cause an immediate short.
Restore Power and Test
Turn the breaker back on or plug the unit in. Run a test bake at 350°F to ensure it reaches temperature without error codes. If you have an oven thermometer, place it on the middle rack to verify accuracy. If the temp is slightly off, check your owner's manual for instructions on how to calibrate the control board offset by +/- 35 degrees.
Tip: Wait at least 10 minutes after the preheat chime before checking the temp with an oven thermometer to allow the cavity to fully stabilize.
Brand-specific notes
Some brands have known design quirks worth knowing about before you start.
Whirlpool
Some Whirlpool/KitchenAid units allow front access, but others require moving the oven and removing the rear panel if the harness is zip-tied inside.
GE
GE and GE Profile models often use a quick-disconnect plug in the cavity, making this a very quick fix. Use only OEM parts to match the resistance curves.
LG
LG sensors often have very short wires; be extra cautious not to let the harness slip back into the wall insulation.
Samsung
Samsung FlexDuo models feature two sensors due to the dual-zone design. Ensure you identify which specific sensor is failing based on your error code.
Bosch
Bosch sensors are often tucked deep into the chassis. Always use genuine Bosch parts, as aftermarket sensors may not be compatible with their control boards.
What our techs see most often
Across Washington and Oregon, we see a surge in oven temperature issues just before the big holiday feasts. Usually, a simple $20 sensor replacement is all it takes to get things back to normal, and it is a repair most homeowners can handle in under an hour.
When to call a professional
- → The harness slips into the wall and you cannot retrieve it.
- → You have a built-in oven that is too heavy or difficult to remove from the cabinetry.
- → You detect a gas leak or disturb the gas line while moving the range.
- → The old sensor tests within range (~1080 ohms), which suggests a more complex control board issue.
- → You see signs of scorched or melted wiring.
- → Your home has outdated electrical panels that won't reset properly.
Related Oven Troubleshooting
These troubleshooting guides cover problems this task can help solve.
Oven Broiler Not Working: Causes and Fixes
Oven Won't Heat: Troubleshooting Gas and Electric Models in the PNW
Fixing an Oven That Won't Complete a Self-Clean Cycle
Oven Smoking: Identifying Causes and Solutions
Why Your Oven Bakes Unevenly: Professional Troubleshooting Guide
Frequently asked questions
What is the cost of a replacement sensor?
Parts typically run between $15 and $40. We strongly recommend sticking to OEM parts to ensure the correct resistance curve for your control board.
Can I bypass the sensor?
No. The sensor is a vital safety component. Bypassing it can lead to the oven failing to heat, overheating, or even a fire.
What should the multimeter reading be?
At 75°F, it should read roughly 1080 to 1100 Ohms. 'OL' or zero indicate a failed sensor.
Do I have to pull the oven out?
Usually, no. Most modern ranges allow you to perform the work entirely from the inside, provided the wire harness is accessible.
What if the oven still bakes unevenly after the fix?
Try calibrating the control board offset. If that fails, the issue could be the bake element, a relay, or a worn door gasket.
Need a technician in WA or OR?
If the fix above does not work, A-Fix Service repairs ovens across Washington and Oregon. $90 diagnostic visit.
Related Repair Guides
Why Your Oven Bakes Unevenly: Professional Troubleshooting Guide
If your cookies brown inconsistently, your cakes lose their shape, or your casseroles only bubble on one side, you are dealing with uneven oven heating. This common issue often stems from a failing convection fan, a drifting temperature sensor, a weak heating element, or simply how you load your pans. Most of these repairs can be completed in under an hour, and some require no parts at all.
Oven Won't Heat: Troubleshooting Gas and Electric Models in the PNW
When an oven powers on but fails to produce heat, it is one of the most frequent service calls we handle across Washington and Oregon. Whether you are dealing with the damp climate affecting electrical contacts in Seattle or hard water mineral buildup in Spokane, the diagnostic path differs significantly between gas and electric units. For electric ovens, a faulty bake element or sensor accounts for roughly 70% of issues. In gas models, a weak igniter is usually the culprit. Most repairs take 1-2 hours and cost between $30 and $180 for parts.
Oven Broiler Not Working: Causes and Fixes
When your broiler quits, searing a steak or finishing a casserole becomes a real headache. We break down the usual suspects—like failed gas igniters or burnt-out electric elements—to help you get your oven back in working order.