
At a glance
Symptoms
- • Visible yellow or brown sticky residue coating the metal mesh
- • Smoke lingering in the kitchen even with the exhaust fan on high
- • Unpleasant, stale cooking odors lingering in the home for days
- • Grease droplets forming on the hood and dripping onto your stovetop
- • Fan motor sounds like it is straining, whining, or working harder than usual
- • It has been more than a month since you last cleaned it (especially if you cook with oil frequently)
Common causes
- • Prevents dangerous grease fires from igniting over high-heat burners
- • Protects the fan motor from burning out due to restricted airflow (saving a $150-$300 repair)
- • Maintains indoor air quality, which is essential in tightly sealed modern the Pacific Northwest homes
- • Stops greasy, sticky residue from coating your kitchen cabinets, walls, and ceilings
- • Improves the efficiency of your HVAC system by properly exhausting excess cooking heat and steam
- • Extends the life of secondary charcoal filters in ductless (recirculating) range hood setups
Safety First — Read Before You Start
- •Turn off the range hood fan and lights before removing the filters to prevent injury from spinning blower blades or burns from hot halogen bulbs.
- •Allow the stove, hood, and filters to cool completely if you have just finished cooking before attempting removal.
- •Never operate the range hood without the grease filters installed; airborne grease will get sucked directly into the blower motor and ductwork, creating a major fire hazard.
- •If using heavy-duty chemical degreasers, ensure adequate ventilation in your kitchen and wear protective rubber gloves to prevent skin irritation.
- •Be extremely careful when handling metal filters over a glass or ceramic cooktop. Dropping a filter edge-down can crack the glass, leading to a costly stovetop replacement.
Tools & supplies you'll need
- Very hot or boiling water
- Grease-cutting dish soap (e.g., Dawn Heavy Duty)
- Baking soda (1/2 cup)
- Non-abrasive scrub brush or old toothbrush
- Microfiber cloths or paper towels
- Heavy-duty degreaser spray (optional, for severe buildup)
- Large sink, basin, or rimmed baking sheet
Step-by-step instructions
Remove the Grease Filters
Verify that your hood is powered down and the stovetop is cool to the touch. Most mesh filters utilize a spring-loaded latch or a simple pull-tab. Gently push the filter toward the rear of the unit to compress the spring, then pull the front edge down to release it. Baffle filters typically lift upward out of a lower groove. Carefully set these aside and inspect the interior cavity; if you notice heavy grease buildup on the motor, professional cleaning might be necessary.
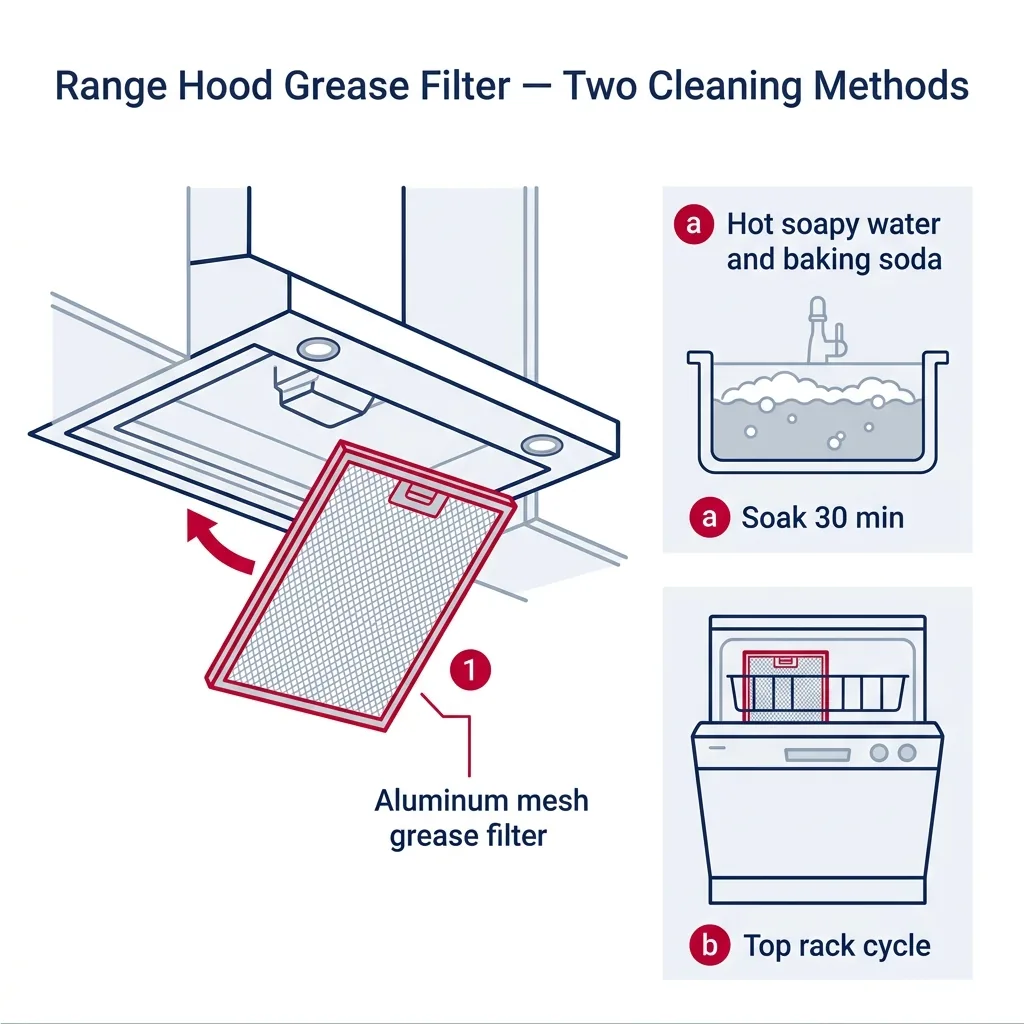
Tip: Lay a thick towel over your cooktop before starting to protect your glass or ceramic surface from accidental scratches or impacts.
⚠ Warning: Do not pull forcefully if a filter seems stuck. A little extra degreaser along the edges can help loosen sticky residue.
Prepare the Soaking Solution
To break down stubborn cooking fats, you need a mix of heat, soap, and alkalinity. Plug your sink and fill it with boiling water. Stir in a generous amount of grease-cutting dish soap and 1/4 to 1/2 cup of baking soda. You will notice a fizzing reaction as the baking soda activates. Use a long brush to ensure everything is well-mixed. If your sink is too small, a large plastic bin or a rimmed baking sheet works just as well.
Tip: In regions with hard water like Spokane or parts of the Willamette Valley, you may need an extra squirt of soap to overcome mineral interference and create a proper lather.
⚠ Warning: Ensure the water is hot, but be careful when handling boiling liquid to avoid burns.
Submerge and Soak the Filters
Submerge the filters entirely in your soapy bath. If they float, hold them down with a heavy glass bowl or mug. Allow them to soak for 15 to 30 minutes. The hot water and baking soda work together to dissolve the ester bonds in the grease. You will see the water turn murky as the oils detach from the metal mesh.
Tip: Keep the filters fully covered for the best results.
⚠ Warning: Do not leave aluminum filters soaking for extended periods, as highly alkaline environments can eventually cause oxidation or discoloration.
Scrub Away the Softened Grease
Once the soak is complete, use a soft-bristled brush or toothbrush to gently remove any remaining grime. Focus on the pull-tabs and edges where grease tends to accumulate. Be gentle with aluminum mesh to avoid denting or tearing the fine layers. If you encounter particularly tough spots, apply a citrus-based degreaser, let it sit for five minutes, and scrub again.
Tip: Keep your scrubbing pressure light to preserve the structural integrity of the mesh.
⚠ Warning: Avoid harsh steel wool or wire brushes, as these will scratch and damage the filter finish.
Rinse Thoroughly
Drain the sink and rinse the filters under hot, running water. Ensure all traces of soap and baking soda are washed away, as residue can attract new grease or leave a chalky film. If you have a kitchen sprayer, use it to force water through the mesh to clear the inner layers.
Tip: A thorough rinse ensures the filter is perfectly clean and ready for service.
⚠ Warning: Make sure no soap bubbles remain, as these can trap future grease.
Dry Completely and Reinstall
Gently shake off excess moisture and wipe the frames with a clean cloth. Allow the filters to dry completely on a rack. Do not reinstall them while wet, as moisture can damage the blower motor or cause electrical shorts. Once dry, slide the back edge into the track, compress the spring, and snap the front into place to secure them.
Tip: Wait until the filters are entirely bone-dry before reassembly.
⚠ Warning: Installing wet filters can lead to moisture-related component failure.
Brand-specific notes
Some brands have known design quirks worth knowing about before you start.
Zephyr & Kobe
These premium hoods often use stainless steel baffle filters. They are highly durable and generally dishwasher-safe, handling heavy-duty cooking with ease.
Whirlpool & GE
These brands typically use aluminum mesh. Handle them with care to avoid damage. Replacements are readily available for $15-$30 if they become too worn.
Broan & NuTone
For ductless models, remember to remove the charcoal odor filter before cleaning the aluminum mesh. Charcoal filters cannot be washed and should be replaced every 3 to 6 months.
Sub-Zero & Wolf
Professional-style units often feature grease collection cups. Clear these out before cleaning the baffles in the dishwasher.
Samsung & LG
Smart hoods often feature a filter indicator. Don't forget to reset the timer (usually a 3-second button press) after cleaning to stop the alert.
What our techs see most often
In the rainy Pacific Northwest, we often see blower motors fail because homeowners neglect their filters. A simple monthly soak is a cheap insurance policy compared to a $350 motor replacement, especially for those with long exhaust runs where the motor is already working hard.
When to call a professional
- → The fan motor makes a loud grinding, squealing, or rattling noise even after the filters are completely clean.
- → The hood has little to no suction at all, indicating a broken blower wheel or a blocked exhaust duct.
- → You see exposed, melted, or frayed wiring when you remove the filters to look inside the cavity.
- → The grease buildup is heavy inside the motor housing or extends far up into the ductwork (this requires professional deep cleaning to prevent chimney fires).
- → The range hood keeps tripping your kitchen's GFCI outlet or the main circuit breaker when you turn it on.
Related Range Hood Troubleshooting
These troubleshooting guides cover problems this task can help solve.
Frequently asked questions
Can I just put my aluminum mesh filters in the dishwasher?
It is possible, but the alkaline detergent can cause oxidation, making the aluminum look dull or gray. Stainless steel baffles are a better candidate for dishwasher cleaning.
How often should I clean my range hood filters?
Monthly cleaning is best for those who cook with oil or fry food. If your cooking is lighter, every 2 to 3 months is usually sufficient.
What if the grease is totally baked on and won't come off with baking soda?
Try a commercial citrus degreaser. If the grease has turned into a hard resin, it is often more cost-effective to simply order a new filter for $20-$35.
My range hood doesn't vent outside. Does cleaning the filter still matter?
It is critical. Clogged metal filters force grease into the charcoal filter, ruining it prematurely. Cleaning the metal mesh protects your expensive carbon filters.
Why is grease dripping from my hood even after cleaning the filter?
This indicates grease has bypassed the filter and entered the blower housing. You will need to manually wipe out the interior cavity with degreaser. If the ductwork is saturated, a professional cleaning ($150-$300) is advised.
Need a technician in WA or OR?
If the fix above does not work, A-Fix Service repairs range hoods across Washington and Oregon. $90 diagnostic visit.
Related Repair Guides
Range Hood Lacks Suction: Troubleshooting Airflow Issues
If your range hood is struggling to pull air, it is rarely a total unit failure. Over 50% of our service calls for weak suction in Washington and Oregon turn out to be nothing more than a clogged grease filter. Other common culprits include obstructed ducting, undersized ventilation, stuck dampers, or saturated charcoal filters in recirculating units. Most of these issues are simple maintenance tasks rather than complex mechanical repairs.
Troubleshooting a Range Hood Fan That Won't Run
If your range hood lights are operational but the exhaust fan refuses to spin, you are likely dealing with a localized circuit failure. Because the lighting and fan motor systems often share a power source but utilize independent control paths, the issue usually boils down to a faulty switch, a failed capacitor, a worn-out motor, or a glitchy control board. Most of these repairs can be completed for under $80 in parts.
Range Hood Light Not Working: Troubleshooting Guide
Struggling to see your stovetop because your range hood light is out? This is a frequent issue for many PNW kitchens. Whether you are dealing with a simple bulb burnout, grease-clogged controls, or a transformer failure, this guide will walk you through the diagnostic process safely.