
At a glance
Symptoms
- • Fan does not turn on at any speed setting
- • Lights work normally but fan stays silent
- • Fan hums but does not spin (or spins very slowly)
- • Fan starts but stops after a few seconds
- • Burnt-electronics smell from the hood
- • Single speed works but other speeds do not
- • Breaker trips when the fan is switched on
Common causes
- • Tripped breaker or blown in-line fuse on the hood circuit
- • Failed control switch (mechanical rocker / push-button)
- • Failed run capacitor on single-speed motors
- • Seized fan motor (bearings or windings failed)
- • Loose or burned wiring at the motor or switch
- • Failed control board on electronic-touch hoods
- • Internal thermal cutout has tripped (overheated motor)
- • Damper or fan blade physically jammed by grease buildup
Safety First — Read Before You Start
- •Turn off the breaker for the hood before any internal work. Do not rely on the hood switch — that only breaks the motor circuit, not necessarily all internal wiring.
- •Confirm power is off with a non-contact voltage tester before touching wires.
- •Capacitors store energy even with power off — discharge across the terminals with an insulated screwdriver before testing or removing.
- •Allow the hood to cool fully before working on it. The motor housing can stay warm long after the fan stops.
- •Some hoods are hardwired (not plugged in). Treat these the same as ceiling fixtures — breaker off, voltage verified, then work.
- •Never run the hood with grease filters removed for more than a brief test. The motor depends on filtered intake to avoid grease loading.
Tools & supplies you'll need
- Phillips and flat-head screwdrivers
- Multimeter
- Non-contact voltage tester
- Wire nuts (for any reconnections)
- Replacement capacitor / switch / motor as identified
- Camera or phone (to photograph wiring)
- Ladder
- Flashlight
Step-by-step instructions
Verify power and check the breaker
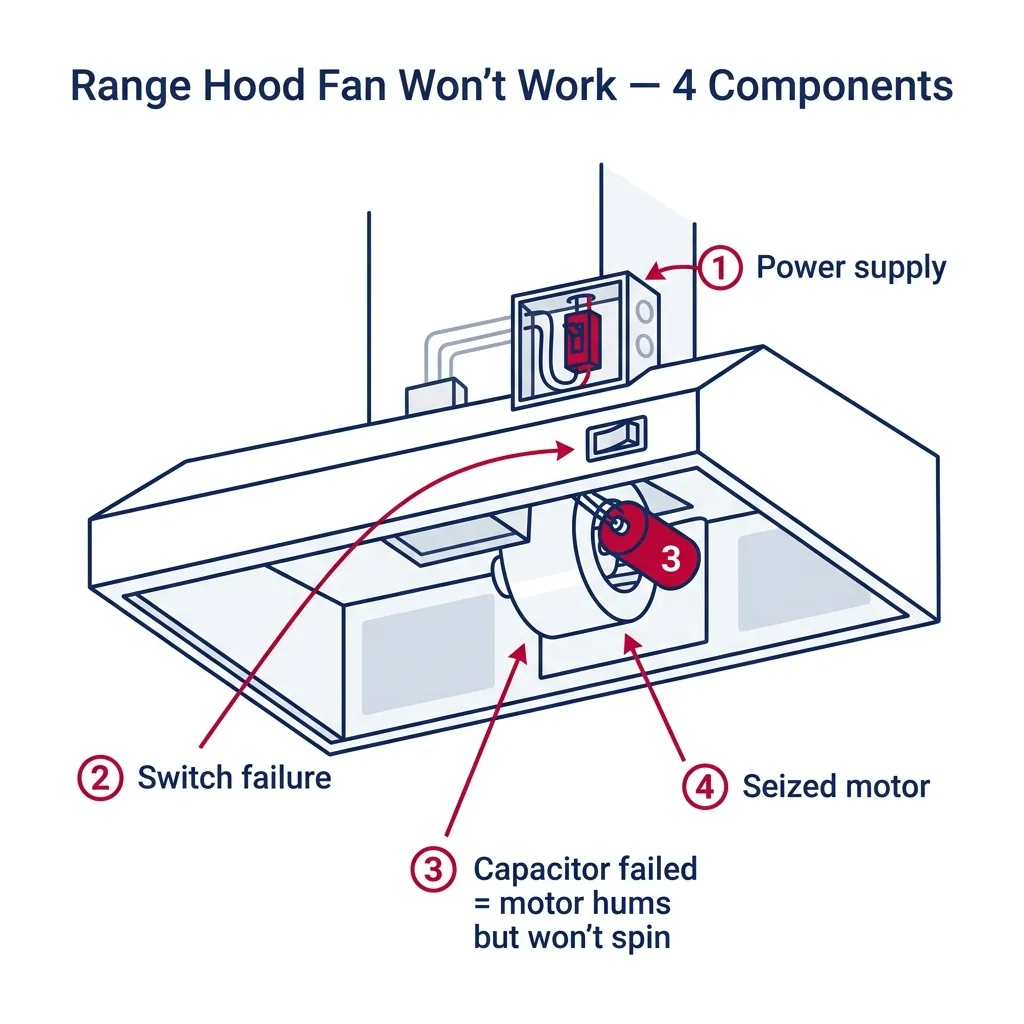
First, check if your hood lights are still functional; if they are, you know the unit is receiving power. If the entire hood is dead, check your main electrical panel to see if the breaker has tripped. For units with power, flip the breaker off and on to clear any potential fault states. Some models feature an in-line fuse tucked near the wiring block inside the hood chassis. With the power disconnected, inspect this fuse using your multimeter and swap it out if it has blown.
Tip: For modern hoods with digital touch-pads, a quick power cycle at the breaker for 30 seconds can often clear a frozen control board.
Test the control switch
Mechanical rocker or push-button switches are frequent culprits. Once the power is cut, remove the filter and access the switch assembly. Document the current wiring configuration with a photo before you detach anything. Use your multimeter's continuity setting to verify the switch functions in every setting. You should see a closed circuit between the common and speed-specific terminals when the switch is engaged. If you get no reading, the switch is faulty and needs to be replaced with an exact match based on the manufacturer's part number.
Tip: Always ensure your replacement switch matches the amperage rating of the original, as these components handle significant motor load.
Test the run capacitor (single-speed motors)
If your fan hums but won't start, or if it requires a manual push to get moving, the run capacitor is likely to blame. After ensuring the power is off, safely discharge the capacitor by bridging the terminals with an insulated screwdriver. Use your multimeter on the capacitance setting to check the reading against the microfarad rating printed on the component. If the reading deviates by more than 10% or shows an open circuit, replace this inexpensive 2-wire component.
Tip: Do not rely on the capacitor's physical appearance; internal failure is often invisible.
Inspect for jammed blades or seized motor
After removing the grease filters, use a flashlight to examine the fan blades. Gently attempt to rotate the blades by hand. They should spin smoothly with little resistance. If you find heavy grease buildup or debris, use a quality degreaser to clean the assembly. If the blade feels gritty or refuses to turn despite your best efforts, the motor bearings have likely failed, necessitating a full motor replacement.
Tip: Avoid forcing a stuck blade, as you risk breaking the hub. Let the degreaser do the heavy lifting.
Test the motor windings
With the power off and your wiring guide photo handy, disconnect the motor wires. Use your multimeter set to ohms to measure resistance across the leads. A typical single-speed motor should show between 5 and 30 ohms. If you encounter an open circuit on any lead pair, the windings are burnt out. Also, verify there is no continuity between the leads and the motor casing; if there is, the motor is shorted to the chassis and must be replaced.
Tip: A distinct, lingering acrid smell near the motor housing is a classic sign of burnt internal windings.
Replace the motor
To swap the motor, remove the bottom panel and the fan housing screws. Carefully disconnect the wiring, unscrew the motor mount, and extract the unit. Move the fan blade onto the new motor, paying close attention to the orientation and rotation direction. Once installed and rewired, verify operation before fully closing the panel. Prices for motors vary, so ensure you match the voltage, RPM, and rotation specs if using a universal replacement.
Tip: When reattaching the fan blade, tighten the set screw firmly but avoid overtightening, as the hub can easily crack.
Check the control board (electronic-touch hoods)
Electronic models rely on a control board to process inputs. If your touch-pad is unresponsive but the lights work, inspect the board for signs of heat damage, such as blackened areas or bulging components. While this is a more expensive repair ($80-$200), it is often the final step in the diagnostic process after ruling out cheaper parts like switches and capacitors.
Tip: Only consider this step after testing all other mechanical components.
Reassemble and verify
Once repairs are finished, reconnect the power and test every fan speed setting. The motor should kick in immediately and run without unusual noise. Check the lighting as well to ensure all connections are secure. Replace your grease filters and run the unit for a few minutes to ensure stability. If the fan remains unresponsive, re-examine your previous diagnostic steps to ensure no connection was missed.
Tip: Always document your wiring steps with photos to make reassembly foolproof.
Brand-specific notes
Some brands have known design quirks worth knowing about before you start.
Broan / NuTone
These are ubiquitous in the PNW. For units between 8 and 12 years old, the rocker switch is a common failure point. A $20 universal switch usually resolves the issue for models like the F40000 or the QS series.
Vent-A-Hood
These high-end hoods use two separate motors. If one side is dead, you only need to address that specific motor or capacitor. While parts are pricier ($150-$300), the modular design makes the physical swap very simple.
Zephyr
On electronic models like the Roma or Tempest, the control board often fails after 6-8 years. If the touch panel stops responding, the board is likely the culprit.
Bosch
Bosch hoods utilize robust European motors. If a failure occurs, parts are often brand-specific and may require lead time. We find that the touch panel interface is more prone to failure than the motor itself.
GE / Whirlpool
When these are integrated into an over-the-range microwave, the repair is more complex. Because these systems share high-voltage components, we recommend professional service rather than DIY to ensure safety.
What our techs see most often
In the Pacific Northwest, we see many range hood issues related to age and grease buildup. Roughly 30% of our calls involve mechanical switches, while 25% are capacitor issues. Seized motors account for another 25%, and electronic board failures make up the remaining 15% or so. Our technicians keep universal capacitors and common Broan switches on hand to handle these frequent repairs in a single trip.
When to call a professional
- → Breaker trips repeatedly when the hood is switched on — indicates a short, do not keep resetting
- → You smell burning plastic or see scorched wiring
- → You replaced the motor and capacitor and the fan still does not run
- → The hood is integrated with a microwave (over-the-range microwave) and the issue traces to shared components
- → The hood is a high-end built-in (Wolf, Thermador, Miele) where DIY motor work voids warranty
- → You are not comfortable working with mains wiring inside an overhead fixture
- → The hood is over a high-output gas range — incorrect repair on these critical units affects kitchen ventilation safety
Range Hood Maintenance & Replacement Tasks
Step-by-step guides for individual maintenance jobs related to this appliance.
Frequently asked questions
My range hood lights work but the fan does not — where do I start?
Since the lights are working, the unit has power. Focus on the fan circuit. Test the switch first, then the capacitor (if single-speed), and finally the control board. The motor is the most expensive part, so check it last.
Is it worth replacing a range hood motor or just buying a new hood?
For most builder-grade hoods, a $100 motor repair is cheaper than a full replacement. On premium brands like Vent-A-Hood or Zephyr, the motor is a small part of the total investment, making repair the smart choice.
My fan hums but does not turn — what is wrong?
This is almost always a failed run capacitor. The motor is trying to start but lacks the necessary electrical 'push.' Check for mechanical obstructions first; if the blade spins freely, swap the capacitor.
How long should a range hood last?
With consistent cleaning, a quality hood can last 25 years. Builder-grade units usually see 8-12 years of service before needing major repairs like a new switch or motor.
Why did my hood suddenly stop working after a power flicker?
Power surges can trip digital controls or damage capacitors. Try a 30-second power reset at the breaker. If the fan hums but won't start afterward, the surge likely took out your capacitor.
Need a technician in WA or OR?
If the fix above does not work, A-Fix Service repairs range hoods across Washington and Oregon. $90 diagnostic visit.
Related Repair Guides
Range Hood Lacks Suction: Troubleshooting Airflow Issues
If your range hood is struggling to pull air, it is rarely a total unit failure. Over 50% of our service calls for weak suction in Washington and Oregon turn out to be nothing more than a clogged grease filter. Other common culprits include obstructed ducting, undersized ventilation, stuck dampers, or saturated charcoal filters in recirculating units. Most of these issues are simple maintenance tasks rather than complex mechanical repairs.
How to Clean a Range Hood Grease Filter
Keep your kitchen air crisp and your ventilation system efficient. Cleaning your range hood filter is a quick, manageable task that prevents motor strain and keeps your home smelling fresh.
Range Hood Light Not Working: Troubleshooting Guide
Struggling to see your stovetop because your range hood light is out? This is a frequent issue for many PNW kitchens. Whether you are dealing with a simple bulb burnout, grease-clogged controls, or a transformer failure, this guide will walk you through the diagnostic process safely.