
At a glance
Symptoms
- • Lingering cooking smells (like fish, garlic, or intense spices) that persist long after you finish cooking
- • Visible dark, oily dust or grease buildup behind the primary metal mesh or baffle filter
- • It has been more than 3 to 6 months since the last time you performed a filter swap
- • The range hood motor sounds strained, louder than usual, or seems to be struggling with airflow
- • Your smoke detector goes off more frequently during routine stovetop cooking
- • A stale, greasy odor coming from the unit even when the fan is switched off
Common causes
- • Activated charcoal granules reach full saturation with VOCs and odor molecules over time, rendering them ineffective.
- • A fresh carbon filter acts as a barrier, preventing vaporized grease and moisture from bypassing the metal filter and fouling the internal blower motor.
- • Frequent replacement ensures the recirculating (ductless) system maintains proper suction and airflow efficiency.
- • Regular maintenance is vital for indoor air quality in tight PNW apartments, condos, or hillside homes that lack exterior kitchen vents.
Safety First — Read Before You Start
- •Always cut power to the hood at the breaker or unplug the unit (if accessible in the cabinet above) before working near the motor.
- •Never try to clean and reuse a charcoal filter; water damages the porous structure of the carbon and creates a mold risk.
- •Verify the stovetop is fully cooled before you lean over the range to access the hood.
- •Do not run a recirculating hood without a carbon filter, as grease will quickly accumulate and damage the motor windings.
Tools & supplies you'll need
- Replacement charcoal/carbon filter (must be specific to your unit's model number, typically $15-$45)
- Screwdriver (Phillips or flathead, depending on the light panel or housing design)
- Heavy-duty degreaser (e.g., Simple Green, Zep, or Dawn Powerwash)
- Microfiber cloths or heavy-duty paper towels
- Stepladder or secure step stool
- Work gloves (to handle sticky, stubborn grease)
- Thick towel or moving blanket (to protect your stovetop from dropped hardware)
Step-by-step instructions
Identify Your Model and Source the Correct Filter
Start by locating your range hood's model number. You can usually find this on a manufacturer label inside the hood cavity, often hidden behind the metal grease filters. Because these filters are not universal, you must purchase the specific OEM part or a confirmed compatible aftermarket version. Budget for $15 to $45. Get the part on hand before you start the project.
Tip: Snap a photo of the model sticker with your phone. It makes it much easier to reference the specific part number when shopping online.
Disconnect Power and Prep Your Workspace
Safety is the priority. You are working near electrical parts and the blower motor, so disconnect power at the breaker or unplug the unit if it is accessible in the cabinet. Lay a thick towel or moving blanket over your cooktop. This protects your glass-top or gas range from scratches if you accidentally fumble a tool or a greasy filter.
Tip: Don't skip the towel. Dropping a metal baffle onto a ceramic glass cooktop can cause it to shatter, turning a small maintenance job into a major expense.
Remove the Outer Metal Grease Filters
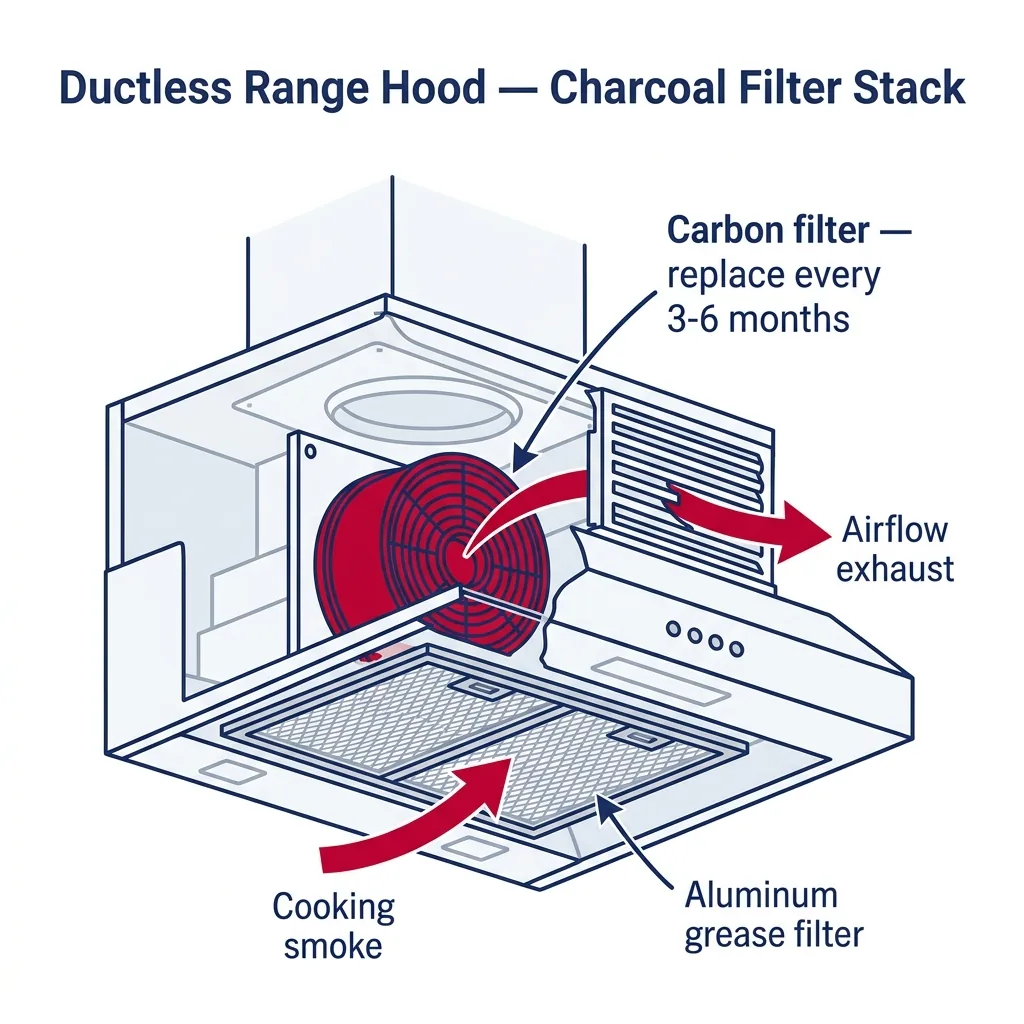
Ductless hoods rely on a two-part filtration system. The first layer is the washable aluminum mesh or stainless steel baffle. Find the latch or pull-tab, release the tension, and slide the filter out. Now is a great time to soak these metal filters in hot water and degreaser, or run them through the dishwasher if the manufacturer says they are safe to do so.
Tip: If the metal filters are stuck due to grease buildup, apply a little degreaser to the tracks and let it sit for 5 minutes to loosen the grime.
Locate and Remove the Old Charcoal Filter
Once the metal filters are out, look into the hood cavity to see the blower motor. The charcoal filter is usually a black, round, or rectangular plastic cassette attached to the motor or tucked behind the metal filters. For round versions, press the center tab and twist counterclockwise to unlock. For rectangular versions, undo the retaining clips or Phillips screws. Remove the old, saturated filter and throw it away.
Tip: Saturated filters can be surprisingly heavy and messy. Handle them carefully to avoid dropping greasy dust onto your kitchen surfaces.
Clean the Filter Housing and Blower Casing
Before installing the new unit, clean the internal cavity. Apply a heavy-duty degreaser to a microfiber cloth or paper towel—never spray directly into the hood, as liquid can ruin the motor's electrical components. Wipe down the motor casing, metal tracks, and interior walls. Removing this gunk helps eliminate stale odors and ensures the new filter has a clean area to work in.
Tip: Dawn Powerwash is excellent here. Spray it on a damp cloth; the alcohol helps cut through polymerized grease without leaving a sticky film.
Install the New Charcoal Filter
Remove the new filter from its packaging. If it is the twist-on style, line up the tabs with the slots on the motor housing, push in, and rotate clockwise until you hear a click. For rectangular cassettes, slide them back into the bracket and secure the clips or screws. Tug gently to ensure it is locked in place; a loose filter will rattle when the fan is on high.
Tip: Some high-end hoods use two round carbon filters, one for each side of the blower. Ensure you swap both if your model requires it.
Reinstall Grease Filters and Test the Hood
Once the carbon filter is secure, put your clean metal filters back in by sliding them into the rear channel and locking the front latches. Remove the protective towel from the cooktop and restore power. Turn the fan to the highest setting to check for rattles and verify suction by holding a paper towel up to the mesh to ensure it stays in place.
Tip: Listen carefully during the test run; any rubbing or rattling usually means the filter or metal mesh isn't seated quite right.
Brand-specific notes
Some brands have known design quirks worth knowing about before you start.
Broan / NuTone
Common in PNW builder-grade homes. Carbon filters often use a center-screw or snap-in frame over the fan intake. These are quite affordable, usually $15 to $25.
GE / GE Profile
Often found in over-the-range microwaves, these use a rectangular filter behind the top vent grille. You may need to remove two Phillips screws at the top edge to access the compartment.
Whirlpool / KitchenAid
These units frequently use a round charcoal filter that twists onto the blower motor. Align the tabs carefully; forcing the fit can break the plastic mounting brackets.
Zephyr
A popular choice for modern PNW kitchen remodels. Zephyr units usually require removing heavy stainless steel baffles first. Their filters are robust, cost $40 to $60, and offer excellent odor-scrubbing density.
Bosch
Bosch ductless systems often use a thick cassette-style filter. These must be seated firmly until they click; if they aren't fully engaged, they will rattle at high speeds.
What our techs see most often
Across Washington and Oregon, we frequently service high-end condos and hillside homes where exterior venting isn't an option. Many clients call us about weak suction or lingering odors, only to realize their ductless hood has a charcoal filter that hasn't been changed in years.
When to call a professional
- → If you find frayed, melted, or damaged wiring inside the hood cavity.
- → If the blower motor makes grinding, squealing, or ticking noises after you have replaced the filter.
- → If the hood is hardwired and years of neglect have caused grease to ruin the motor assembly.
- → If you are uncertain if your hood is properly vented or ductless and need an airflow assessment.
- → If the mounting hardware feels loose or unstable when you try to install the new filter.
Related Range Hood Troubleshooting
These troubleshooting guides cover problems this task can help solve.
Frequently asked questions
Can I wash and reuse my charcoal range hood filter?
No. Activated carbon relies on microscopic pores to trap odors and VOCs. Washing it fills these pores with water, making it useless and creating a perfect environment for mold. Always replace it.
How much does a replacement charcoal filter cost?
Prices typically range from $15 to $45 depending on the brand. Pro-style brands like Wolf, Thermador, or Zephyr may cost between $50 and $80 for their high-density kits.
How often should I really replace the carbon filter?
For standard cooking, aim for every 3 to 6 months. If you do a lot of frying, searing, or cooking with heavy spices—common in our diverse PNW food scene—you will likely need to swap it every 2 to 3 months.
Why does my range hood still smell bad even after changing the carbon filter?
The metal grease filters might be saturated, or past neglect may have allowed grease to coat the internal blower housing. Degrease the metal filters and wipe down the internal plastic motor casing.
Can I convert my vented range hood to a ductless/recirculating one?
Many modern hoods are convertible using a recirculating kit, which includes the carbon filter and a diverter plate. These kits generally cost $40 to $100. Consult your manual to see if your model supports this.
Need a technician in WA or OR?
If the fix above does not work, A-Fix Service repairs range hoods across Washington and Oregon. $90 diagnostic visit.
Related Repair Guides
Range Hood Lacks Suction: Troubleshooting Airflow Issues
If your range hood is struggling to pull air, it is rarely a total unit failure. Over 50% of our service calls for weak suction in Washington and Oregon turn out to be nothing more than a clogged grease filter. Other common culprits include obstructed ducting, undersized ventilation, stuck dampers, or saturated charcoal filters in recirculating units. Most of these issues are simple maintenance tasks rather than complex mechanical repairs.
How to Clean a Range Hood Grease Filter
Keep your kitchen air crisp and your ventilation system efficient. Cleaning your range hood filter is a quick, manageable task that prevents motor strain and keeps your home smelling fresh.
Troubleshooting a Range Hood Fan That Won't Run
If your range hood lights are operational but the exhaust fan refuses to spin, you are likely dealing with a localized circuit failure. Because the lighting and fan motor systems often share a power source but utilize independent control paths, the issue usually boils down to a faulty switch, a failed capacitor, a worn-out motor, or a glitchy control board. Most of these repairs can be completed for under $80 in parts.