
At a glance
Symptoms
- • Burner clicks continuously but fails to ignite
- • Uneven, lazy, or sputtering gas flames
- • Flames are yellow or orange instead of a crisp blue
- • Visible grease, boil-over crust, or burnt food around the burner base
- • Gas smell when trying to light a burner due to delayed ignition
- • Burner only lights on one side of the circle
Common causes
- • Prevents the igniter from sparking properly against the burner cap
- • Restores proper oxygen-to-gas mixture, eliminating dangerous carbon monoxide production from yellow flames
- • Extends the lifespan of the spark module by stopping endless clicking
- • Maintains even heat distribution for better cooking performance
- • Prevents permanent staining and pitting on expensive enamel or brass burner caps
Safety First — Read Before You Start
- •Never attempt to clean the burners while they are hot or immediately after cooking. Let the stovetop cool completely.
- •Ensure all burner control knobs are in the OFF position before starting.
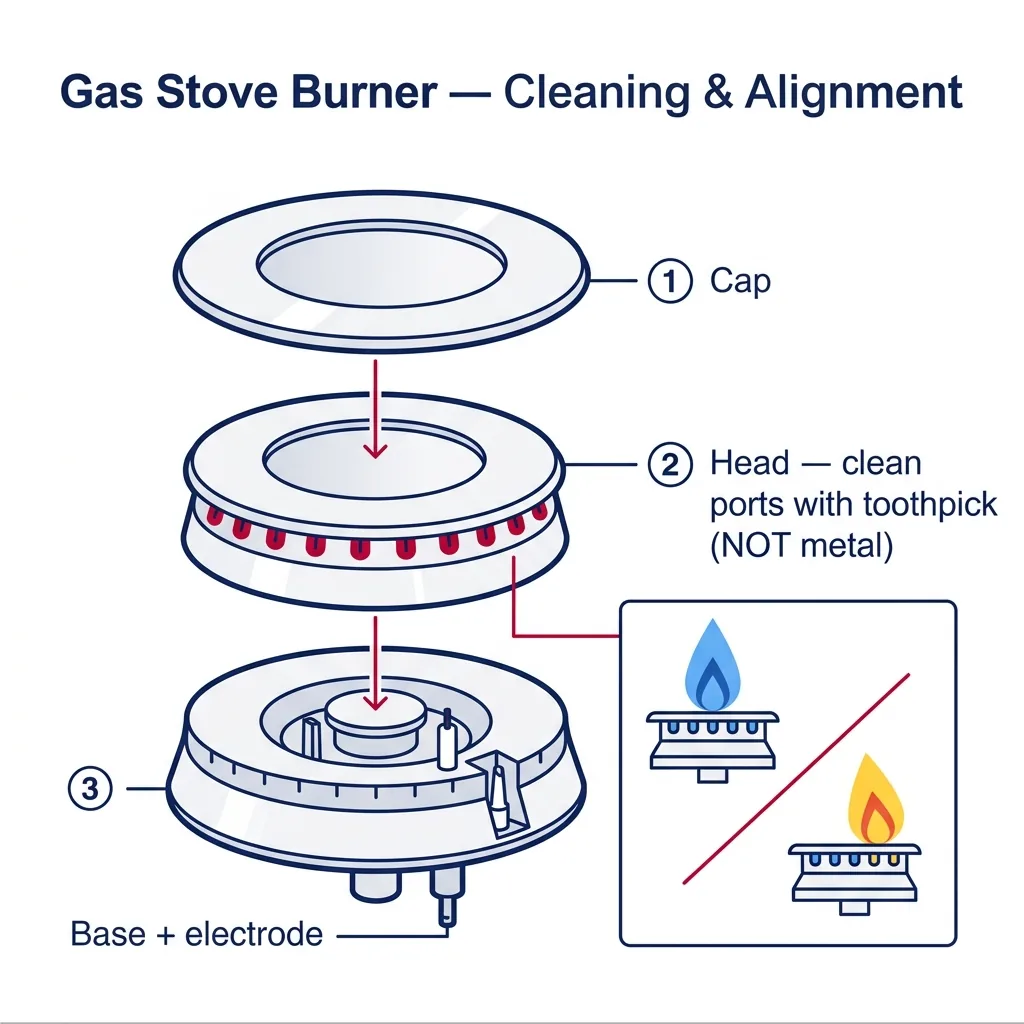
- •Do not use metal safety pins, paperclips, or needles to clean burner ports; enlarging the holes will ruin the burner head and cause dangerous flare-ups.
- •Never spray cleaning solutions directly onto the spark igniter, as this can short out the delicate ceramic housing.
- •Do not attempt to remove or modify the gas supply valves or internal gas lines. If you suspect a gas leak, shut off the main valve and call a professional.
Tools & supplies you'll need
- Dish soap (grease-cutting, like Dawn)
- Non-abrasive nylon scrub brush or old toothbrush
- Wooden toothpicks (never use metal pins or needles)
- Microfiber cloths or paper towels
- Baking soda (for stubborn boil-overs)
- White vinegar (for hard water mineral deposits)
Step-by-step instructions
Prepare the Stovetop and Remove Grates
Verify the stove is completely cool and the knobs are set to OFF. Carefully lift off the heavy cast-iron grates and place them on a towel to protect your kitchen surfaces. Snap a photo of the burner layout before disassembling; since burners vary by size (simmer, standard, power), putting them back in the correct spot is vital to prevent improper gas flow.
Tip: If your grates are greasy, soak them in hot, soapy water while you tend to the burner caps.
Remove the Burner Caps and Heads
Lift the burner caps (typically black or brass discs) straight off. Underneath, you will find the burner head—the slotted metal component. Lift this straight up as well. Be very cautious around the white ceramic igniter post; these are fragile, and a snapped igniter turns a simple cleaning into a costly repair.
Tip: Do not attempt to unscrew the base of the burner that is attached to the glass or enamel cooktop. You are only removing the loose, top-sitting components.
Soak the Components
Prepare a basin with warm water and a good amount of grease-cutting dish soap. Submerge your caps and heads. If you are in hard-water areas like Spokane or the Willamette Valley, add a half-cup of white vinegar to break down mineral buildup. Let them soak for 20 to 30 minutes.
Tip: This soak is essential for softening baked-on food residue.
Scrub the Caps and Heads
Use a nylon brush or toothbrush to clean the surfaces. For tough, burnt-on spots, create a paste using baking soda and water, let it sit on the stain for 10 minutes, and scrub again. Avoid steel wool or harsh chemicals, which can scratch the finish or strip the protective coating off brass and aluminum parts.
Tip: Stick to non-abrasive tools to preserve the integrity of the burner finish.
Clear the Burner Ports
This is vital for fixing ignition issues. Use a wooden toothpick to gently clear every small slot or port around the burner head. These ports must be free of debris to allow the gas to mix with oxygen correctly, ensuring a steady, blue flame.
Tip: Never use metal tools like needles or drill bits, as these will permanently warp the ports and ruin the burner's flame pattern.
Rinse and Dry Completely
Rinse the parts under warm water to remove all soap and baking soda. Dry them thoroughly with a microfiber cloth, then let them air dry upside down for 30-60 minutes. In damp climates like the Oregon coast or rainy Seattle, you may need to use a low-heat hair dryer or a 150-degree oven for 10 minutes to ensure they are moisture-free.
Tip: If you hear water sloshing inside the burner head, it is not dry enough to reinstall.
Reassemble and Test the Burners
Place the heads back onto the bases, ensuring they are properly seated on their alignment pins. Set the caps on top, making sure they are centered. Turn on your kitchen ventilation and test each burner. A healthy burner should ignite within a few clicks and show a crisp, blue flame.
Tip: Ensure the burner head is not wobbling; it must sit perfectly flat.
Brand-specific notes
Some brands have known design quirks worth knowing about before you start.
Wolf / Sub-Zero
Wolf dual-stacked burners feature brass parts that naturally tarnish. Avoid harsh polishes; just keep the ports clear. Replacement brass caps are costly, so handle with care.
Thermador
The Star Burner design is unique. Take care when cleaning the points of the star. The porcelain finish on these caps can chip easily if they hit a hard sink surface.
LG & Samsung
These aluminum heads can oxidize in a dishwasher. Hand wash only. Acidic spills can pit the aluminum, requiring expensive replacement heads.
GE / Café / Monogram
The oval center griddle burner can warp if cleaned while hot. Always wait for the unit to reach room temperature before cleaning.
Whirlpool / KitchenAid
The ceramic igniter is extremely brittle. Avoid bumping it with heavy grates or brushes to prevent a $30-$60 repair bill.
What our techs see most often
Across the Pacific Northwest, we see many service calls where a simple pasta boil-over is the culprit. Taking 30 minutes to clean these parts yourself can save you a $125-$185 service fee and stop that annoying clicking sound.
When to call a professional
- → You smell gas even when the stove is completely turned off and the room is ventilated.
- → The burner continues to click endlessly even after you have allowed the cleaned components to dry for 48 hours.
- → Flames remain mostly yellow or orange after a thorough cleaning, indicating a deeper gas pressure or air shutter issue.
- → The white ceramic igniter is visibly cracked, or the wire beneath it is frayed and sparking against the chassis.
- → You suspect an issue requiring access to the internal gas valves, regulators, or manifold beneath the cooktop.
Related Stove Troubleshooting
These troubleshooting guides cover problems this task can help solve.
Electric Stove Burner Not Heating: How to Fix
Fixing a Gas Stove That Won't Stop Clicking
Gas Stove Burner Won't Ignite: Causes and Fixes
Broken Glass Cooktop: Assessment and Repair Guidelines
Frequently asked questions
Can I put my gas stove burner caps in the dishwasher?
No. Dishwasher detergents are too abrasive and will strip the finish or damage the metal. Hand washing is the only recommended method to avoid costly replacements.
Why is my burner flame yellow instead of blue?
Yellow flames indicate the gas isn't mixing correctly with oxygen, usually due to clogged ports. If cleaning the ports doesn't fix the color, the air shutter or regulator may need professional adjustment.
I cleaned my burners and now they won't stop clicking. What did I do wrong?
Moisture is trapped in the igniter or burner head. Remove the parts and ensure they are completely dry, potentially using a hair dryer on low to speed up the process.
How often should I clean my burner caps and heads?
Aim for a deep clean every 3 to 6 months. Clean immediately after any boil-over to prevent sticky residue from hardening.
Can I use a needle or safety pin to unclog the burner ports?
Never. Metal tools can scratch the precision ports, leading to uneven flames or dangerous flare-ups. Use only wooden toothpicks.
Need a technician in WA or OR?
If the fix above does not work, A-Fix Service repairs stoves across Washington and Oregon. $90 diagnostic visit.
Related Repair Guides
Fixing a Gas Stove That Won't Stop Clicking
If your gas stove is stuck in a clicking loop or fails to ignite, it is usually a minor issue involving moisture or improper parts alignment rather than a major hardware failure. Most of these repairs involve simple maintenance and can be completed in under half an hour. While a failing spark module is a possibility, it is rarely the initial cause; however, chronic exposure to humidity or spills can eventually damage the internal electronics.
Gas Stove Burner Won't Ignite: Causes and Fixes
When you turn the stove knob and hear clicking but see no flame, or hear nothing at all, your gas burner needs attention. We will walk you through diagnosing and fixing the most common ignition failures safely, from simple clogs to electrical faults.
Electric Stove Burner Not Heating: How to Fix
If an electric burner on your range stops heating, it is often a straightforward fix. Typical culprits include a burnt-out heating element, a faulty infinite switch, a damaged burner receptacle, or loose terminal connections. While the diagnostic approach varies slightly between traditional coil stoves and modern smooth-top radiant ranges, most homeowners can complete the repair for under $50 in parts within an hour.