
At a glance
Symptoms
- • One burner does not heat at all while others work normally
- • Burner heats only on high (or only on low)
- • Burner heats intermittently — sometimes works, sometimes does not
- • Burner glows dimly or unevenly compared to other burners
- • Visible burn marks, pitting, or discoloration on a coil element
- • Smooth-top: visible cracks in the glass over a non-working zone
- • Burner stays on at full power and ignores the control knob
Common causes
- • Burnt-out heating element / coil (most common — easy swap)
- • Failed infinite switch (control switch behind the knob)
- • Damaged burner receptacle / socket (the prongs the coil plugs into)
- • Loose or burned terminal connection at the receptacle
- • Faulty internal wiring
- • Smooth-top: failed radiant element under the glass
- • Smooth-top: cracked ceramic glass cooktop
- • Control board failure (electronic models without infinite switches)
Safety First — Read Before You Start
- •ALWAYS turn off the breaker for the stove before opening the cooktop or removing any element. The stove circuit is 240V and shock hazard is significant.
- •Confirm power is off with a non-contact voltage tester before touching internal wiring.
- •Allow the stove to cool fully before any repair — burner elements can stay over 200°F for an hour after use.
- •Never bypass a thermal limit or override a damaged switch with a jumper. Stoves on 240V wiring can cause electrical fires when modified.
- •On smooth-top ranges, do not pry on the glass cooktop with metal tools. The ceramic glass is rigid but cracks easily under point load.
Tools & supplies you'll need
- Phillips and flat-head screwdrivers
- Nut driver set (1/4 inch and 5/16 inch)
- Multimeter
- Replacement element / receptacle / switch as identified
- Needle-nose pliers
- Flashlight
- Camera or phone (to photograph wiring)
- Oven mitt or towel (handling potentially still-warm parts)
Step-by-step instructions
Confirm the symptom and rule out the obvious
Set the problematic burner to high and wait about a minute. If it is a coil, check for any sign of a glow. For smooth-top units, hover your hand slightly above the surface to detect heat. If you have a coil range, perform a simple swap: take the coil from a working burner and plug it into the suspect socket. If the burner now works, your original coil was the culprit. If it still fails, the issue lies deeper in the receptacle, switch, or wiring. This quick test prevents unnecessary parts purchases.
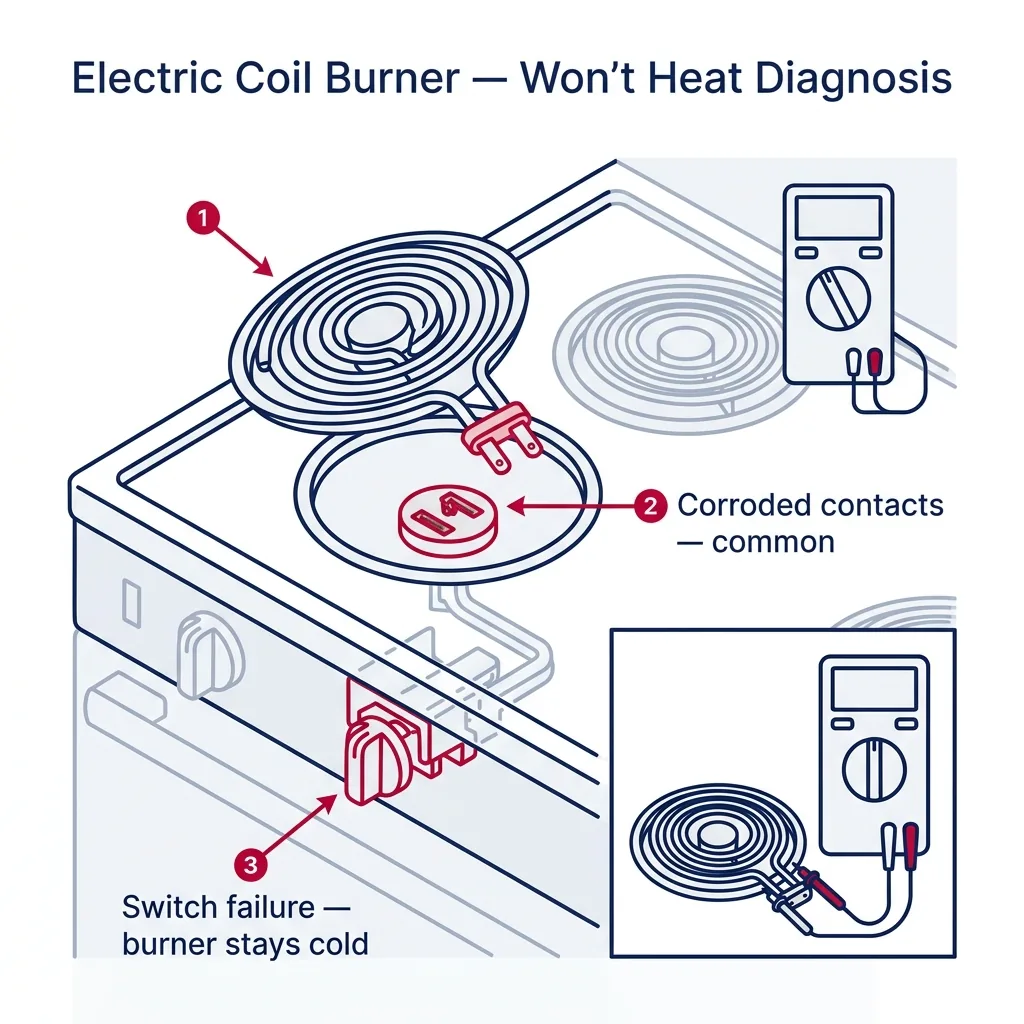
Tip: Smooth-top ranges do not allow the swap test. For smooth-tops, jump to the multimeter steps below.
Inspect the burner coil and receptacle (coil-element stoves)
Remove the coil and inspect the two prongs on its base. They should look clean and smooth, not pitted or scorched. Next, examine the receptacle socket on the stove surface; it should be free of debris with firm, secure terminals. Arcing often causes pitting, which leads to intermittent heating. If the receptacle shows signs of burning, replace it—it is a simple 4-screw, 2-wire job. Always replace both the receptacle and the coil if you see burn marks to prevent further damage.
Tip: A receptacle with brown or black burn marks indicates arcing under load. Replace it before continuing to use the stove — continued arcing can damage wiring inside the cooktop.
Test the heating element with a multimeter
Set your multimeter to the lowest ohms setting. Place the probes on the two prongs of the coil. Typically, a 6-inch element should read between 50-60 ohms, while an 8-inch element should show 30-40 ohms. If the meter shows an open circuit (infinite ohms), the element is dead and needs replacement. Also, check for continuity between the prongs and the metal body; if you find any, the element is shorted to the ground. Replacements generally cost between $20 and $40.
Tip: Always replace coils as a pair if one fails on a heavily used range. The other one is usually close to failure too, and the small price difference for a second coil is worth not opening the stove again in 6 months.
Test the infinite switch
Gain access to the infinite switches by lifting the cooktop or removing the rear panel. These are the circular components behind each knob. With the power disconnected, use your multimeter to check for continuity. As you rotate the knob from off to high, the switch should cycle continuity. If it remains open or closed regardless of the position, it is faulty. Replacements are $25-50. Snap a photo of the wire configuration before removing anything to ensure proper reconnection.
Tip: Infinite switches are model-specific. Match the part number on the back of the original; otherwise you may install a switch with the wrong amp rating, which is a fire hazard.
Smooth-top: test the radiant element
Because you cannot remove the radiant element from above, you must lift the glass cooktop—usually held by screws under the front edge. Once the glass is propped up, test the radiant element for continuity at its terminals. You should see resistance values similar to coil elements (30-60 ohms). If the circuit is open, the element has failed, costing $40-90. When installing a new one, ensure you apply the proper heat-sink paste between the element and the mounting plate to ensure efficient heat transfer.
Tip: When lifting a smooth-top cooktop for the first time, support it carefully — most are held open by a single prop rod. Drop the glass and you are buying a new range.
Check wiring and grounds
If the element, receptacle, and switch test fine, inspect the wiring harness for signs of heat damage. Look for brittle or melted insulation near terminal screws, which often indicates a loose connection that has generated excessive heat. Tighten any loose terminals. On older units, inspect the main power-block where the 240V supply enters the stove for any signs of charring. If the wiring is compromised, it is a fire risk; you may need to replace the harness or consult a professional.
Tip: Check wiring and grounds.
Reassemble and test
After reassembling, restore power and verify that the burner heats consistently on medium. Cycle through low, medium, and high settings. For smooth-top units, ensure the glow is uniform; patchy heat indicates a failing element or improper heat-sink paste application. Briefly test your other burners to ensure everything is functioning correctly. If the repaired burner heats evenly across all settings, you have successfully fixed the issue.
Tip: Reassemble and test.
Brand-specific notes
Some brands have known design quirks worth knowing about before you start.
GE
GE coil ranges (XL44, JBP and similar) use industry-standard 6-inch and 8-inch coils that work across most other GE/Hotpoint/Frigidaire models. The infinite switches are also widely cross-compatible. GE smooth-tops in the JBS and JB series are similarly serviceable — radiant elements clip in with two screws and a wire harness.
Whirlpool
Whirlpool ranges (WFC, WFE, WEE series) use the same coil and receptacle parts as their KitchenAid and Maytag siblings. If you can't find a Whirlpool-branded part in stock, the equivalent KitchenAid or Maytag part will fit.
KitchenAid
KitchenAid smooth-top ranges (KSEB, KSEG series) use heavier-duty radiant elements and can have higher-wattage simmer/dual-zone elements. When replacing, match the wattage exactly — generic substitutes that look identical may have lower power and the dual-ring control will not work correctly.
Frigidaire
Frigidaire smooth-top ranges (FCRE, FFEF series) frequently fail at the surface element control switch rather than the element itself. If a Frigidaire smooth-top burner runs only on high or only on low, suspect the switch first.
Samsung
Samsung electric ranges (NE series and Flex Duo models) use electronic control boards instead of mechanical infinite switches on most models. A non-heating burner that tests good at the element and wiring usually means the relay on the control board has failed — that is a $200-300 part and a more involved repair.
What our techs see most often
Electric burner calls are heavily skewed toward two failures: burnt-out coil elements (about 50% of coil-element calls) and failed radiant elements on smooth-tops (about 60% of smooth-top calls). The receptacle / socket issue runs maybe 20%, infinite switch around 15%, and the rest are wiring or control board. We always carry common 6-inch and 8-inch coils on the truck because they fit nearly every coil range made in the last 30 years.
When to call a professional
- → You see burned wiring, a damaged power-block, or scorched insulation inside the stove
- → The breaker trips when the stove is energized — this indicates a short and is not a DIY repair
- → You have replaced the element and confirmed switch continuity but the burner still does not heat
- → It is a smooth-top with a cracked glass cooktop — the glass alone is $300-600 and replacement is awkward without two people
- → The range is an electronic-control model and the issue traces to the main control board
- → You smell burning plastic when the stove is on — stop using it immediately and call a tech
- → The stove is a high-end induction model (Wolf, Thermador, Bosch induction) — diagnostic equipment is needed
Stove Maintenance & Replacement Tasks
Step-by-step guides for individual maintenance jobs related to this appliance.
Frequently asked questions
Why does only one of my electric burners not work?
The most common cause is a burnt-out heating element. Each burner has its own element, switch, and pair of contacts in the receptacle, so a single-burner failure points right at that burner-and-switch combo. Swap a known-good coil into the dead position to immediately tell whether the problem is the coil or the socket / switch.
How can I tell if the element or the switch is bad?
On coil-element stoves, the swap test is the fastest answer: move a working coil to the dead burner. If the moved coil heats, the original coil was bad. If the moved coil does not heat, the issue is the switch, receptacle, or wiring for that burner. On smooth-top stoves, you need a multimeter — check resistance on the radiant element first, then continuity on the switch.
My burner heats only on high — what does that mean?
An infinite switch that has lost the ability to cycle is the most likely cause. The switch is supposed to pulse the element on and off to maintain a chosen temperature; when the cycling contacts fail welded-shut, the burner just stays full-on. Turn it off at the breaker and replace the switch. Continued use is a fire risk because the burner cannot regulate temperature.
Are heating elements universal across brands?
Coil elements largely are — 6-inch and 8-inch plug-in coils have been industry-standard for decades, and a $25 generic OEM-spec coil fits most GE, Whirlpool, KitchenAid, Maytag, Hotpoint, Frigidaire, and Kenmore coil ranges. Smooth-top radiant elements are not universal; they vary by brand, wattage, and physical mount. Match the model number when ordering.
How long do electric stove burners last?
Coil elements typically last 8-15 years with normal use. Radiant elements under smooth-top glass last 10-20 years. Infinite switches outlast both — failures before 15 years usually mean a one-off bad part. If your range is over 15 years old and one burner fails, others are likely close behind; consider whether ongoing repair is worth it versus replacement.
Need a technician in WA or OR?
If the fix above does not work, A-Fix Service repairs stoves across Washington and Oregon. $90 diagnostic visit.
Related Repair Guides
Fixing a Gas Stove That Won't Stop Clicking
If your gas stove is stuck in a clicking loop or fails to ignite, it is usually a minor issue involving moisture or improper parts alignment rather than a major hardware failure. Most of these repairs involve simple maintenance and can be completed in under half an hour. While a failing spark module is a possibility, it is rarely the initial cause; however, chronic exposure to humidity or spills can eventually damage the internal electronics.
How to Clean Gas Stove Burner Caps and Heads
Routine maintenance is key to keeping your burners lighting reliably and maintaining a clean blue flame. We provide a guide on soaking, cleaning, and realigning your burner parts without harming the sensitive gas ports.
Gas Stove Burner Won't Ignite: Causes and Fixes
When you turn the stove knob and hear clicking but see no flame, or hear nothing at all, your gas burner needs attention. We will walk you through diagnosing and fixing the most common ignition failures safely, from simple clogs to electrical faults.