
At a glance
Symptoms
- • The coil burner doesn't heat up at all when the dial is turned on.
- • The element has developed visible blisters, cracks, or deep pitting on its outer surface.
- • You see bright orange sparking, arcing, or hear a loud pop when turning the burner on.
- • The coil only heats up partially, leaving cold spots that cook food unevenly.
- • The burner feels excessively loose or wobbly in its drip pan, failing to sit level.
- • The metal prongs on the burner plug look melted or severely corroded.
Common causes
- • A damaged burner can short out, potentially tripping your breaker or causing a minor electrical fire.
- • Uneven heating ruins expensive cookware and makes cooking meals a frustrating, inconsistent experience.
- • Corroded burner contacts can melt the terminal block receptacle, turning a simple $20 fix into a more involved electrical repair.
- • Ignoring a sparking element is a serious safety hazard, especially in older the Pacific Northwest homes with aging electrical panels.
- • Rusted or degraded coils drop in efficiency, taking much longer to boil water and wasting electricity.
Safety First — Read Before You Start
- •Always unplug the stove or flip the dedicated 40-50 amp circuit breaker in your electrical panel before starting any work. 240V power is lethal.
- •Wait until the stove has completely cooled down; electric coils retain severe burning heat long after the red glow fades.
- •Never force a burner into a receptacle. If it doesn't slide in easily, the terminal block may be melted or you have the wrong part.
- •Do not use water to clean the terminal block or the plug ends of the burner element, as this can cause a short circuit.
- •If replacing a terminal block, you must use high-temperature ceramic wire nuts, not standard plastic ones, or they will melt.
Tools & supplies you'll need
- New electric coil burner element (matching wattage and size, $15-$35)
- Work gloves (to protect hands from sharp edges or built-up grease)
- Multimeter (optional, to test the old coil for continuity)
- Phillips-head screwdriver (only if replacing the terminal block)
- Wire strippers and ceramic wire nuts (only if splicing a new terminal block)
- Flashlight (to inspect the receptacle contacts)
Step-by-step instructions
Disconnect power to the stove
Prioritize safety when working with 240-volt systems. Either pull your range away from the wall to unplug the heavy-duty cord or visit your main breaker box to switch the double-pole breaker marked 'Stove' or 'Range' to the OFF position. Confirm power is cut by checking if the oven clock or interior light remains off.
⚠ Warning: Never skip this step. Even if the burner switch is turned off, one leg of the 240V circuit may still carry live voltage to the terminal block.
Lift and remove the old coil burner
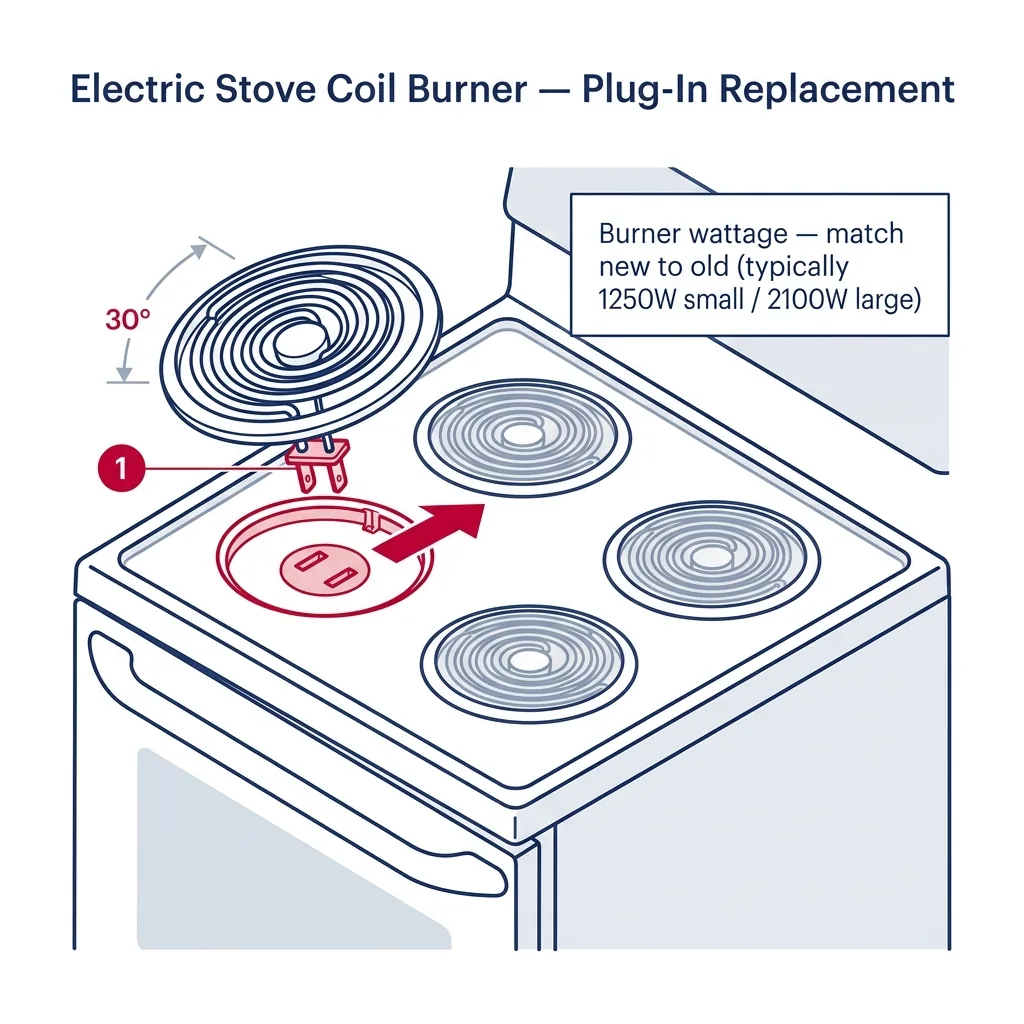
Ensure the cooktop is cold. Grip the coil on the side opposite the plug-in prongs. Lift that side just 1 to 2 inches. Avoid lifting higher to prevent damage to the ceramic block beneath. Pull the burner toward you to detach the prongs from the receptacle.
⚠ Warning: If the burner is stuck, wiggle it very gently from side to side while pulling. If it absolutely won't budge, the prongs may have melted into the block, meaning you'll need to replace the terminal block as well.
Inspect the terminal block and drip pan
Use your flashlight to inspect the receptacle where the burner connects. If you notice melted plastic, cracked ceramic, or signs of heavy corrosion—common in humid PNW environments—you must install a new terminal block kit before using the stove again. Clean or replace the drip pan while you are at it.
⚠ Warning: Do not wrap your drip pans in aluminum foil. Foil can reflect too much heat back up into the element, causing premature burner failure and creating a fire hazard.
Test the old burner with a multimeter (Optional)
Check for continuity if you are uncertain about the failure. Set your multimeter to the lowest Ohms resistance setting. Place one probe on each metal prong of the burner. A healthy coil should read between 15 and 50 ohms. If the display shows 'OL' or no reading, the element is internally broken.
⚠ Warning: If the burner tests fine but won't heat up on the stove, the issue is likely a burnt terminal block or a faulty infinite control switch on the console.
Install the new coil burner
Confirm the new unit matches the size and support frame of your original. Align the burner feet with the drip pan indentations and insert the prongs firmly into the terminal block. Ensure the element sits level and flat.
⚠ Warning: Make sure you bought the correct size. Stoves typically use 6-inch (approx. 1500W) and 8-inch (approx. 2100W-2600W) burners. Don't mix them up.
Restore power and perform a burn-off test
Switch the breaker back on or plug the unit in. Set the control knob to 'High'. The element should glow red momentarily. You might notice a bit of smoke or a faint burning smell; this is just the factory coating curing on the new metal. Let it run for 5 minutes.
⚠ Warning: Turn on your range hood fan or open a kitchen window during the initial burn-off to vent the smoke and smell outside.
Brand-specific notes
Some brands have known design quirks worth knowing about before you start.
GE
GE and Hotpoint coils often use a specific 'Y' shaped bracket or delta-style terminal. Ensure you buy the exact GE-compatible replacement. Universal coils from big box stores frequently don't fit GE terminal blocks correctly and will sit at an angle.
Whirlpool
Many older Whirlpool and Kenmore freestanding ranges use a standard plug-in coil, but watch out for the terminal block wiring. The high heat over years of use often makes the wire insulation brittle. If you have to replace the block, handle the wires gently to avoid stripping insulation further down the line.
Frigidaire
Frigidaire models frequently feature a unique support crossbar underneath the coil. When replacing, make sure the new coil's support feet align perfectly with the indentations in the drip pan so the burner sits completely level, otherwise your pans will slide.
Samsung
While Samsung is better known for smooth glass tops, their older or budget coil models use highly specific wattage ratings (e.g., 2100W for the 8-inch). Replacing it with a lower wattage 'universal' coil will result in disappointingly slow boil times.
Maytag
Classic Maytag coil stoves are built like tanks, but their terminal blocks are prone to ceramic cracking after years of heavy cast-iron pan use. If the burner wiggles excessively, inspect the ceramic block for hairline fractures.
What our techs see most often
Many customers in King County or the Willamette Valley assume their stove is broken, when it is simply a $20 coil issue. If the contacts look pitted or blackened, swap the terminal receptacle too, or your new burner will fail prematurely.
When to call a professional
- → If the new burner still doesn't heat up, indicating a faulty infinite switch or burnt internal wiring in the console.
- → If the main wiring harness connecting to the terminal block is melted, scorched, or the insulation is too brittle to safely splice.
- → If turning on the burner repeatedly trips your home's main electrical breaker.
- → If you have a smooth glass-top stove (radiant element) rather than a traditional exposed coil—these require disassembling the cooktop and handling delicate insulation.
- → If you smell burning plastic, ozone, or electrical smoke coming from the control panel when the stove is turned on.
Related Stove Troubleshooting
These troubleshooting guides cover problems this task can help solve.
Electric Stove Burner Not Heating: How to Fix
Fixing a Gas Stove That Won't Stop Clicking
Gas Stove Burner Won't Ignite: Causes and Fixes
Broken Glass Cooktop: Assessment and Repair Guidelines
Frequently asked questions
How much does a replacement electric coil burner cost?
A standard 6-inch or 8-inch coil burner typically costs between $15 and $35. Terminal block receptacle kits, if needed, run about $10 to $20. Buying OEM (Original Equipment Manufacturer) parts is highly recommended over cheaper universal options for longevity and safety.
Can I use a universal burner from the hardware store?
While universal burners claim to fit most brands, they often sit unevenly or have slightly different terminal prong lengths. This can lead to poor connections, electrical arcing, and premature failure. It's best to spend the extra $5-$10 for a brand-specific replacement.
Why did my new burner smoke the first time I turned it on?
This is completely normal. New coils have a protective, oil-based factory coating that burns off during the first use. It usually smokes slightly and smells for about 5 to 10 minutes. Just turn on your range hood or open a window until it stops.
Do I need to replace the drip bowls at the same time?
It's not strictly necessary, but heavily rusted or scorched drip pans (which are common in humid coastal areas like Seattle or Tacoma) reflect heat poorly. Replacing them for $15-$25 a set improves heating efficiency and makes the stove look brand new.
How do I know if I need to replace the terminal block too?
If the metal prongs on your old burner are pitted, melted, blackened, or missing chunks of metal, the terminal block is likely damaged inside. If you just plug a new burner into a bad block, the resulting electrical arcing will destroy the new burner in a matter of weeks.
Need a technician in WA or OR?
If the fix above does not work, A-Fix Service repairs stoves across Washington and Oregon. $90 diagnostic visit.
Related Repair Guides
Electric Stove Burner Not Heating: How to Fix
If an electric burner on your range stops heating, it is often a straightforward fix. Typical culprits include a burnt-out heating element, a faulty infinite switch, a damaged burner receptacle, or loose terminal connections. While the diagnostic approach varies slightly between traditional coil stoves and modern smooth-top radiant ranges, most homeowners can complete the repair for under $50 in parts within an hour.
How to Clean Gas Stove Burner Caps and Heads
Routine maintenance is key to keeping your burners lighting reliably and maintaining a clean blue flame. We provide a guide on soaking, cleaning, and realigning your burner parts without harming the sensitive gas ports.
Fixing a Gas Stove That Won't Stop Clicking
If your gas stove is stuck in a clicking loop or fails to ignite, it is usually a minor issue involving moisture or improper parts alignment rather than a major hardware failure. Most of these repairs involve simple maintenance and can be completed in under half an hour. While a failing spark module is a possibility, it is rarely the initial cause; however, chronic exposure to humidity or spills can eventually damage the internal electronics.