
At a glance
Symptoms
- • Musty, swampy odor coming from the washer drum
- • Visible black or dark green spotting on the gray rubber door boot
- • Freshly washed clothes smell like mildew or damp towels
- • Slimy, grayish residue accumulating in the bottom fold of the gasket
- • Small water drips from the front door due to debris breaking the glass seal
- • Allergic reactions or skin irritation from mold spores transferring to clothing
Common causes
- • Prolongs the life of the $150-$250 rubber door boot seal by preventing dry rot
- • Prevents harmful mold spores from transferring to your family's clothing and bedding
- • Stops the buildup of hard water minerals (extremely common in Spokane and the Willamette Valley) that trap organic matter
- • Maintains a watertight seal against the glass door to prevent expensive flooring damage
- • Improves washing machine efficiency by keeping drain ports in the gasket clear of sludge
Safety First — Read Before You Start
- •NEVER mix chlorine bleach with white vinegar, ammonia, or hydrogen peroxide. Doing so creates highly toxic, potentially lethal chloramine or chlorine gas.
- •Always wear heavy-duty rubber gloves and eye protection when scrubbing with bleach to prevent chemical burns and eye damage.
- •Ensure excellent ventilation. Prop open your laundry room door or run the exhaust fan, especially in unventilated Pacific Northwest garage setups where fumes can accumulate quickly.
- •Unplug the washer from the wall outlet before performing deep cleaning to prevent accidental starts or electrical hazards while working with liquids.
Tools & supplies you'll need
- Heavy-duty rubber gloves and safety goggles
- Liquid chlorine bleach OR 3% Hydrogen Peroxide (never mix the two)
- Old toothbrush or soft-bristled nylon scrub brush
- Microfiber cloths, paper towels, or old rags you don't mind ruining
- Empty spray bottle
- Mild dish soap (like Dawn)
Step-by-step instructions
Prep the Area and Protect Yourself
Start by disconnecting your machine from the power source to ensure you are safe while handling cleaning agents. Don your protective goggles and durable rubber gloves. If your laundry area is confined, keep the door open and turn on any available ventilation. For washers located in chilly PNW garages, keep the service door open to ensure fresh air circulates, as fumes can build up in stagnant, trapped air.
Tip: Wear older clothing you don't mind getting stained, as bleach splashes are common when scrubbing rubber.
Perform an Initial Debris Wipe-Down
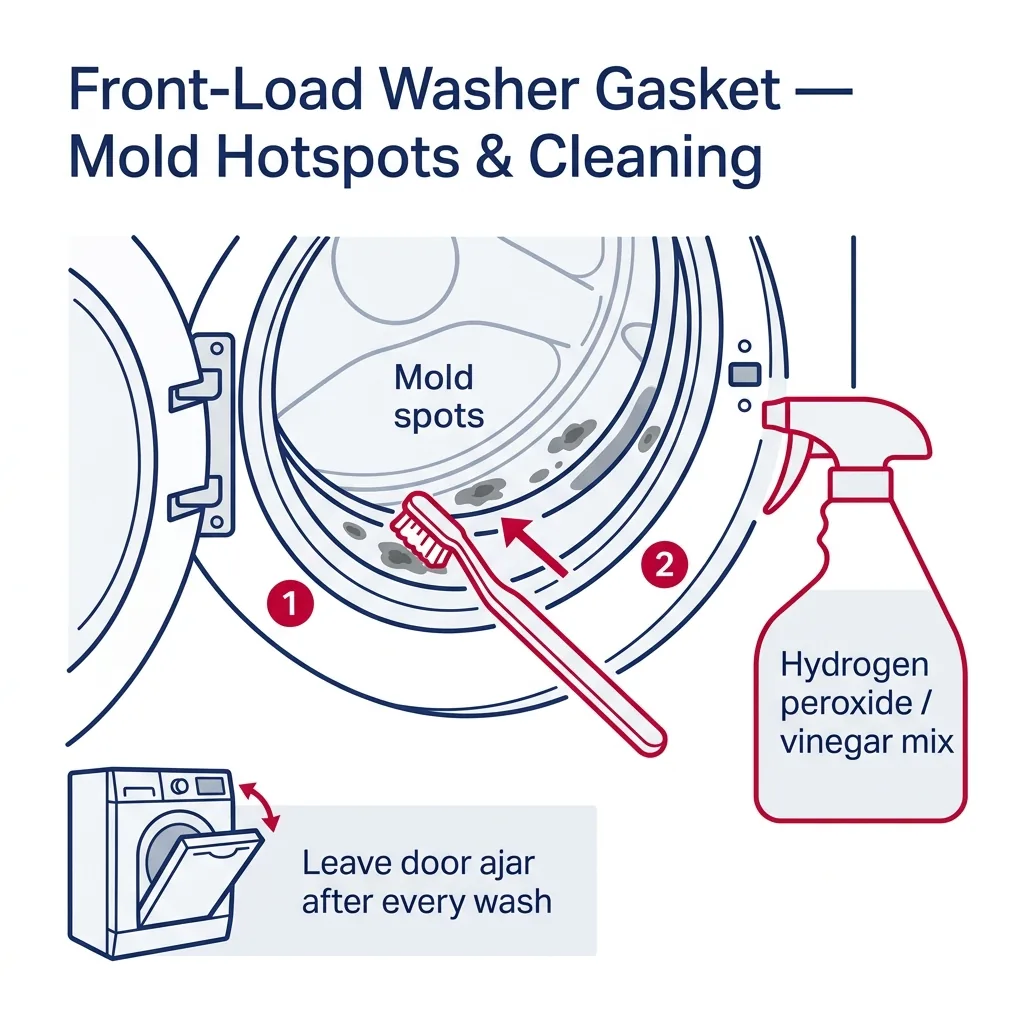
Open the door and carefully peel back the folds of the gray rubber gasket, also referred to as the door boot seal. Use a dry rag or paper towel to clear out the 6 o'clock position at the bottom. You will likely find a collection of lint, hair, loose change, and grime. Clearing this physical waste first stops you from just smearing it around later. Use a light touch to ensure you don't pop the retaining spring loose.
Tip: Be wary of sharp items like bobby pins or screws that might be hidden in the folds; they can cut your skin or puncture the seal.
Apply the Mold-Killing Solution (The Rag Packing Method)
Since mold clings to the sides and top of the circular seal, spraying liquid just makes it run to the bottom. Use the 'rag packing' technique instead. Select either a 50/50 bleach-to-water solution OR undiluted 3% hydrogen peroxide (never both). Soak rags or sturdy paper towels in your mixture and pack them deep into the gasket's folds all the way around. This keeps the chemical in direct contact with the mold colonies.
Tip: Hydrogen peroxide is an excellent, less harsh alternative that attacks the mold's cellular structure directly.
Let the Solution Soak
Allow the saturated rags to sit in the gasket for 30 to 60 minutes. Mold roots often penetrate deep into the porous rubber, and a quick surface wipe won't be enough to prevent a rapid return. This dwell time is essential for the bleach or peroxide to kill the spores entirely. Use this time to tidy up the rest of your machine or wash out the detergent tray.
Tip: Avoid leaving concentrated bleach on the rubber for too long—overnight soaking can cause the rubber to turn brittle and crack.
Scrub the Stubborn Spots
Remove the rags and discard them. Use a soft nylon brush or old toothbrush to scrub away any remaining dark spots. Focus on the weep holes located at the bottom center, as these are critical for drainage. In areas with hard water, like parts of Oregon or Washington, calcium buildup often clogs these ports. If you see crusty mineral deposits, scrub them gently, but avoid using vinegar if you have already used bleach.
Tip: For narrow spots, a Q-tip soaked in your cleaning solution works perfectly to clear tiny drain ports.
Rinse and Run a Tub Clean Cycle
Once finished scrubbing, use a damp cloth with fresh water to wipe down the entire gasket, ensuring all chemical residue is gone. Plug the machine back in. To finish, run a 'Tub Clean' cycle or the hottest setting available (such as Sanitize) with an empty drum. You can drop a commercial cleaner tablet, like Affresh, into the drum to help the process.
Tip: Keep the drum empty during this cycle to ensure the rinse is effective.
Implement a Prevention Routine
Stopping mold requires constant maintenance. Mold thrives in dark, damp, and warm spaces. After your final load of the day, leave the washer door slightly open. Keep a microfiber cloth nearby to quickly dry the bottom fold of the gasket after your last cycle. Additionally, try to minimize liquid fabric softener usage, as it leaves a fatty film that acts as a food source for mold.
Tip: Consistency is key to preventing the return of mildew.
Brand-specific notes
Some brands have known design quirks worth knowing about before you start.
LG
LG front loaders often have a small drain hole at the 6 o'clock position in the gasket. If this gets clogged with lint and hard water scale, water pools and creates a mold factory. Make sure to clear this hole with a toothpick or cotton swab during your deep clean.
Samsung
Many Samsung models feature 'Self Clean+' technology, which spins the drum at high speeds to clean the tub, but this doesn't scrub the physical gasket. You still need to manually wipe the rubber boot fold, especially on the VRT series where the deep folds can easily hide baby socks and sludge.
Whirlpool
On Whirlpool Duet and newer front-load series, the bellows (gasket) has a very deep, wide lip. While their Fan-Fresh options help circulate air, manually wiping the moisture out of the bottom lip after your last load of the day is still absolutely crucial to prevent black mold.
GE
GE's newer UltraFresh models actually feature Microban-treated blue gaskets and an active venting system to dry the drum. However, if you use excess liquid fabric softener, it can still coat the Microban surface with a sticky film, allowing mold to grow on top of the residue.
Bosch
Bosch compact washers, common in urban PNW apartments, have very rigid gaskets. Be gentle when pulling back the folds to clean, as aggressive yanking can tear the stiff rubber or unseat the high-tension retaining spring ring.
What our techs see most often
Here in the Pacific Northwest, our coastal humidity combined with closed washer doors creates the perfect environment for mold growth. Many of our service calls for 'leaking doors' actually turn out to be gaskets so clogged with mildew and debris that the glass can no longer create a proper seal.
When to call a professional
- → The mold has eaten deep into the rubber, causing it to become brittle, cracked, or physically degraded.
- → Water is actively leaking from the bottom of the washer door onto the floor even after a thorough cleaning.
- → The rubber gasket has detached from the front metal panel or the inner plastic drum lip.
- → The mold simply won't come off, and you want to replace the door boot seal entirely (a difficult job requiring front panel removal and stretching a high-tension spring clamp).
- → You smell a burning or electrical odor coming from the machine, completely unrelated to the musty mold smell.
Related Washer Troubleshooting
These troubleshooting guides cover problems this task can help solve.
Decoding Washing Machine Error Codes: A Quick Guide for LG, Samsung, Whirlpool, and GE
Why Your Washing Machine Shakes and Vibrates: Troubleshooting and Solutions
Washing Machine Leaking from Bottom: Locate and Resolve the Issue
Washing Machine Won't Spin: Troubleshooting Tips
Washing Machine Odors: A Guide to Clearing Mold and Mildew
Frequently asked questions
How much does it cost to replace a moldy washer gasket if cleaning fails?
Professional replacement usually runs between $250 and $400. While the rubber part itself is typically $80 to $150, the labor is extensive, often requiring the removal of the top panel, control board, and front panel to correctly seat the internal spring clamps.
Can I use bleach and vinegar together for extra cleaning power?
Absolutely NOT. Mixing chlorine bleach and white vinegar creates toxic chlorine gas, which is dangerous to inhale. Always use one or the other. If you switch agents, rinse the gasket thoroughly with water first.
Why does my washer smell like a swamp even after I run a tub clean cycle?
Tub clean cycles target the drum and outer tub, but they often fail to reach the deep folds of the front gasket. You must manually clean the door boot to remove the source of the odor.
Will fabric softener make the mold problem worse?
Yes. Softeners are often made from animal fats or silicones that leave a sticky residue behind. Mold feeds on this organic film. Consider using white vinegar in the softener dispenser as a residue-free alternative.
Is it safe to leave the washer door open if I have pets or toddlers?
Safety is the priority. If you have curious pets or children, consider using a magnetic washer door prop. These inexpensive tools hold the door open just an inch or two, allowing for airflow while preventing small children or pets from climbing inside.
Need a technician in WA or OR?
If the fix above does not work, A-Fix Service repairs washers across Washington and Oregon. $90 diagnostic visit.
Related Repair Guides
Washing Machine Odors: A Guide to Clearing Mold and Mildew
If your washer has a swampy, musty smell, it is likely due to mold, mildew, or a buildup of detergent-based biofilm. This guide will walk you through the process of deep-cleaning the gasket, clearing the drain pump filter, and performing a sanitizing tub flush to permanently remove odors.
Washing Machine Leaking from Bottom: Locate and Resolve the Issue
Finding water pooled beneath your washer is a headache that threatens your home's flooring. We guide you through the process of isolating the leak source—whether it is a damaged drain pump, a worn tub seal, or a compromised hose—so you can stop the damage before it spreads.
Maintaining Your Washing Machine Drain Pump Filter
Cleaning the drain pump filter on your front-load washer is a simple but vital maintenance chore. Using a few towels and a shallow container, you can remove trapped debris like coins, lint, and hair to restore proper drainage.