
At a glance
Symptoms
- • Washer rocks side-to-side or front-to-back during the high-speed spin
- • Loud banging or thumping sound that gets faster as the spin ramps up
- • Washer physically walks several inches across the floor over a few cycles
- • A persistent metallic "ringing" sound during spin (often shipping-bolt related on new installs)
- • Cabinet vibrates against the wall, dryer, or pedestal hard enough to chip paint or crack tile grout
Common causes
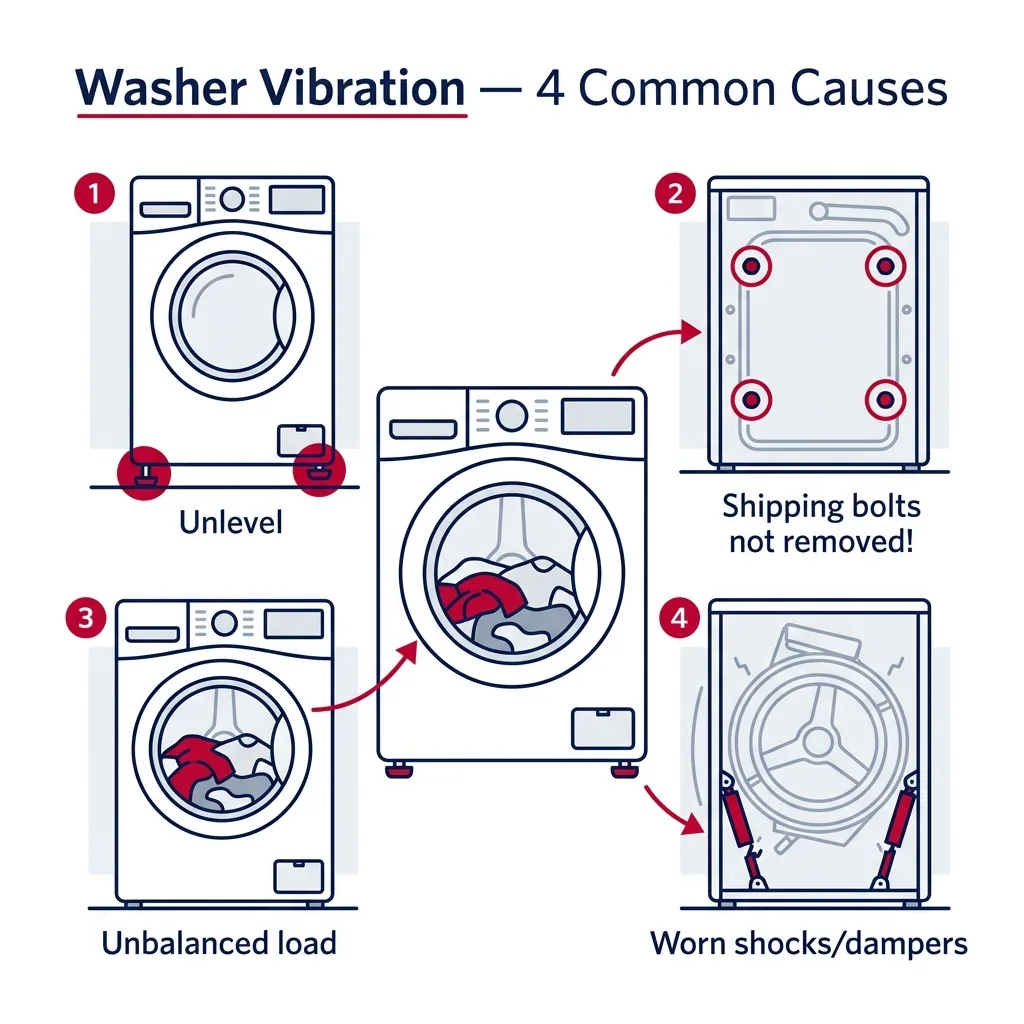
- • Washer is not level — feet are uneven or the floor itself is sloped (very common in older the Pacific Northwest homes built on hillside grades)
- • Shipping bolts were never removed after delivery — the bolts hold the drum rigidly and bypass the suspension
- • Unbalanced load (single heavy item like a comforter on one side of the drum)
- • Worn or leaking shock absorbers / dampers (front-load) failing to dampen drum motion at 1000+ RPM
- • Broken or stretched suspension springs (top-load) letting the inner basket swing freely
- • Worn tub bearing on a front-loader — drum has play and clatters during spin
- • Pedestal not anchored to the washer or to the floor, allowing the whole assembly to walk
Safety First — Read Before You Start
- •ALWAYS unplug the washer before tipping, leveling, or accessing internal suspension components.
- •Front-load washers are heavy (180-250 lb) and top-heavy when tipped. Always work with a partner, especially when adjusting rear feet.
- •Do not run the washer with the cabinet open or the front panel removed to "watch" the drum spin — moving suspension components can pinch fingers.
- •If your laundry room has tile, lay down cardboard before tipping the washer — porcelain feet will chip tile.
- •Turn off both water supply valves before pulling the washer out from the wall to avoid stressing the fill hoses.
Tools & supplies you'll need
- Adjustable wrench or open-end wrench set (typically 13mm, 17mm, or 19mm for shipping bolts and feet)
- Bubble level (or a smartphone level app)
- Flashlight
- Pliers and channel-lock pliers
- Phillips and flat-head screwdrivers
- Work gloves
Step-by-step instructions
Confirm shipping bolts are removed (new installs only)
Every front-loading machine comes from the factory with 3-4 large bolts, often highlighted with yellow or red caps, designed to lock the drum in place during transit. If you just had a new unit delivered and it is shaking violently, these bolts are almost certainly still in place. Check the rear of the machine for these large bolt heads. Use a 17mm or 19mm wrench to extract them, and insert the included plastic covers to seal the openings. Keep these bolts in a safe spot in case you need to move the machine later.
Tip: It is quite common for these to be overlooked during installation. If you paid for professional delivery and they missed these, contact your retailer; they may offer a credit for the installation error.
⚠ Warning: Operating a front-loader for even a single cycle while these bolts are still in place can permanently compromise the suspension and void your coverage. If you suspect they are still there, stop the machine immediately.
Level the washer with a bubble level
Place your level atop the machine to check both front-to-back and side-to-side alignment. The bubble must be centered. If it is off, adjust the four threaded feet. Most front feet can be adjusted manually or with a wrench, while many rear feet are designed to self-level when the machine is tilted forward. Get the front feet set correctly and locked, then tilt the machine forward about 6 inches to allow the rear legs to find their proper position.
Tip: After leveling, try to rock the machine by pushing on opposite corners. If you feel any movement, keep tweaking the feet until the unit is rock-solid.
⚠ Warning: Ensure the locknuts on the front feet are tightened firmly against the cabinet base so they do not vibrate loose over time.
Test load balance and laundry distribution
Examine your laundry load. A heavy blanket, bath mat, or a pair of bulky denim jeans concentrated on one side of a 4.5 cu ft drum will trigger severe vibration. Distribute items evenly. If you are washing a single heavy item, add a few towels to balance the weight. Run a spin-only cycle to see if the noise stops. If it does, the issue was simply how the clothes were arranged.
Tip: If your machine has a 'Bulky Bedding' or 'Comforter' setting, use it for heavy items. These cycles often spin at lower RPMs to better manage weight distribution.
⚠ Warning: Avoid overloading the drum, as this prevents the clothes from shifting during the cycle and leads to persistent imbalances.
Inspect the floor and consider an anti-vibration pad
Many homes in the Pacific Northwest, particularly older wood-frame houses in Seattle or Portland, have floors that are not perfectly rigid. If your floor joists flex, even a perfectly level washer may walk across the room. Check the floor with your level. If the floor is uneven or springy, a 1/2-inch rubber anti-vibration pad or a sheet of 3/4-inch plywood placed under the machine can provide the stability needed to stop it from moving.
Tip: Residents in high-rise buildings should check their HOA rules, as anti-vibration pads are often required to keep noise from bothering neighbors.
⚠ Warning: Do not stack multiple mats, as this can make the washer unstable and increase the risk of it tipping.
Inspect the shock absorbers / dampers (front-load)
Front-load washers rely on 2 to 4 shock absorbers to keep the tub stable. Over time, these can leak oil or lose their tension. Tip the machine forward to inspect the underside. If you see oily residue or if the cylinders move with zero resistance, they need to be replaced. They generally cost $25-50 for a set and can be swapped out by removing the retaining pins with pliers.
Tip: If you are unsure if they are bad, compare the resistance to a new part or look for signs of fluid leakage.
⚠ Warning: Always replace these in pairs or as a full set. Mixing new and old shocks will lead to uneven tension and cause the new ones to fail prematurely.
Check suspension springs (top-load)
Top-loading machines use springs or rods to suspend the inner basket. If you can open the top cabinet panel, check for broken or stretched springs. A basket that sits crooked is a clear sign that a spring has failed. Replacing the set (usually $30-60) is standard practice. On older direct-drive models, check for a single bent rod which is a common point of failure.
Tip: If the tub remains tilted even after a new spring kit, the tub support itself may be compromised, which is a more significant repair.
⚠ Warning: Be careful when opening the cabinet, as internal components can be sharp.
Verify pedestal anchoring (stacked or pedestal-mounted units)
If your washer sits on a storage pedestal, ensure it is bolted down using the manufacturer-provided brackets. If the pedestal feet are not level and locked, the entire unit will wobble. For stacked units, verify that the rear locking bracket between the dryer and washer is tight. A loose connection here will cause the upper unit to sway during the spin cycle.
Tip: Double-check the pedestal feet every few months, as vibration can cause them to unscrew over time.
⚠ Warning: Never skip the bracket installation for stacked units, as this is a safety hazard.
Brand-specific notes
Some brands have known design quirks worth knowing about before you start.
Samsung
Samsung VRT (Vibration Reduction Technology) front-loaders, WF42 and WF45 series, are marketed as low-vibration but still throw "uE" (unbalance) errors when shocks degrade. Samsung uses a unique 4-shock design — replace all four together, not in pairs, to keep the VRT algorithm calibrated.
LG
LG WashTower and stacked WM/DLEX combos are extremely intolerant of unlevel floors because the dryer multiplies any rocking motion at the top. If your WashTower walks or shakes, level the entire pedestal or anti-vibration base first, then verify the rear locking bracket between washer and dryer is fully engaged. LG also publishes a dedicated leveling procedure in the manual that uses a torque sequence on the rear self-leveling feet.
Whirlpool / Kenmore (Cabrio, Duet)
Whirlpool Cabrio top-loaders use a unique "shifter and gearcase" design where heavy-loaded vibration accelerates wear on the gearcase mounts. If your Cabrio has a knocking sound during spin (not just shaking), check the bolts on the gearcase before assuming spring or shock issues. Duet front-loaders use a 4-spring counterweight system — broken concrete counterweights are a known issue and look like cracks in the 30-lb block on top of the tub.
Maytag
Older Maytag MVWC top-loaders use mechanical springs that stretch noticeably after year 7-8. The fix is a $30 spring kit and 30 minutes. Maytag MHW front-loaders share Whirlpool Duet hardware — same shock and counterweight failure modes.
GE
GE GTW top-loaders and GFW front-loaders use a single-piece tub suspension that is cheap but sensitive to off-level installs. If you have a GE that walks, level it twice — once with the level on top of the cabinet, once with the level on the agitator (top-load) or door rim (front-load). Tech sheets specify both checks.
What our techs see most often
In our service area covering Washington and Oregon, we see many 'walking' washers caused by the unique flooring found in older local homes. Roughly 35% of our calls are due to unlevel floors or springy subfloors, while 25% are simple load-balancing errors. About 20% involve worn-out shocks on older units, 15% are shipping bolt oversights, and the remaining 5% are miscellaneous issues like loose pedestal hardware. When you call us, knowing the age of your machine helps us arrive with the right parts, like shock kits for older units or simple leveling tools for new ones.
When to call a professional
- → The washer continues to shake violently after leveling, redistributing loads, and confirming shipping bolts are removed
- → You hear metallic grinding or scraping during spin in addition to vibration — likely a failed tub bearing requiring a full drum teardown
- → You see hydraulic fluid (oily black streaks) leaking from shock absorbers and you are not comfortable tipping a 200+ lb washer to replace them
- → A concrete counterweight on top of the tub is cracked or has fallen off (visible by removing the top panel)
- → The washer is a stacked LG WashTower, Samsung FlexWash, or built-in unit where servicing the suspension requires uninstalling the dryer or surrounding cabinetry
- → The vibration cracks tile, baseboard, or wall finishes — this is a sign of dangerously high force and the unit should not be used until repaired
Washer Maintenance & Replacement Tasks
Step-by-step guides for individual maintenance jobs related to this appliance.
Maintaining Your Washing Machine Drain Pump Filter
Removing Mold from Your Front-Load Washer Gasket
How to Descale a Washing Machine with Vinegar (Hard Water Fix)
How to Stabilize Your Washing Machine and Stop Vibration
Replacing a Washing Machine Drive Belt: A DIY Guide
Frequently asked questions
Why does my washer shake so badly during the spin cycle?
In order of frequency: an unbalanced load, an unlevel washer or floor, forgotten shipping bolts (new installs), or worn shock absorbers / springs. Modern front-loaders spin at 1000-1400 RPM, so even small balance issues become very visible vibration. Start with the easy checks (load distribution, leveling, shipping bolts) before assuming hardware failure.
My washer walks across the floor — is that dangerous?
It can be. A walking washer can rip the fill hoses off the supply valves (causing flooding), tip over against you or a child, or snap the drain hose. Stop using it and diagnose immediately. The top causes are an unlevel floor and worn rear feet — both fixable in under an hour.
What is an anti-vibration pad and do I need one?
An anti-vibration pad is a 1/2-inch thick rubber-and-cork mat that sits between the washer feet and the floor. They cost $30-50 and are recommended for any wood-frame floor over a crawl space, any second-floor laundry room, and any high-rise condo. They reduce vibration transmitted to the structure by 60-80% and significantly cut noise. They will not fix an actually broken suspension.
How long should washer shock absorbers last?
Typical lifespan is 7-12 years on a moderately used family washer. Heavy use (daily loads) can shorten this to 5-6 years. The first sign is increasing vibration during spin, often accompanied by a slight thump as the drum reaches max speed. Replacement is a 30-60 minute DIY job on most front-loaders.
Can a washer damage the floor or my house?
A severely vibrating washer can chip tile grout, crack vinyl flooring at the seams, separate baseboards, and over time loosen drywall screws on adjoining walls. We have also seen vibrating washers rip galvanized fill hoses, leading to floods that cost thousands. If your washer is shaking the room, treat it as urgent — it almost always gets worse, not better.
Need a technician in WA or OR?
If the fix above does not work, A-Fix Service repairs washers across Washington and Oregon. $90 diagnostic visit.
Related Repair Guides
Washing Machine Won't Spin: Troubleshooting Tips
A laundry machine that fills and agitates but fails to reach the spin phase is a common issue for homeowners across the Pacific Northwest, from the humid coast of Bellingham to the dry, cold winters in Bend. Frequently, the issue is as simple as an unbalanced load, a faulty door lock, a snapped belt, or a worn motor coupling—most of which can be resolved in under an hour.
Washing Machine Won't Drain: Troubleshooting Guide
A washer that fills but fails to empty is a common issue we encounter across the Pacific Northwest. About 70% of these service calls are solved by removing a blockage from the pump filter, unkinking a hose, or clearing an object from the impeller. Most homeowners can fix this in under an hour using basic tools.
Maintaining Your Washing Machine Drain Pump Filter
Cleaning the drain pump filter on your front-load washer is a simple but vital maintenance chore. Using a few towels and a shallow container, you can remove trapped debris like coins, lint, and hair to restore proper drainage.