
At a glance
Symptoms
- • Washer 'walks' or shifts across the floor during the high-speed spin cycle.
- • Loud banging, thumping, or machine-gun noises when the washer accelerates.
- • Excessive vibration felt through the floorboards or in adjacent rooms.
- • Uneven gaps between the washer and the dryer or adjacent cabinetry.
- • Constant out-of-balance error codes (like UE or UB) that pause the wash cycle.
- • The machine visibly rocks back and forth when you push firmly on opposite diagonal corners.
Common causes
- • Prevents premature wear on internal shock absorbers and suspension springs, which can cost $150-$300 to replace.
- • Protects the expensive drum bearings and spider arm assembly from catastrophic eccentric rotation damage.
- • Prevents structural floor damage, scratched ceramic tiles, or gouged linoleum caused by the heavy machine walking.
- • Relieves stress on hot and cold water supply hoses and drain lines, drastically reducing the risk of a flooded laundry room.
- • Ensures cycles finish on time without forcing you to constantly pause the machine to manually redistribute wet, heavy clothes.
Safety First — Read Before You Start
- •Always unplug the washer before tipping or moving it to avoid electrical shock or accidentally starting a cycle while your hands are underneath.
- •Never tilt a front-load washer forward; always tilt it backward or side-to-side. Tilting it forward can crush the door latch, crack the glass, or dent the front panel.
- •Have a helper available. Modern front-load washers have heavy concrete counterweights and can weigh well over 200 lbs, posing a serious crushing hazard to fingers and toes.
- •Ensure the washer is completely empty of water and clothes before attempting to move or lift it. A tub full of water adds over 100 lbs of unstable, sloshing weight.
Tools & supplies you'll need
- Standard carpenter's bubble level (24-inch preferred)
- Adjustable wrench or channel-lock pliers
- Pry bar or a sturdy wooden block (to safely prop up the machine)
- Thick rubber anti-vibration pads (optional but recommended)
- Flashlight or headlamp
- Penetrating oil like WD-40 (if leveling legs are rusted or seized)
Step-by-step instructions
Check for and Remove Shipping Bolts (New Installations Only)
If your appliance is brand new or has been moved recently, confirm that all shipping bolts are gone. These 4 or 5 heavy-duty bolts secure the suspension during transit. Running the machine with them in place will cause violent shaking and severe internal damage. Use a wrench to remove the bolts and their plastic sleeves, then insert the provided caps. Keep these bolts stored away in case you move again.
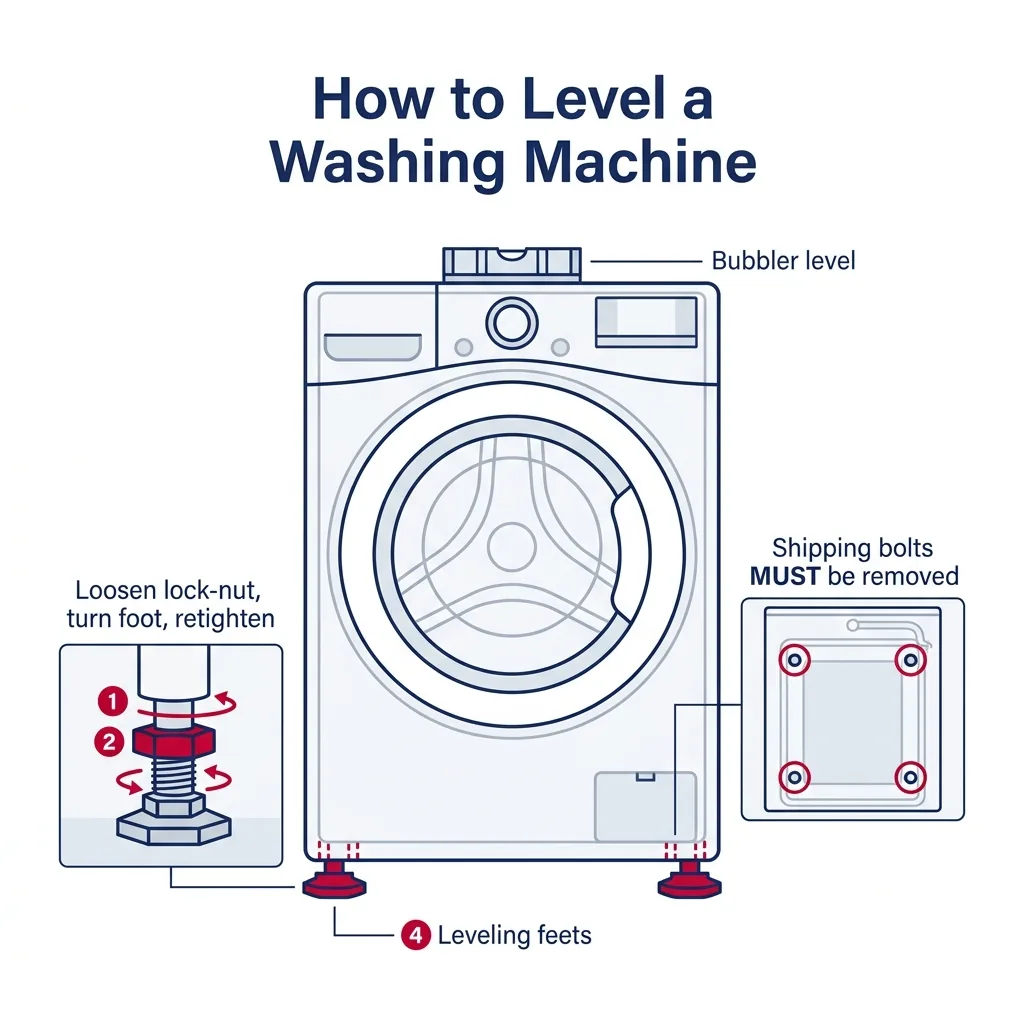
⚠ Warning: Running a washer with shipping bolts installed will void your warranty and can cause catastrophic damage to the drum and outer tub within a single cycle.
Assess the Floor and Foundation
Before you start adjustments, inspect the floor itself. Many older homes across the Pacific Northwest—from Portland bungalows to hillside structures—have subfloors that flex. Lay your bubble level on the floor surface. If the floor is soft or sagging, leveling the machine won't stop the vibration. In such cases, installing a piece of 3/4-inch plywood secured to the floor joists provides the necessary rigid foundation.
⚠ Warning: If your laundry room is on a second floor, adding thick rubber anti-vibration pads under the feet after leveling can dramatically reduce noise transfer through the framing.
Level the Washer Side-to-Side
Place your 24-inch level atop the front edge of the machine. Identify which side sits lower. Have a partner tilt the washer back, or use a pry bar and block to lift it. Loosen the locknut on the leg that needs adjustment. Rotate the leg clockwise to lower the corner, or counter-clockwise to raise it. Set the machine back down and re-check the level. Repeat until the bubble sits dead center.
⚠ Warning: If the threads on the legs are rusted and won't turn, spray them with penetrating oil, wait 15 minutes, and try again. Don't force them with excessive leverage, or you risk snapping the leg off inside the frame.
Level the Washer Front-to-Back
Shift your bubble level to the side edge of the unit, checking from front to back. For front-loaders, adjust the rear legs using the same procedure as the front. If you own a classic top-loader, such as older Maytag or Whirlpool models, it likely uses self-adjusting rear legs. Simply tilt the machine forward 3 to 4 inches to lift the back legs, then return it to the floor; the internal springs will set the legs to the correct height.
⚠ Warning: Never use wood shims or folded cardboard to level a washer. The intense vibration of the spin cycle will quickly compress, splinter, or spit out temporary shims.
Tighten the Locknuts Securely
Skipping this step leads to future leveling issues. Once the washer is perfectly balanced, tighten the locknut on each leg upward until it sits flush and firm against the washer’s base frame. This keeps the leg from rotating out of place during the high-speed spin cycle.
⚠ Warning: Hold the bottom of the foot with pliers while tightening the locknut with a wrench to ensure you don't accidentally change the height of the leg while tightening the nut.
Perform the Diagonal Rock Test
With the unit level and locknuts secured, push firmly on the top right front corner and the top left rear corner. Then switch to the opposite diagonal corners. The machine should remain rock-steady. If you detect any movement, one leg is likely too short. Loosen that leg's locknut, adjust it until it makes firm contact with the floor, and re-tighten the nut.
⚠ Warning: A machine can technically be 'level' according to the bubble, but still rock if the floor is slightly warped. The rock test is the ultimate indicator of stability.
Run a Calibration and Test Cycle
Modern machines often require a calibration mode to measure the drum weight and improve balance detection. Consult your manual for the specific button sequence. After calibrating, run a test spin with a few wet towels. The washer should operate smoothly without walking or banging.
⚠ Warning: Watch the machine carefully. It should hum smoothly without walking, banging, or visibly shaking the outer cabinet.
Brand-specific notes
Some brands have known design quirks worth knowing about before you start.
LG
LG front-loaders are notorious for having hyper-sensitive out-of-balance sensors. If an LG unit is off by even a fraction of an inch, it will throw a 'UE' (Uneven) error code and refuse to spin out the water, leaving your clothes soaked. Perfect leveling is non-negotiable for these models.
Samsung
Samsung washers are frequently installed on matching storage pedestals. It is critical that you level the pedestal to the floor first, and then ensure the washer is tightly secured to the pedestal using the provided metal brackets. If the screws connecting the washer to the pedestal are loose, the whole tower will sway violently.
Whirlpool
Many older Whirlpool and Kenmore top-load models feature self-leveling rear legs. You don't need a wrench for the back—just tilt the entire machine forward about 3-4 inches and gently set it back down. The rear mechanism will auto-adjust to the floor angle.
GE
GE front-loaders utilize heavy internal concrete counterweights. Ensure the rubber anti-skid pads on the bottom of the leveling legs are intact. If they've worn off or fallen out, the bare metal foot will slide effortlessly on slippery tile floors, causing the machine to walk even if it is perfectly level.
Bosch
Compact 24-inch Bosch washers, highly popular in tight coastal condos in Seattle or Seattle, spin at incredibly high speeds (up to 1400 RPM). Because of their small footprint and high RPM, perfect leveling is absolutely critical to prevent them from vibrating right out of their closets.
What our techs see most often
In our experience across the Pacific Northwest, we frequently see 'exploding' washer reports in second-story laundry closets or older homes in Spokane and Tacoma. Usually, the machine isn't broken—it just requires the locknuts tightened and a 3/4-inch plywood base to reinforce a bouncy subfloor.
When to call a professional
- → The washer still bangs violently even after perfect leveling, indicating broken internal shock absorbers or a snapped suspension spring.
- → The inner stainless steel drum moves independently of the outer plastic tub, or you hear a roaring jet-engine sound, which are signs of a broken spider arm or rear bearing failure.
- → The leveling legs are completely rusted or sheared off inside the base frame, requiring the machine to be lifted and the frame repaired.
- → The floor structure is severely damaged, sagging, or rotting from a previous leak, requiring a licensed contractor to rebuild the subfloor.
- → You are dealing with a heavy stacked washer/dryer unit in a very tight closet where you cannot safely reach the rear legs or pull the unit out without risking injury.
Related Washer Troubleshooting
These troubleshooting guides cover problems this task can help solve.
Decoding Washing Machine Error Codes: A Quick Guide for LG, Samsung, Whirlpool, and GE
Why Your Washing Machine Shakes and Vibrates: Troubleshooting and Solutions
Washing Machine Leaking from Bottom: Locate and Resolve the Issue
Washing Machine Won't Spin: Troubleshooting Tips
Washing Machine Odors: A Guide to Clearing Mold and Mildew
Frequently asked questions
How much does it cost to replace broken washer shock absorbers if I ignored the vibration too long?
If the suspension is shot from years of out-of-level operation, replacing the shock absorbers on a front-loader typically costs between $150 and $250 for parts and pro labor. However, if you are handy, DIYing the shocks can drop that cost to just $40-$80 for the OEM parts.
Do anti-vibration pads actually work?
Yes, thick rubber anti-vibration pads (which cost about $15-$30 for a set of four) are excellent for absorbing high-frequency micro-vibrations. They are highly recommended for raised wooden foundations or second-floor laundry rooms common in Washington & Oregon condos.
Why does my washer only vibrate during the final spin cycle?
The final spin cycle reaches extreme speeds of 800 to 1400 RPM to extract water from the clothes. At these high speeds, any slight imbalance in the leveling legs or the load itself is magnified exponentially by centrifugal force.
Can I use wood shims to level my washing machine?
No, you should never use wood shims under a washing machine. Wood shims will eventually splinter, compress, or simply slide out from under the machine due to the intense vibration. Always use the built-in threaded metal leveling legs.
Need a technician in WA or OR?
If the fix above does not work, A-Fix Service repairs washers across Washington and Oregon. $90 diagnostic visit.
Related Repair Guides
Why Your Washing Machine Shakes and Vibrates: Troubleshooting and Solutions
If your washing machine is rattling the laundry room floor or shifting its position during the spin cycle, it is usually a matter of improper setup or balance rather than a major mechanical failure. The primary culprits—sloped floors, leftover shipping bolts, lopsided loads, and tired shock absorbers—are straightforward to address. Most of these issues can be resolved in under an hour by a handy homeowner.
Maintaining Your Washing Machine Drain Pump Filter
Cleaning the drain pump filter on your front-load washer is a simple but vital maintenance chore. Using a few towels and a shallow container, you can remove trapped debris like coins, lint, and hair to restore proper drainage.
Removing Mold from Your Front-Load Washer Gasket
Tackle that damp, musty odor and unsightly black sludge in your washer. This guide shows you how to safely scrub your rubber door gasket and keep your laundry smelling fresh.