
At a glance
Symptoms
- • The washer motor hums or runs, but the drum does not agitate or spin.
- • A distinct burning rubber smell during the spin cycle.
- • Loud, high-pitched squealing or chirping noises when the drum tries to move.
- • The drum spins completely freely by hand with zero resistance.
- • The washer stops mid-cycle and displays a motor or spin error code.
- • Finding black rubber dust or a snapped belt under the machine.
Common causes
- • Normal wear and tear causes rubber belts to dry rot, stretch, and snap over thousands of cycles.
- • Chronic overloading of the washer (especially with heavy items like wet the Pacific Northwest beach towels or denim) puts immense strain on the belt.
- • A seized drain pump or motor pulley creates extreme friction, burning right through the belt.
- • Replacing a worn belt prevents motor burnout and saves you between $150 and $300 in professional repair bills.
- • Ignoring a squealing belt can eventually lead to damage to the plastic drum pulley, turning a $20 fix into a $100+ repair.
Safety First — Read Before You Start
- •Always unplug the washing machine from the wall outlet before starting any disassembly to prevent electrical shock.
- •Shut off the hot and cold water supply valves and disconnect the hoses. Have a bucket ready, as residual water will spill out.
- •Washing machines are incredibly heavy. If you need to tip the machine back or move it out of a tight laundry closet, use an appliance dolly or get a helper.
- •Beware of sharp sheet metal edges inside the washer cabinet. Wearing sturdy work gloves is highly recommended.
- •If you find oil leaking onto the belt or motor, do not just replace the belt. This indicates a failing transmission or tub seal, which requires professional attention.
Tools & supplies you'll need
- 1/4-inch and 5/16-inch nut drivers
- Socket wrench set (typically 1/2-inch or 9/16-inch)
- Phillips and flathead screwdrivers
- Heavy-duty zip ties (crucial for installation)
- Work gloves and safety glasses
- Flashlight or headlamp
- Putty knife (for top-load cabinet clips)
Step-by-step instructions
Disconnect Power and Water
Prioritize safety by unplugging the unit from the power source. Shut off the hot and cold water valves located behind the appliance. Unhook the fill hoses, keeping a bucket nearby to catch the water that will inevitably leak out. If your washer is tucked into a cramped Seattle-area laundry nook, pull it out carefully to gain at least two feet of room. Secure the door or lid with tape to prevent it from swinging while you maneuver.
Tip: Label your hot and cold hoses with masking tape before removal so you don't mix them up when reconnecting.
Access the Drive Belt (Front-Load vs. Top-Load)
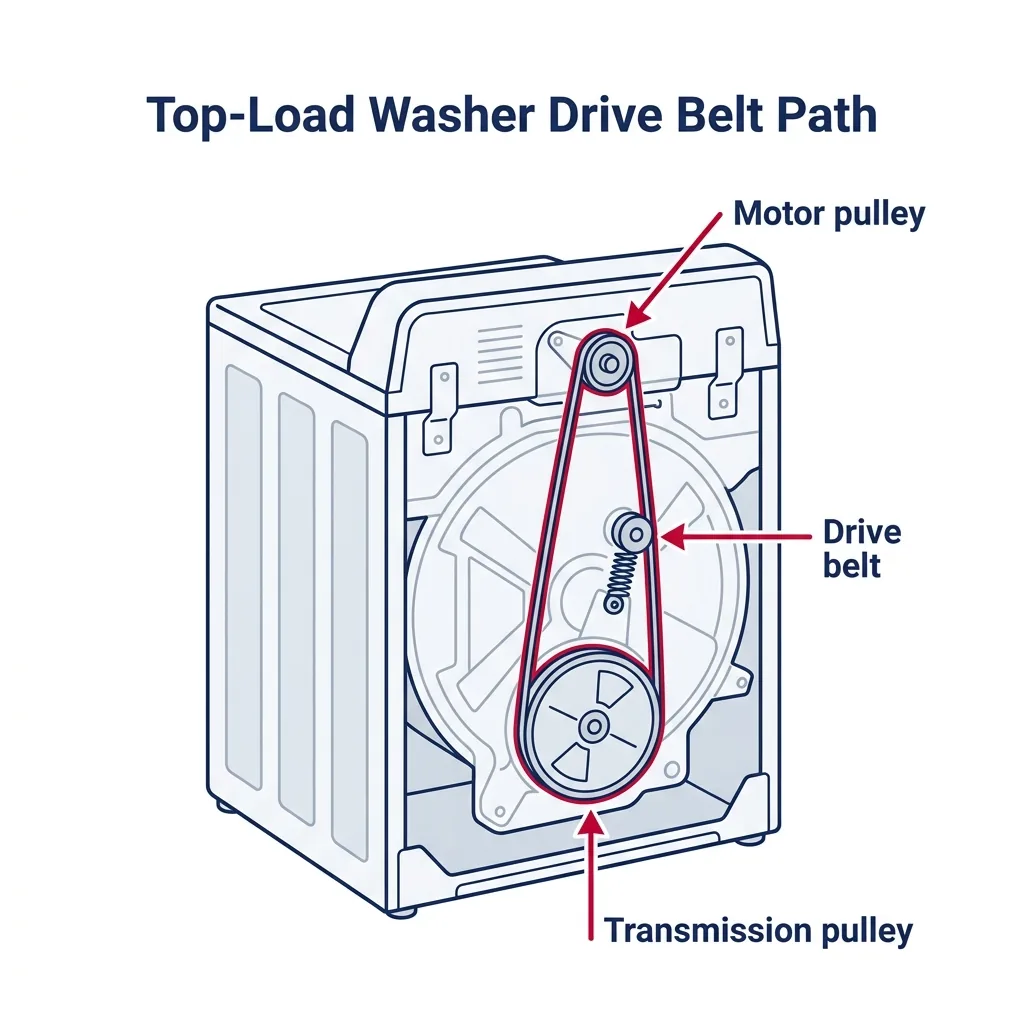
Your access point depends on your machine's configuration. For most front-load units, the belt is reached by removing the rear panel using 1/4-inch hex screws. For modern top-loaders like Whirlpool VMW units, the belt is underneath; you will need to gently lean the machine back against a wall or have an assistant support it at a 45-degree angle. Older top-loaders might require removing the outer cabinet by releasing the spring clips beneath the console. Once inside, identify the belt linking the motor pulley to the drum pulley.
Tip: Never place the washer on its front panel, as this can damage the control interface.
Remove the Old Belt and Inspect the Area
If the belt has broken, remove the remnants. If it is merely stretched or frayed, pull it toward you while turning the large drum pulley; the belt should slide off the edge. Use your light to check for debris. A buildup of black rubber dust suggests a misalignment or a seized part. Manually rotate both pulleys to ensure they move freely without grinding or resistance.
Tip: Wipe away any rubber residue from the pulleys with a damp cloth to ensure the new belt grips properly.
Thread the New Belt onto the Motor Pulley
Examine your new OEM belt; one side is ribbed while the other is smooth. Ensure the ribbed side faces inward to seat properly in the motor pulley grooves. Carefully loop the belt over the motor pulley first. If it is not centered, it will quickly shred or slip off once the high-speed spin cycle begins.
Tip: Avoid generic automotive fan belts. Washer belts are designed to handle specific torque, preventing motor damage if the tub binds.
Stretch the Belt onto the Drum Pulley (The Zip Tie Trick)
Since modern stretch-fit belts lack tensioner arms, they are intentionally tight. Hook the belt over the edge of the large drum pulley and secure it using a heavy-duty zip tie through the pulley spokes. Once held in place, rotate the large pulley clockwise. The belt will be pulled and stretched into the groove. Once fully seated, remove the zip tie.
Tip: If the belt is too rigid, soak it in warm water for 10 minutes to increase flexibility.
Test the Fit and Alignment
With the zip tie removed, turn the large pulley by hand for five or six full rotations. Monitor the belt to ensure it stays centered on the drum pulley and seated in the motor pulley grooves. If it drifts, adjust it manually while rotating until it centers itself. A correct installation should feel tight, with no more than a half-inch of play under firm thumb pressure.
Tip: Be cautious of pinch points between the belt and pulleys while rotating to avoid injury.
Reassemble and Run a Test Cycle
Replace the belt shield or rear panel as needed. Carefully return the washer to its original spot, reconnect the water hoses, and turn the water valves back on. Check for leaks. Plug the unit in and run a 'Rinse and Spin' cycle while empty. Listen for quiet operation and ensure there are no squeals, thumping, or burning odors.
Tip: Testing with an empty load ensures you won't have to deal with heavy wet laundry if there is still an issue.
Brand-specific notes
Some brands have known design quirks worth knowing about before you start.
Samsung
Samsung VRT front-load models use an exceptionally tight ribbed stretch belt. You will almost certainly need to use the 'zip tie trick' mentioned in the steps to force the new belt onto the large drum pulley. Don't be afraid to use some muscle.
LG
Important: LG 'Direct Drive' (Inverter Direct Drive) models do NOT have a drive belt! The motor is attached directly to the back of the wash tub. If your LG says Direct Drive on the front panel and isn't spinning, you likely have a stator, rotor, or clutch issue—not a belt problem.
Whirlpool
Older Whirlpool and Kenmore direct-drive top loaders (pre-2010) use a rubber and plastic motor coupling instead of a belt. Newer Whirlpool VMW (Vertical Modular Washers) use a splined stretch belt located under the machine, protected by a plastic shield that requires a 5/16-inch nut driver to remove.
GE
Many GE top-loaders utilize an 'elastic' style stretch belt with no adjustable tensioner bracket. You have to walk it onto the pulley manually. If you hear a loud squealing during agitation on a GE, the belt is usually the culprit.
Speed Queen
Speed Queen washers are built like tanks, but when a belt does go, you'll usually access it by removing the front panel rather than the back. They use heavy-duty v-belts that cost a bit more ($30-$40) than standard ribbed belts but last significantly longer.
What our techs see most often
We frequently hear from families in the Willamette Valley whose washers smell like burnt rubber. Usually, it's due to overloading with heavy items like wet beach towels, which causes the belt to overheat and snap.
When to call a professional
- → If the motor pulley or the large drum pulley is completely seized and will not turn by hand.
- → If you find oil or rusty water leaking onto the belt, which indicates a failing tub seal or transmission.
- → If the large drum pulley is cracked, warped, or the center mounting bolt is stripped out.
- → If your washer is stacked in a tight laundry closet and you cannot safely unstack the heavy dryer on top.
- → If the motor itself smells burnt out or is making a loud electrical buzzing noise without turning.
- → If the appliance is still covered by a manufacturer warranty or an extended home warranty plan.
Related Washer Troubleshooting
These troubleshooting guides cover problems this task can help solve.
Decoding Washing Machine Error Codes: A Quick Guide for LG, Samsung, Whirlpool, and GE
Why Your Washing Machine Shakes and Vibrates: Troubleshooting and Solutions
Washing Machine Leaking from Bottom: Locate and Resolve the Issue
Washing Machine Won't Spin: Troubleshooting Tips
Washing Machine Odors: A Guide to Clearing Mold and Mildew
Frequently asked questions
How much does a replacement washer drive belt cost?
A new OEM (Original Equipment Manufacturer) drive belt typically costs between $15 and $35 depending on the brand. We strongly recommend buying OEM belts rather than cheap $8 generic versions online, as generics often stretch out or snap within a few months.
Why did my brand new washer belt break immediately?
If a new belt shreds or snaps right away, it usually means there is an underlying mechanical issue. The most common culprits are a seized tub bearing, a jammed drain pump, or the belt not being seated properly in the motor pulley grooves.
Can I use an automotive fan belt from an auto parts store?
No. While they look similar, washer belts and automotive belts are engineered differently. Washer belts are designed to stretch and slip at specific torque loads to protect the washer's motor from burning out if the tub gets jammed.
How long should a washing machine drive belt last?
Under normal conditions, a quality OEM drive belt should last 5 to 10 years. However, chronic overloading, washing heavy items like rugs frequently, or running multiple loads every single day can shorten a belt's lifespan to 3 to 5 years.
Need a technician in WA or OR?
If the fix above does not work, A-Fix Service repairs washers across Washington and Oregon. $90 diagnostic visit.
Related Repair Guides
Washing Machine Won't Spin: Troubleshooting Tips
A laundry machine that fills and agitates but fails to reach the spin phase is a common issue for homeowners across the Pacific Northwest, from the humid coast of Bellingham to the dry, cold winters in Bend. Frequently, the issue is as simple as an unbalanced load, a faulty door lock, a snapped belt, or a worn motor coupling—most of which can be resolved in under an hour.
Maintaining Your Washing Machine Drain Pump Filter
Cleaning the drain pump filter on your front-load washer is a simple but vital maintenance chore. Using a few towels and a shallow container, you can remove trapped debris like coins, lint, and hair to restore proper drainage.
Removing Mold from Your Front-Load Washer Gasket
Tackle that damp, musty odor and unsightly black sludge in your washer. This guide shows you how to safely scrub your rubber door gasket and keep your laundry smelling fresh.